
Golden Colosseum
Golden Colosseum is a weekly seasonal PvP content.
TL;DR
- A Golden Colosseum season lasts one week, concluding with a brief Settlement period.
- Golden Colosseum does not use Gear. Only Costumes upgrade levels (+5), Potential Liberation, Awakening, and Bursts matter.
- Completing missions and ranking up rewards
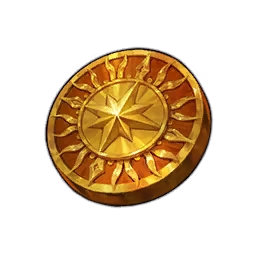 Aurum Coins, which can be spent in the Golden Colosseum Shop.
Golden Colosseum Main Menu
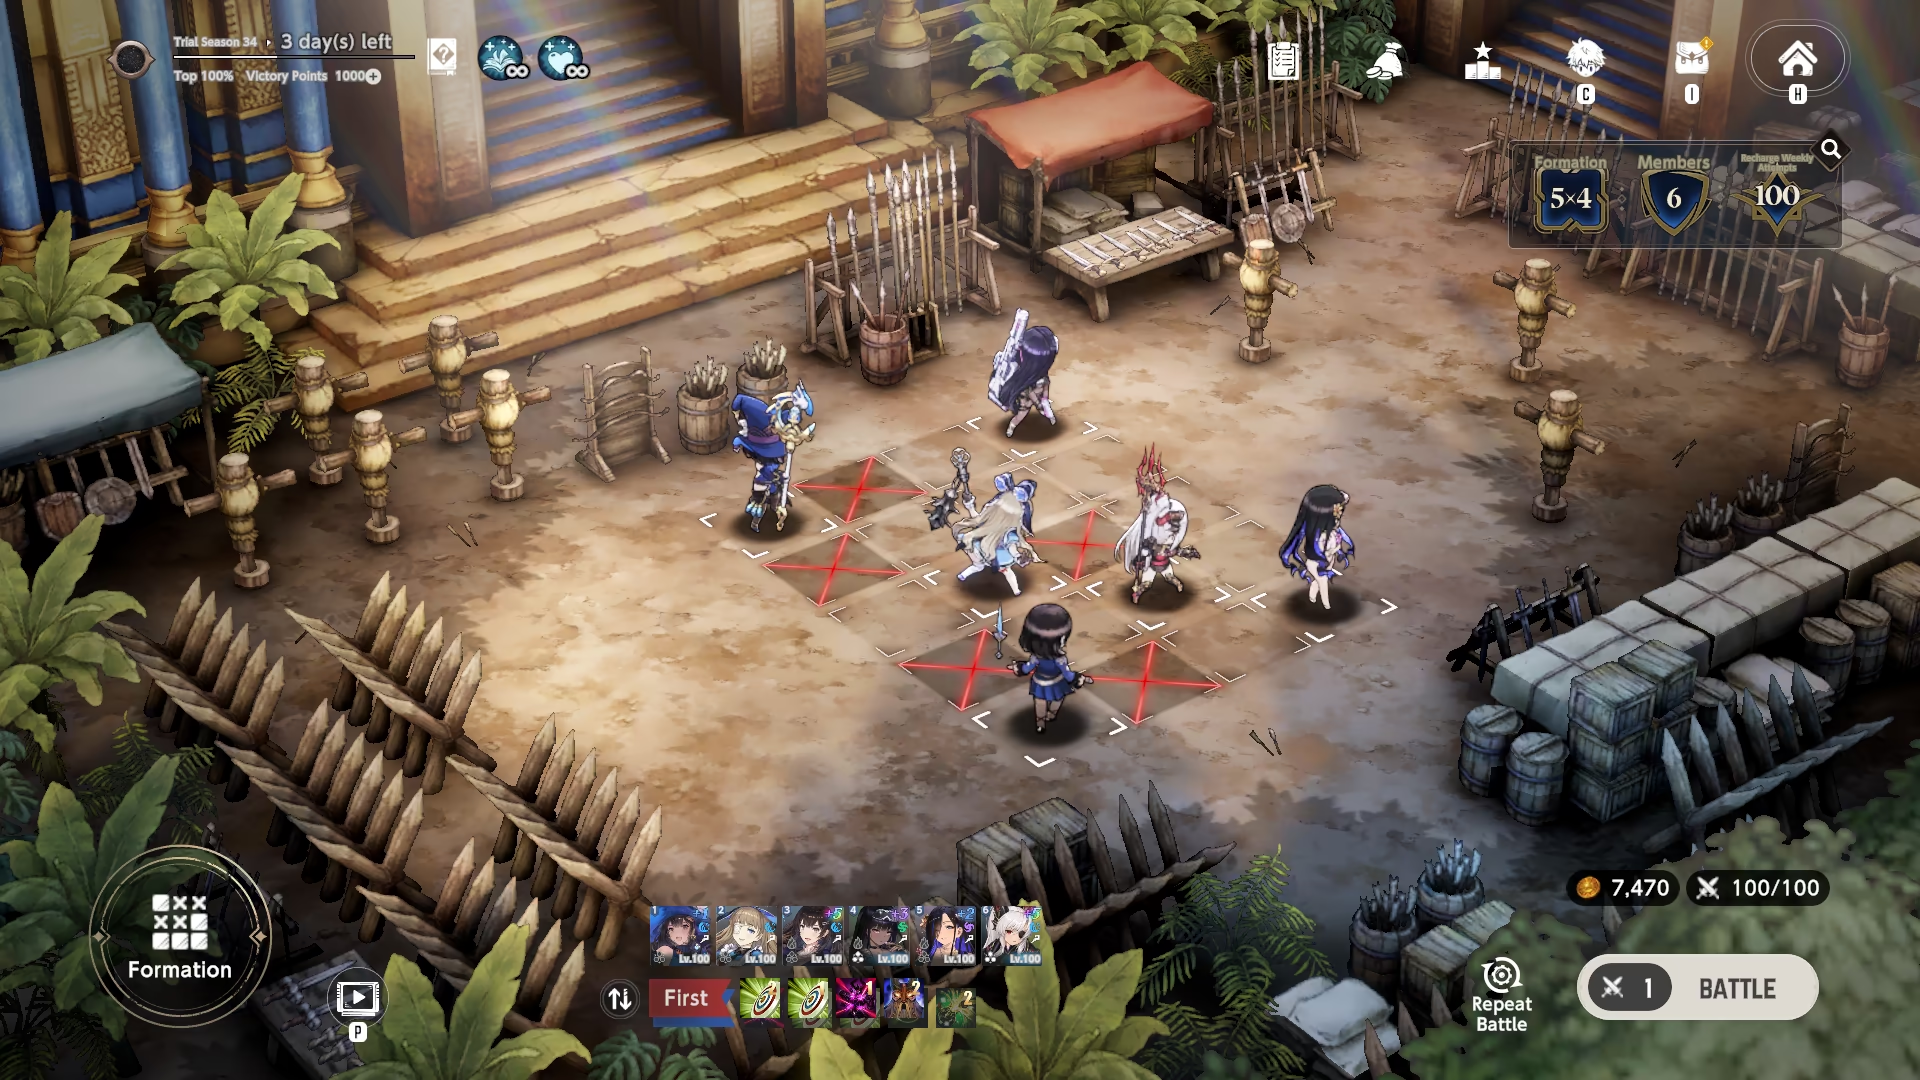
Basics
The Golden Colosseum is unlocked upon clearing all Pagan Tower (Story Pack 6) Main Quests.
To fight, you set up a team and Blessings tailored to the active season's Rules. While core combat mechanics remain stable across most seasons, specific parameters (like grid size, unit limits, and bans) rotate regularly.
Similarly to Mirror Wars, the battles are automatic and do not require an active input from a player.
Winning against the opponent grants Points, and losing decreases Points, correspondingly. Unlike the Mirror Wars, though, losing in Defense does not affect your points; only your offense matters.
Repeat Battle
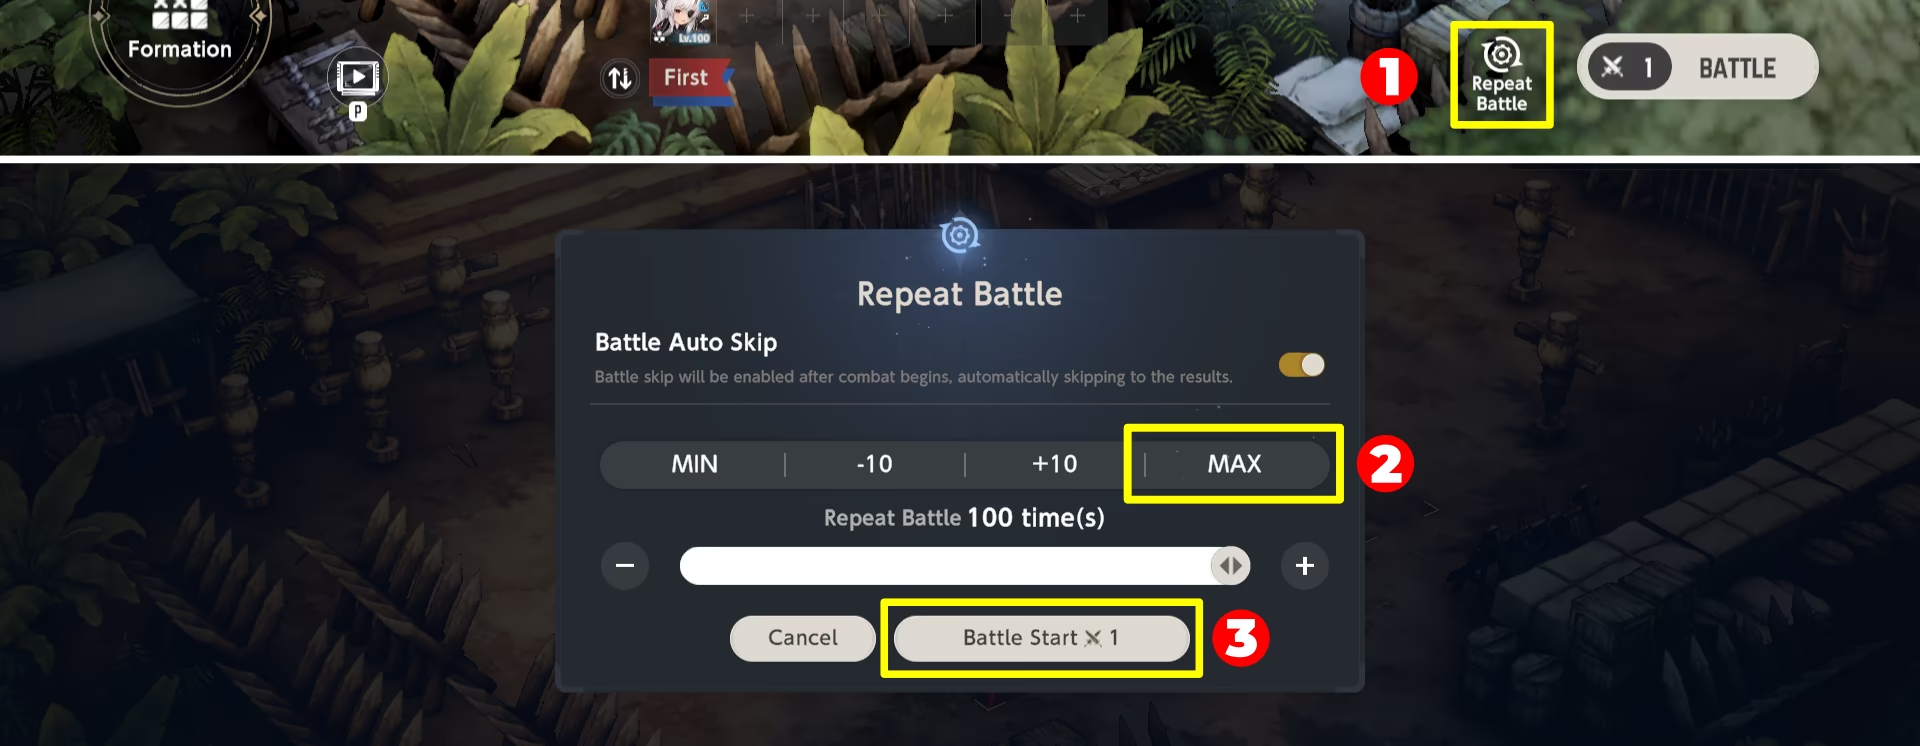
To save your time, you can use Repeat Battle feature. It will automatically start the battles and skip them after first Costume's Action until the set number of attempts is exhausted.
To activate it, press Repeat Battle at the bottom right corner of the Golden Colosseum Menu.
Image Guide
Team
The team consists of Costumes, not Characters. You set up one team for both offense and defense, as well as for going first or second.
Each Costume is separate, which means you can put multiple Costumes of the same Character. Additionally, each Costume is affected by its own Costume bond, Awakening, Character Level, and Costume Upgrade level. The only thing Costumes are not affected by is Gear.
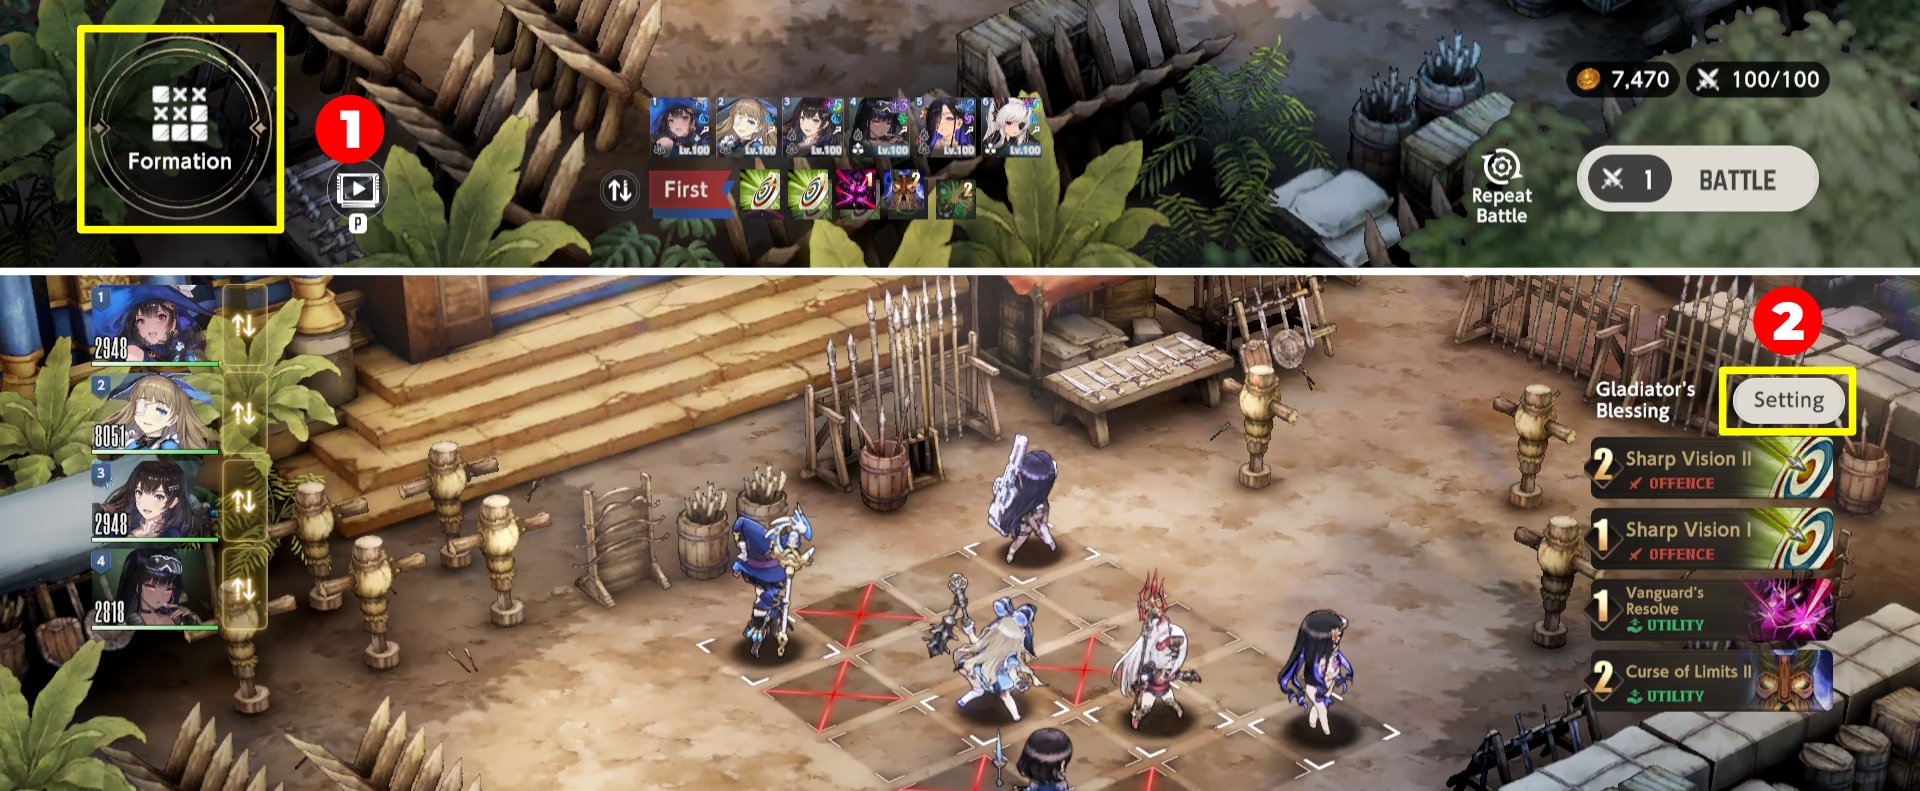
To set the team, press the Formation button, then Replace, pick the needed Costume, and, finally, place it on the field and save the changes.
Image Guide
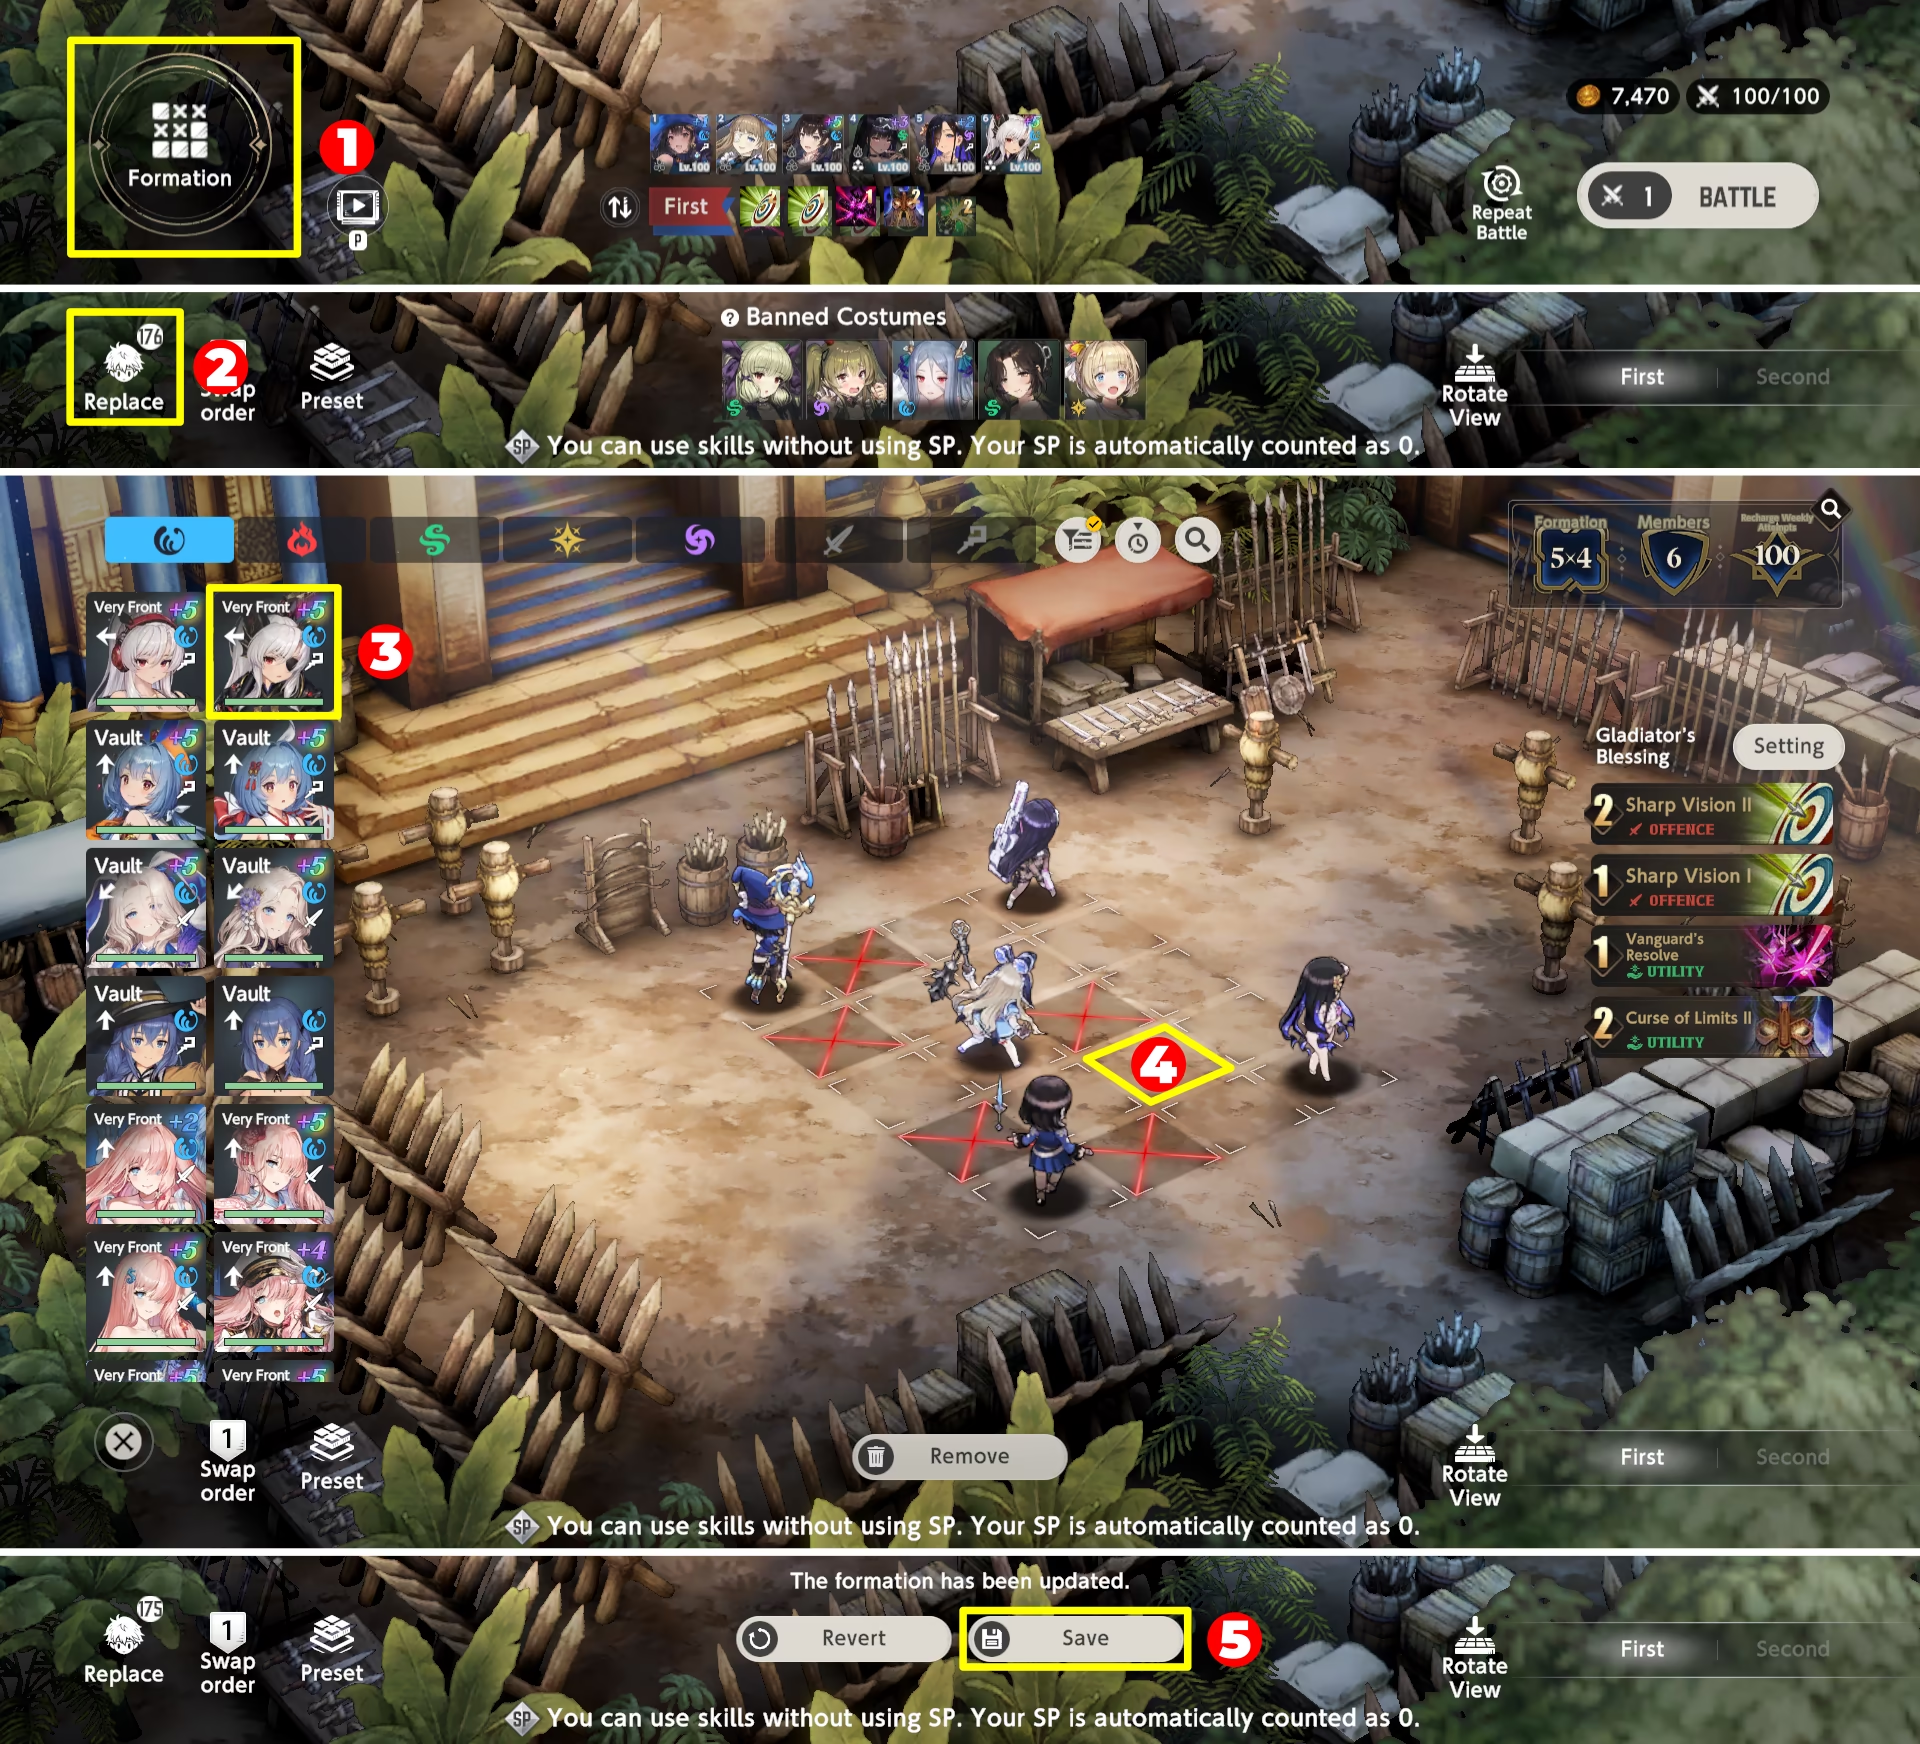
Additionally, in the Formation tab, you can freely change the order of your Costumes, similar to the regular battles.
Blessings
Blessings are effects that impact you or your enemy. They are separated into three categories: Offense, Defense, and Utility.
To access the Blessings menu, press the Formation button followed by Settings on the right.
Image Guide
Blessings Menu
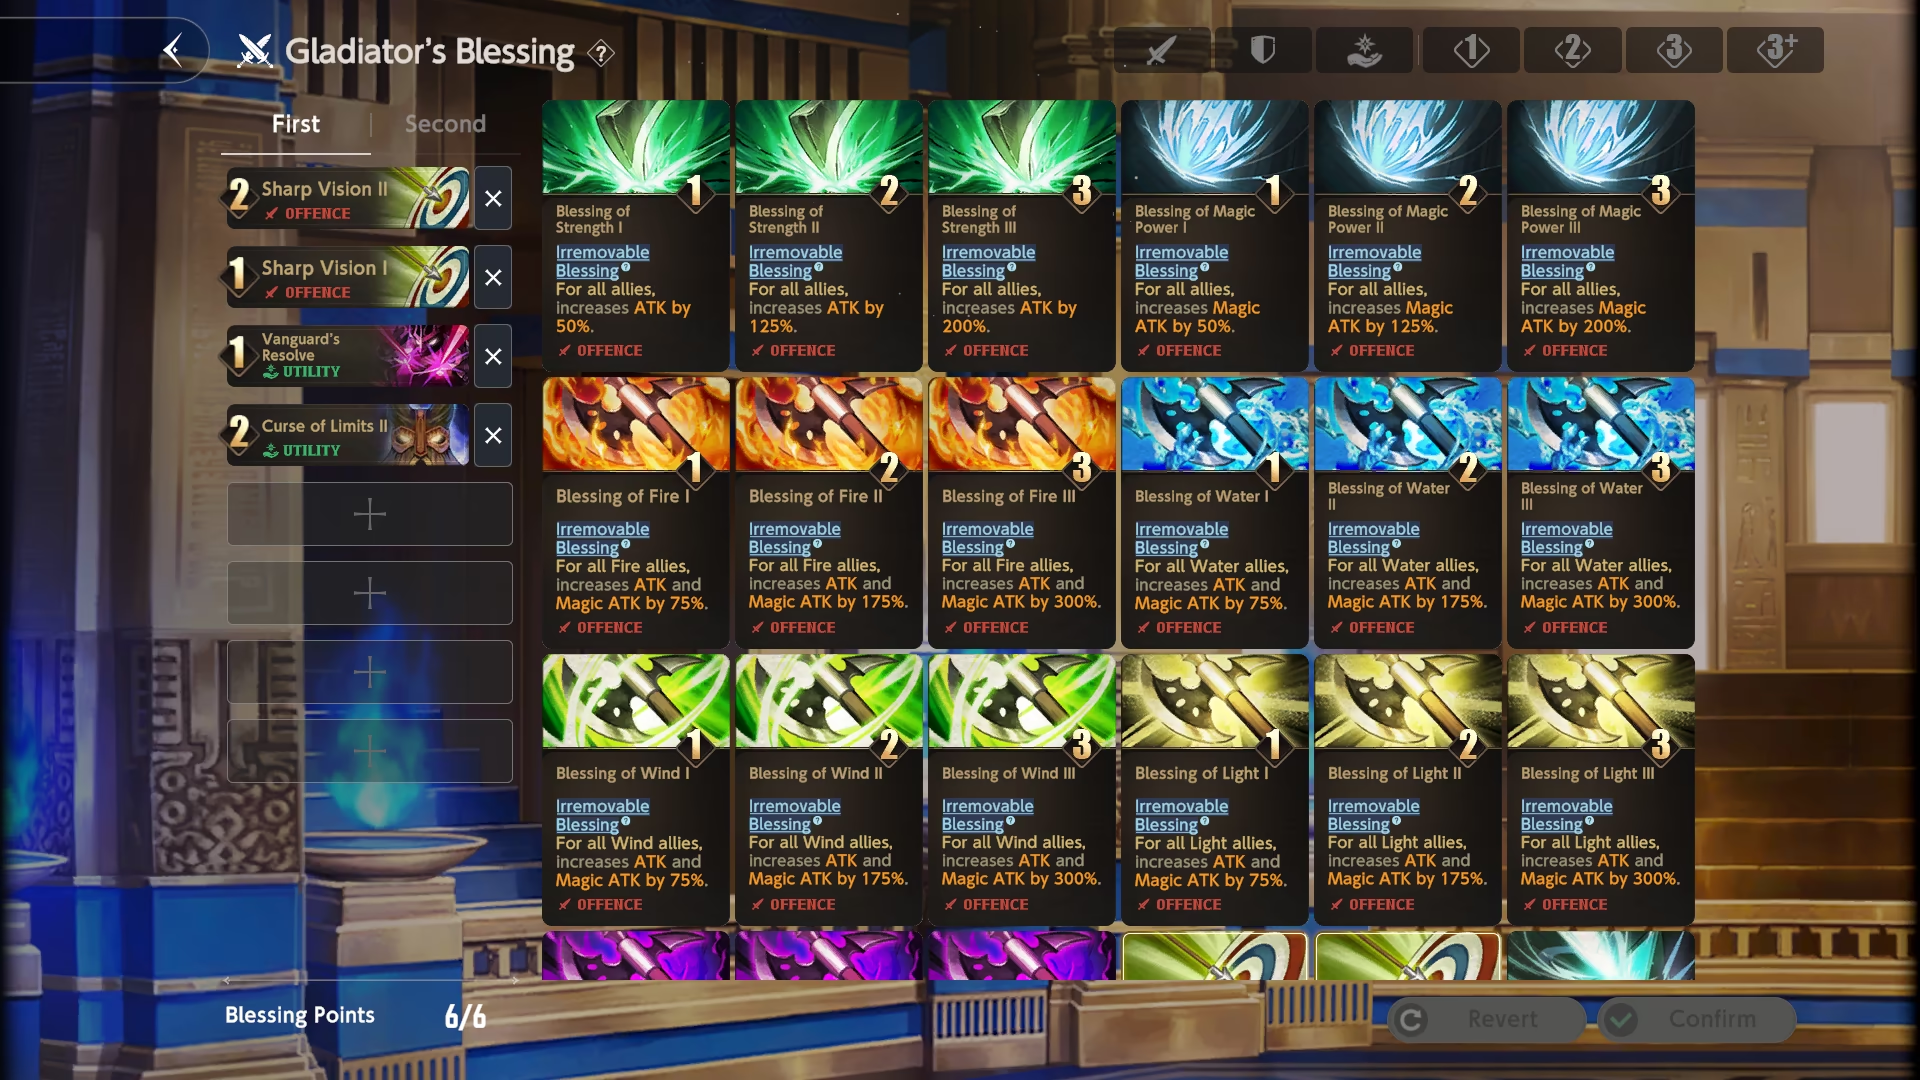
Each Blessing costs a specific amount of Blessing Points, based on how impactful the Blessing is. You can equip a limited number of Blessings, dictated by the total Blessing Points available. You also have to make two separate Blessing builds for going First or Second, with going second granting extra points to compensate for turn order.
To check each Blessing, refer to the Blessing Menu mentioned above. Alternatively, check Souseha's Database.
What Blessings to choose?
It comes down to the used team and the strategy. Check the Guide section below.
If you want to use Blessings of the other person but have only a list for going first or second, you can usually adjust it by picking higher/lower potency Blessings for more/less points.
For example, if the person has Curse of Limits I in their "going first" lineup, you can try picking both Curse of Limits I and Curse of Limits II for when you go second.
Blessing Order
Blessing order matters. They activate in order from the top to the bottom. That means, using Grace before Barrier of Life will provide more Energy Guard compared to using Barrier of Life before Grace.
Rules
Every 2 Seasons, a new set of Rules is released. They dictate how the season goes. There are a total of 17 Rules, with 7 Rules changing (Rotating), while the rest are untouched/consistent (as of now).
To check the Rules of current and previous Seasons, press the corresponding menu.
Image Guide

Rules Menu
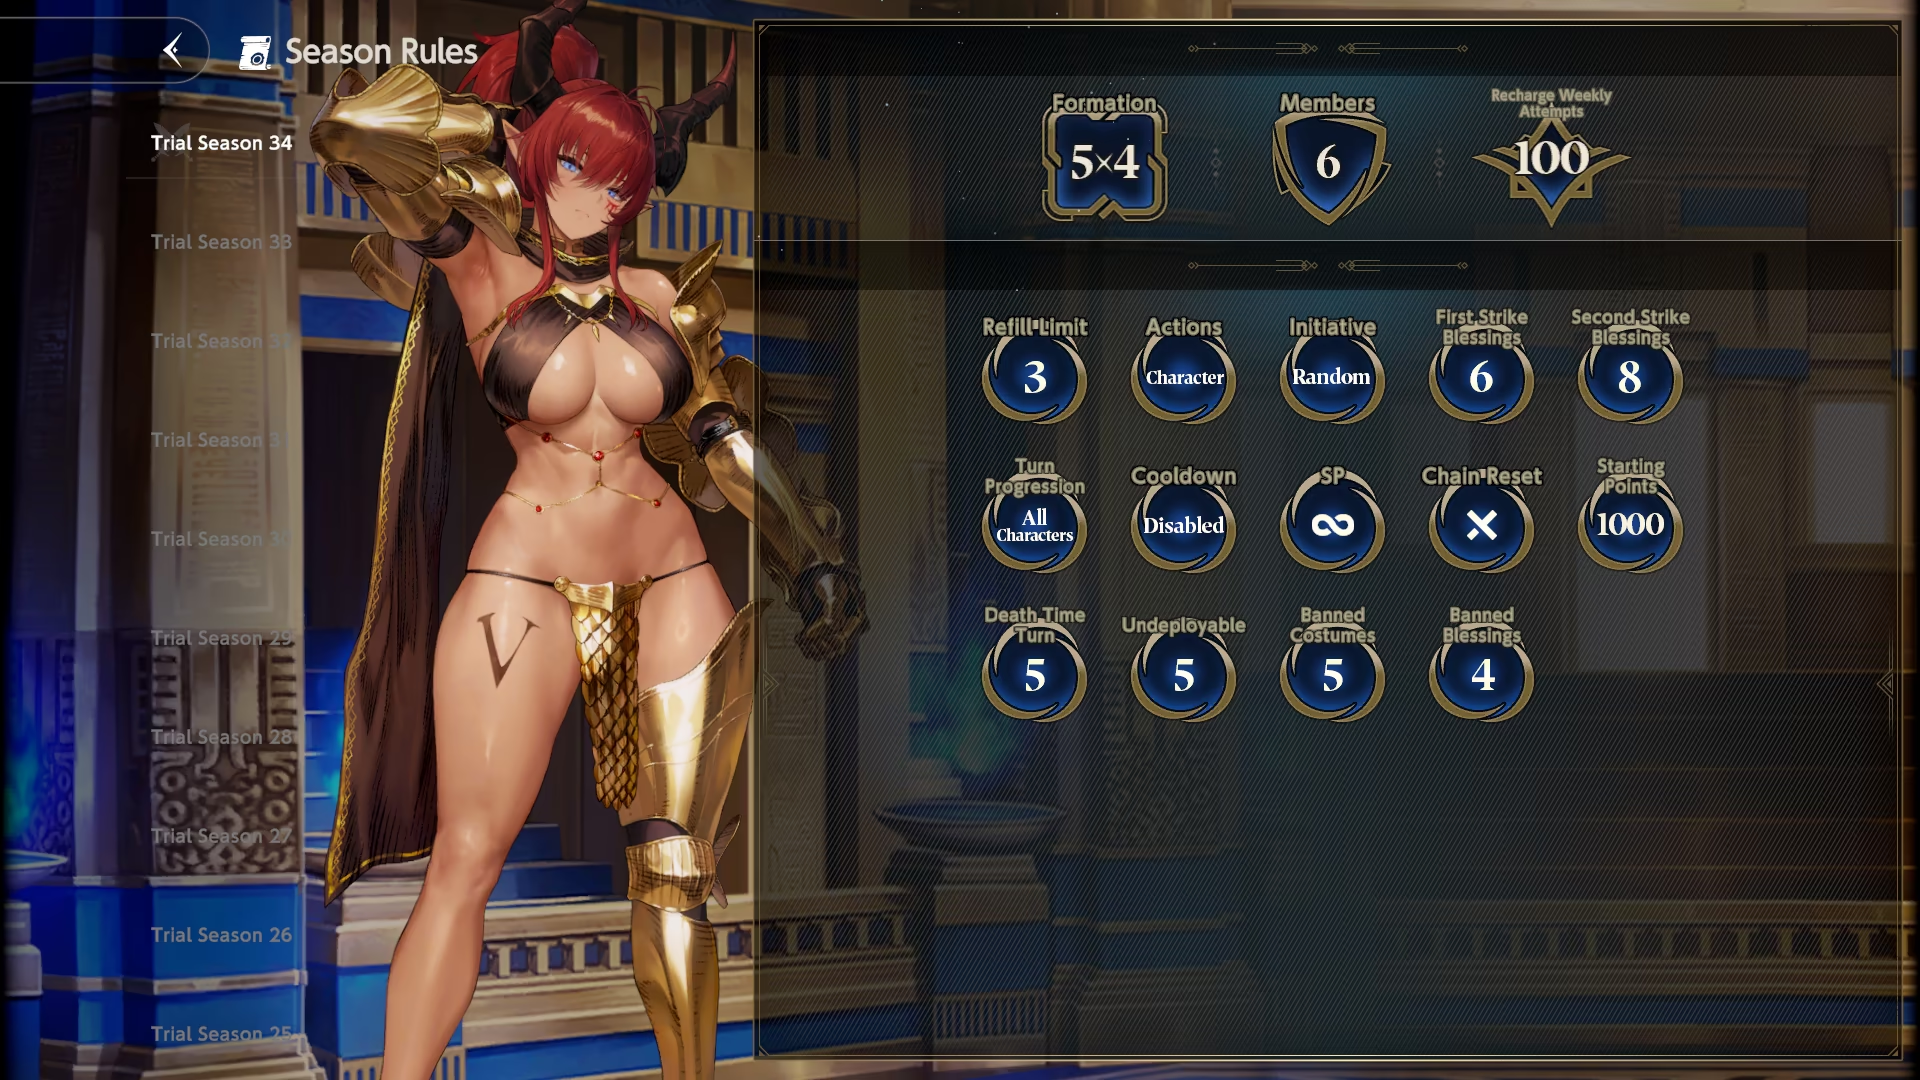
Rules List
| Rule | Description |
|---|---|
| Formation | 3×3 — 5×5 (Rotates) The Grid Size. Impacts positioning, units, basically everything. |
| Members | 3 — 11 (Rotates) The maximum number of Costumes you can bring in the battle. |
| Recharge Weekly Attempts | 100 (Consistent) The total number of battles you can enter per season. |
| Refill Limit | 3 (Consistent) The total number of possible refills of Battle Attempts. |
| Actions | Character (Consistent) Determines how characters behave in battle. Character option means you and the enemy take turns each action. Team option means going all out before the opponent. |
| Initiative | Random (Consistent) Determines who goes first in the battle. |
| First Strike Blessings | 5 — 13 (Rotates) Determines how many Blessing Points you have when you go first. |
| Second Strike Blessings | 7 — 15 (Rotates) Determines how many Blessing Points you have when you go second. |
| Turn Progression | All Characters (Consistent) Determins when the turn ends. Character represents end of the turn after each action. All represents end of the turn after every action on the field. |
| Cooldown | Disabled (Consistent) Determins if Costumes have a cooldown. |
| SP | ∞ (Consistent) Determines how many SP you have. ∞ means skill costs are bypassed. Available SP in this case is 0. |
| Chain Reset | X (Consistent) Determines if Chain count resets at the end of the turn. |
| Starting Points | 1000 (Consistent) Determines how many Rating Points you get at the beginning of the Season. |
| Death Time Turn | 5 (Consistent) Determines on which turn Death Time is enabled. |
| Undeployable | 0 — 10 (Rotates) Determines how many tiles are not accessible for placing your Costumes. |
| Banned Costumes | 4 — 5 (Rotates) Determines how many and which Costumes are not available for the current Season. |
| Banned Blessings | 4 (Rotates) Determines how many and which Blessings are not available for the current Season. |
"Consistent" Rules
While parameters labeled as (Consistent) can technically be altered by developers in future seasons, they have remained stable defaults throughout 34 seasons:
- Weekly Entry: You are given 100 base attempts per week. You can purchase up to 3 refills (100 attempts each) for 10
 Dia per refill, capping out at 400 attempts for 30 Dia total per season.
 - Initiative: You cannot choose whether you go first or second; initiative is decided randomly at the start of battle.
- Action Flow: Units alternate turns individually based on placement order.
(Player Costume 1 → Enemy Costume 1 → Player Costume 2 → Enemy Costume 2...) (if you go first).- If the Enemy Costume 1 dies from Player Costume 1, Enemy Costume 2 takes its place, until all deployed enemy Costumes have acted.
- If the enemy used all their Costumes in a given Turn, but you still have multiple unused Costumes, they will do their actions without the enemy using skills once again.
- Cooldowns: Costumes have no Cooldowns between Turns.
- SP Costs: SP is set to ∞ (ignored/bypassed), meaning skills do not cost SP to cast. However, available SP for scaling mechanics (e.g., Olivier) is treated as baseline 0.
- Starting Points: You start with 1000 Ranking points.
- Death Time Turn: At Turn 5, combat enters Death Time. Unlike standard game modes where skills remain active during Death Time, skills in Golden Colosseum are disabled completely, forcing units to use basic attacks alongside the ramping Death Time stat buffs/debuffs.
Missions
Missions are tasks that you can complete once per season. Completing missions grants you Aurum Coins, which are spent in the Shop.
To get them, press the corresponding icon in the Golden Colosseum menu.
Image Guide

Missions
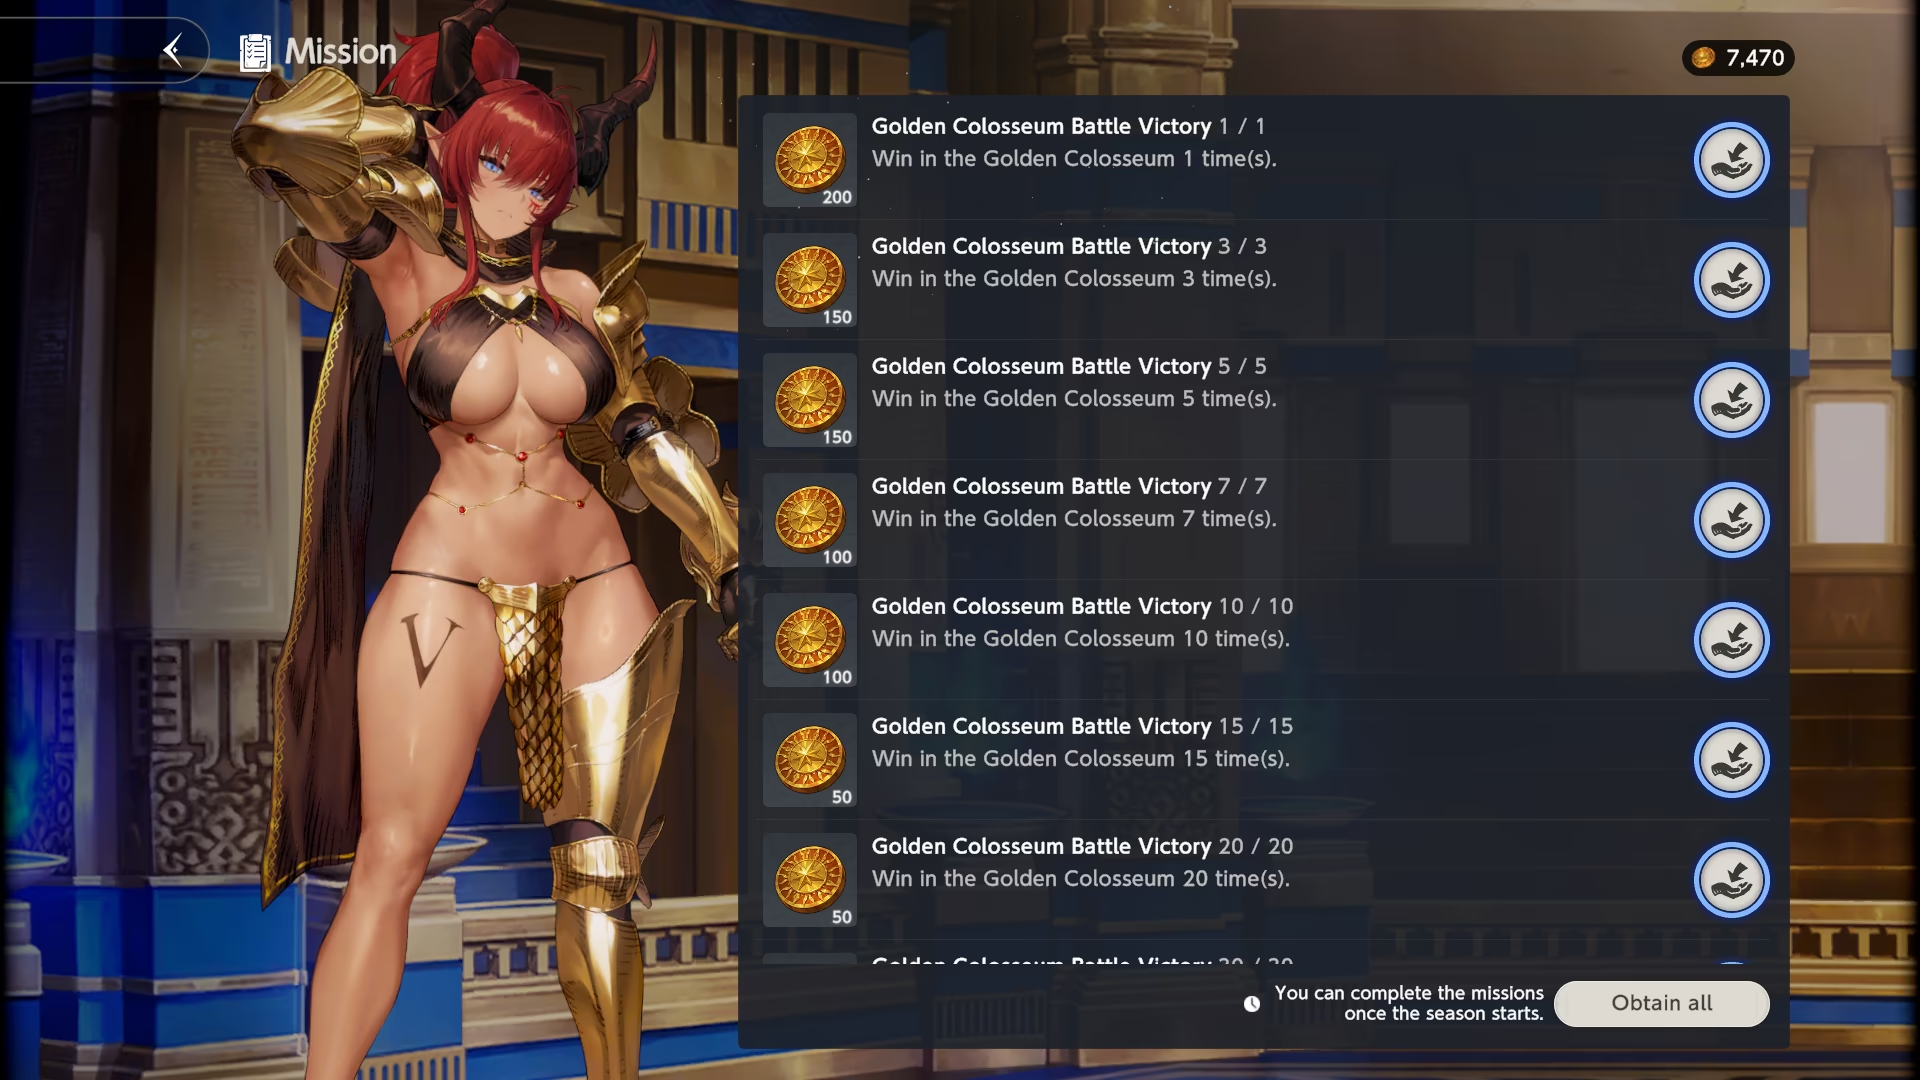
Mission List
| Mission | Reward |
|---|---|
| Win in the Golden Colosseum 1 time(s). | 200 |
| Win in the Golden Colosseum 3 time(s). | 150 |
| Win in the Golden Colosseum 5 time(s). | 150 |
| Win in the Golden Colosseum 7 time(s). | 100 |
| Win in the Golden Colosseum 10 time(s). | 100 |
| Win in the Golden Colosseum 15 time(s). | 50 |
| Win in the Golden Colosseum 20 time(s). | 50 |
| Win in the Golden Colosseum 30 time(s). | 50 |
| Win in the Golden Colosseum 40 time(s). | 50 |
| Total | 900 |
If you are very busy, ...
...at least win 10 fights per Season. You will lose around 22% of coins from Missions alone and some coins from ranking, but at least it will be better than not participating at all.
10 wins is not hard if you find a good team for a given season.
Missions Availability
You cannot complete Missions during the Settlement Period.
However, you still can claim rewards during the Settlement Period, given you satisfied the conditions beforehand.
This is helpful if you complete your battles right before the deadline or forget to claim your rewards before settlement begins.
Ranking
Similarly to the Mirror Wars, there are 29 Rankings. Reaching a specific Rank awards you with a different amount of Aurum Coins at the end of the Season.
The Season lasts for a week with a Settlement Period that starts at 15:00 UTC on the last day. It happens on Wednesday (UTC), the last day of the game week. During the Settlement Period, you cannot perform any Attacks, so be sure to use your Attempts before the period.
Golden Colosseum ranks players strictly by relative percentile brackets across the active player base. At the end of the season, all active players are sorted by their final Rating Points and divided into percentage cutoffs (e.g., Top 1%, Top 5%, Top 10%, etc.).
Understanding Game Wording
The game UI uses inverted wording for the ranking system. Here are some examples of how to translate the brackets:
- Within the Top 0.1%: You performed better than at least 99.9% of players.
- Above Top 10% - Below Top 12.5%: You performed worse than 10% of players but still better than 87.5%. In other words, you are within the Top 10% — 12.5% bracket of players.
Ranks & Rewards List
| Rank | Percentile Bracket | Seasonal Reward | |
|---|---|---|---|
| Bronze |  | 90% — 100% | 900 |
| Silver III |  | 85% — 90% | 920 |
| Silver II |  | 80% — 85% | 960 |
| Silver I |  | 75% — 80% | 1000 |
| Gold III |  | 70% — 75% | 1040 |
| Gold II |  | 65% — 70% | 1080 |
| Gold I |  | 60% — 65% | 1120 |
| Platinum III |  | 55% — 60% | 1160 |
| Platinum II |  | 50% — 55% | 1200 |
| Platinum I |  | 45% — 50% | 1240 |
| Ruby III |  | 40% — 45% | 1280 |
| Ruby II |  | 35% — 40% | 1320 |
| Ruby I |  | 30% — 35% | 1360 |
| Dia III |  | 25% — 30% | 1400 |
| Dia II |  | 20% — 25% | 1440 "Not Bad Greta 1" sticker |
| Dia I |  | 17.5% — 20% | 1480 "Not Bad Greta 1" sticker |
| Sapphire III |  | 15% — 17.5% | 1520 "Not Bad Greta 1" sticker |
| Sapphire II |  | 12.5% — 15% | 1560 "Not Bad Greta 1" sticker |
| Sapphire I |  | 10% — 12.5% | 1600 "Not Bad Greta 1" sticker |
| Master III |  | 7.5% — 10% | 1640 "Not Bad Greta 1" sticker |
| Master II |  | 5% — 7.5% | 1680 "Not Bad Greta 1" sticker |
| Master I |  | 3% — 5% | 1720 "Not Bad Greta 1" sticker |
| Grandmaster III |  | 2% — 3% | 1760 "Not Bad Greta 2" sticker |
| Grandmaster II |  | 1.5% — 2% | 1800 "Not Bad Greta 2" sticker |
| Grandmaster I |  | 1% — 1.5% | 1840 "Not Bad Greta 2" sticker |
| Challenger III |  | 0.5% — 1% | 1880 "Not Bad Greta 2" sticker |
| Challenger II |  | 0.25% — 0.5% | 1920 "Not Bad Greta 2" sticker |
| Challenger I |  | 0.1% — 0.25% | 1960 "Not Bad Greta 2" sticker |
| Champion |  | <0.1% | 2000 "Not Bad Greta 3" sticker |
Guides
If you do not care about PvP to the degree you want to actually climb the ladder, copying someone's teams will do. This will give you decent Rank and 40 wins easily to complete all missions.
For that, you have plenty of options:
- Gamekee Encyclopedia (Chinese)
- pennyosa's videos on Bilibili or YouTube
- Arca Live Forum
- GemMog's Youtube Channel
- VioletRose's YouTube Channel
If you want to actually climb the ladder (or want to have slightly different explanations for basics), refer to blanketninja's Colosseum Guide.
Small advice
Since Costumes rely on progression, it would make sense to pick the options that include your better upgraded Costumes.
Search for the one you're comfortable with.
Shop
Shop is a place where you can spend earned Aurum Coins. To access it, either press the Shop icon directly from the Golden Colosseum Pack or find the Golden Colosseum Shop in a Content Shop section of a regular Shop.
Image Guide
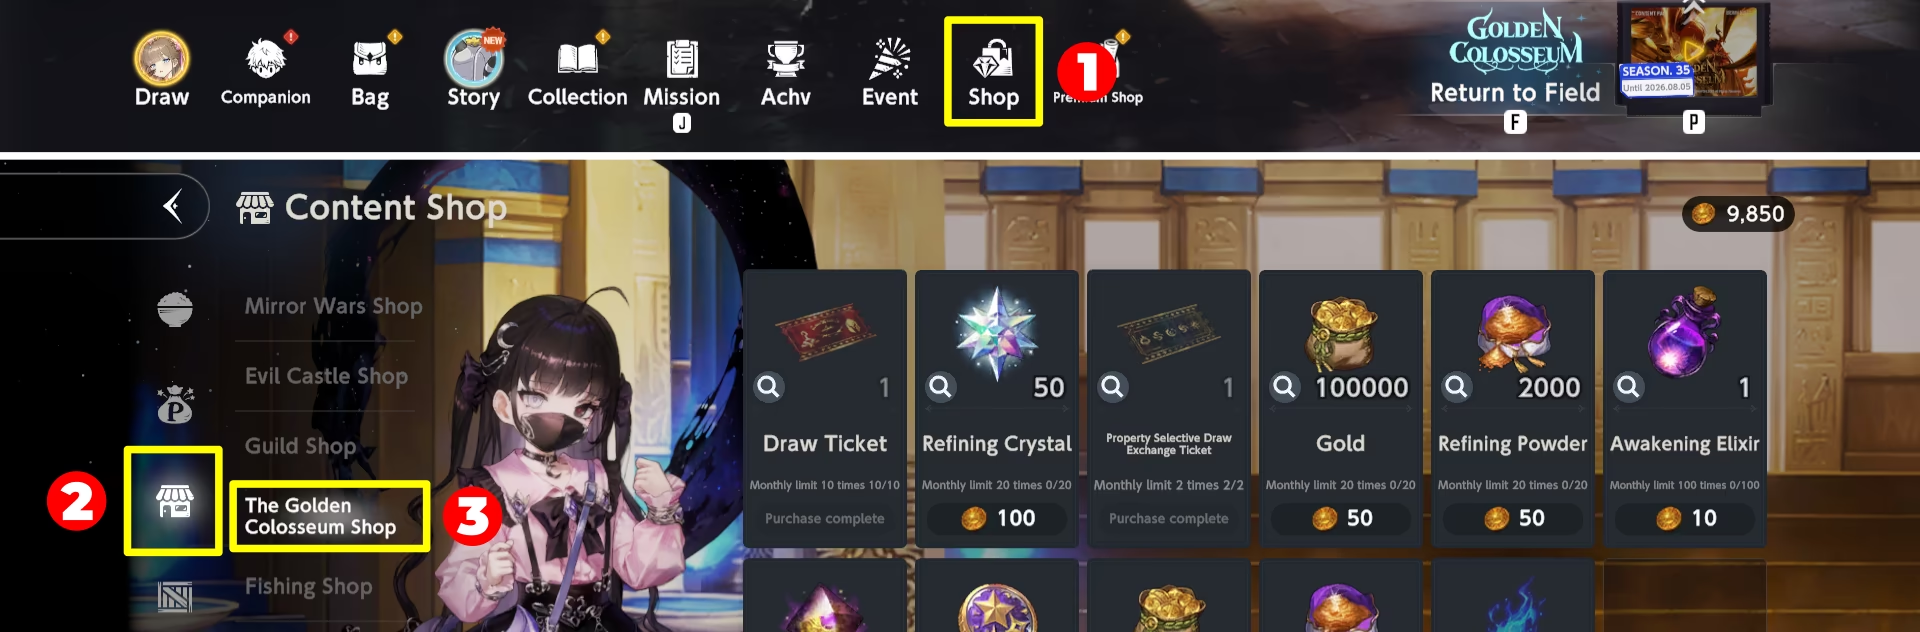
Golden Colosseum Shop
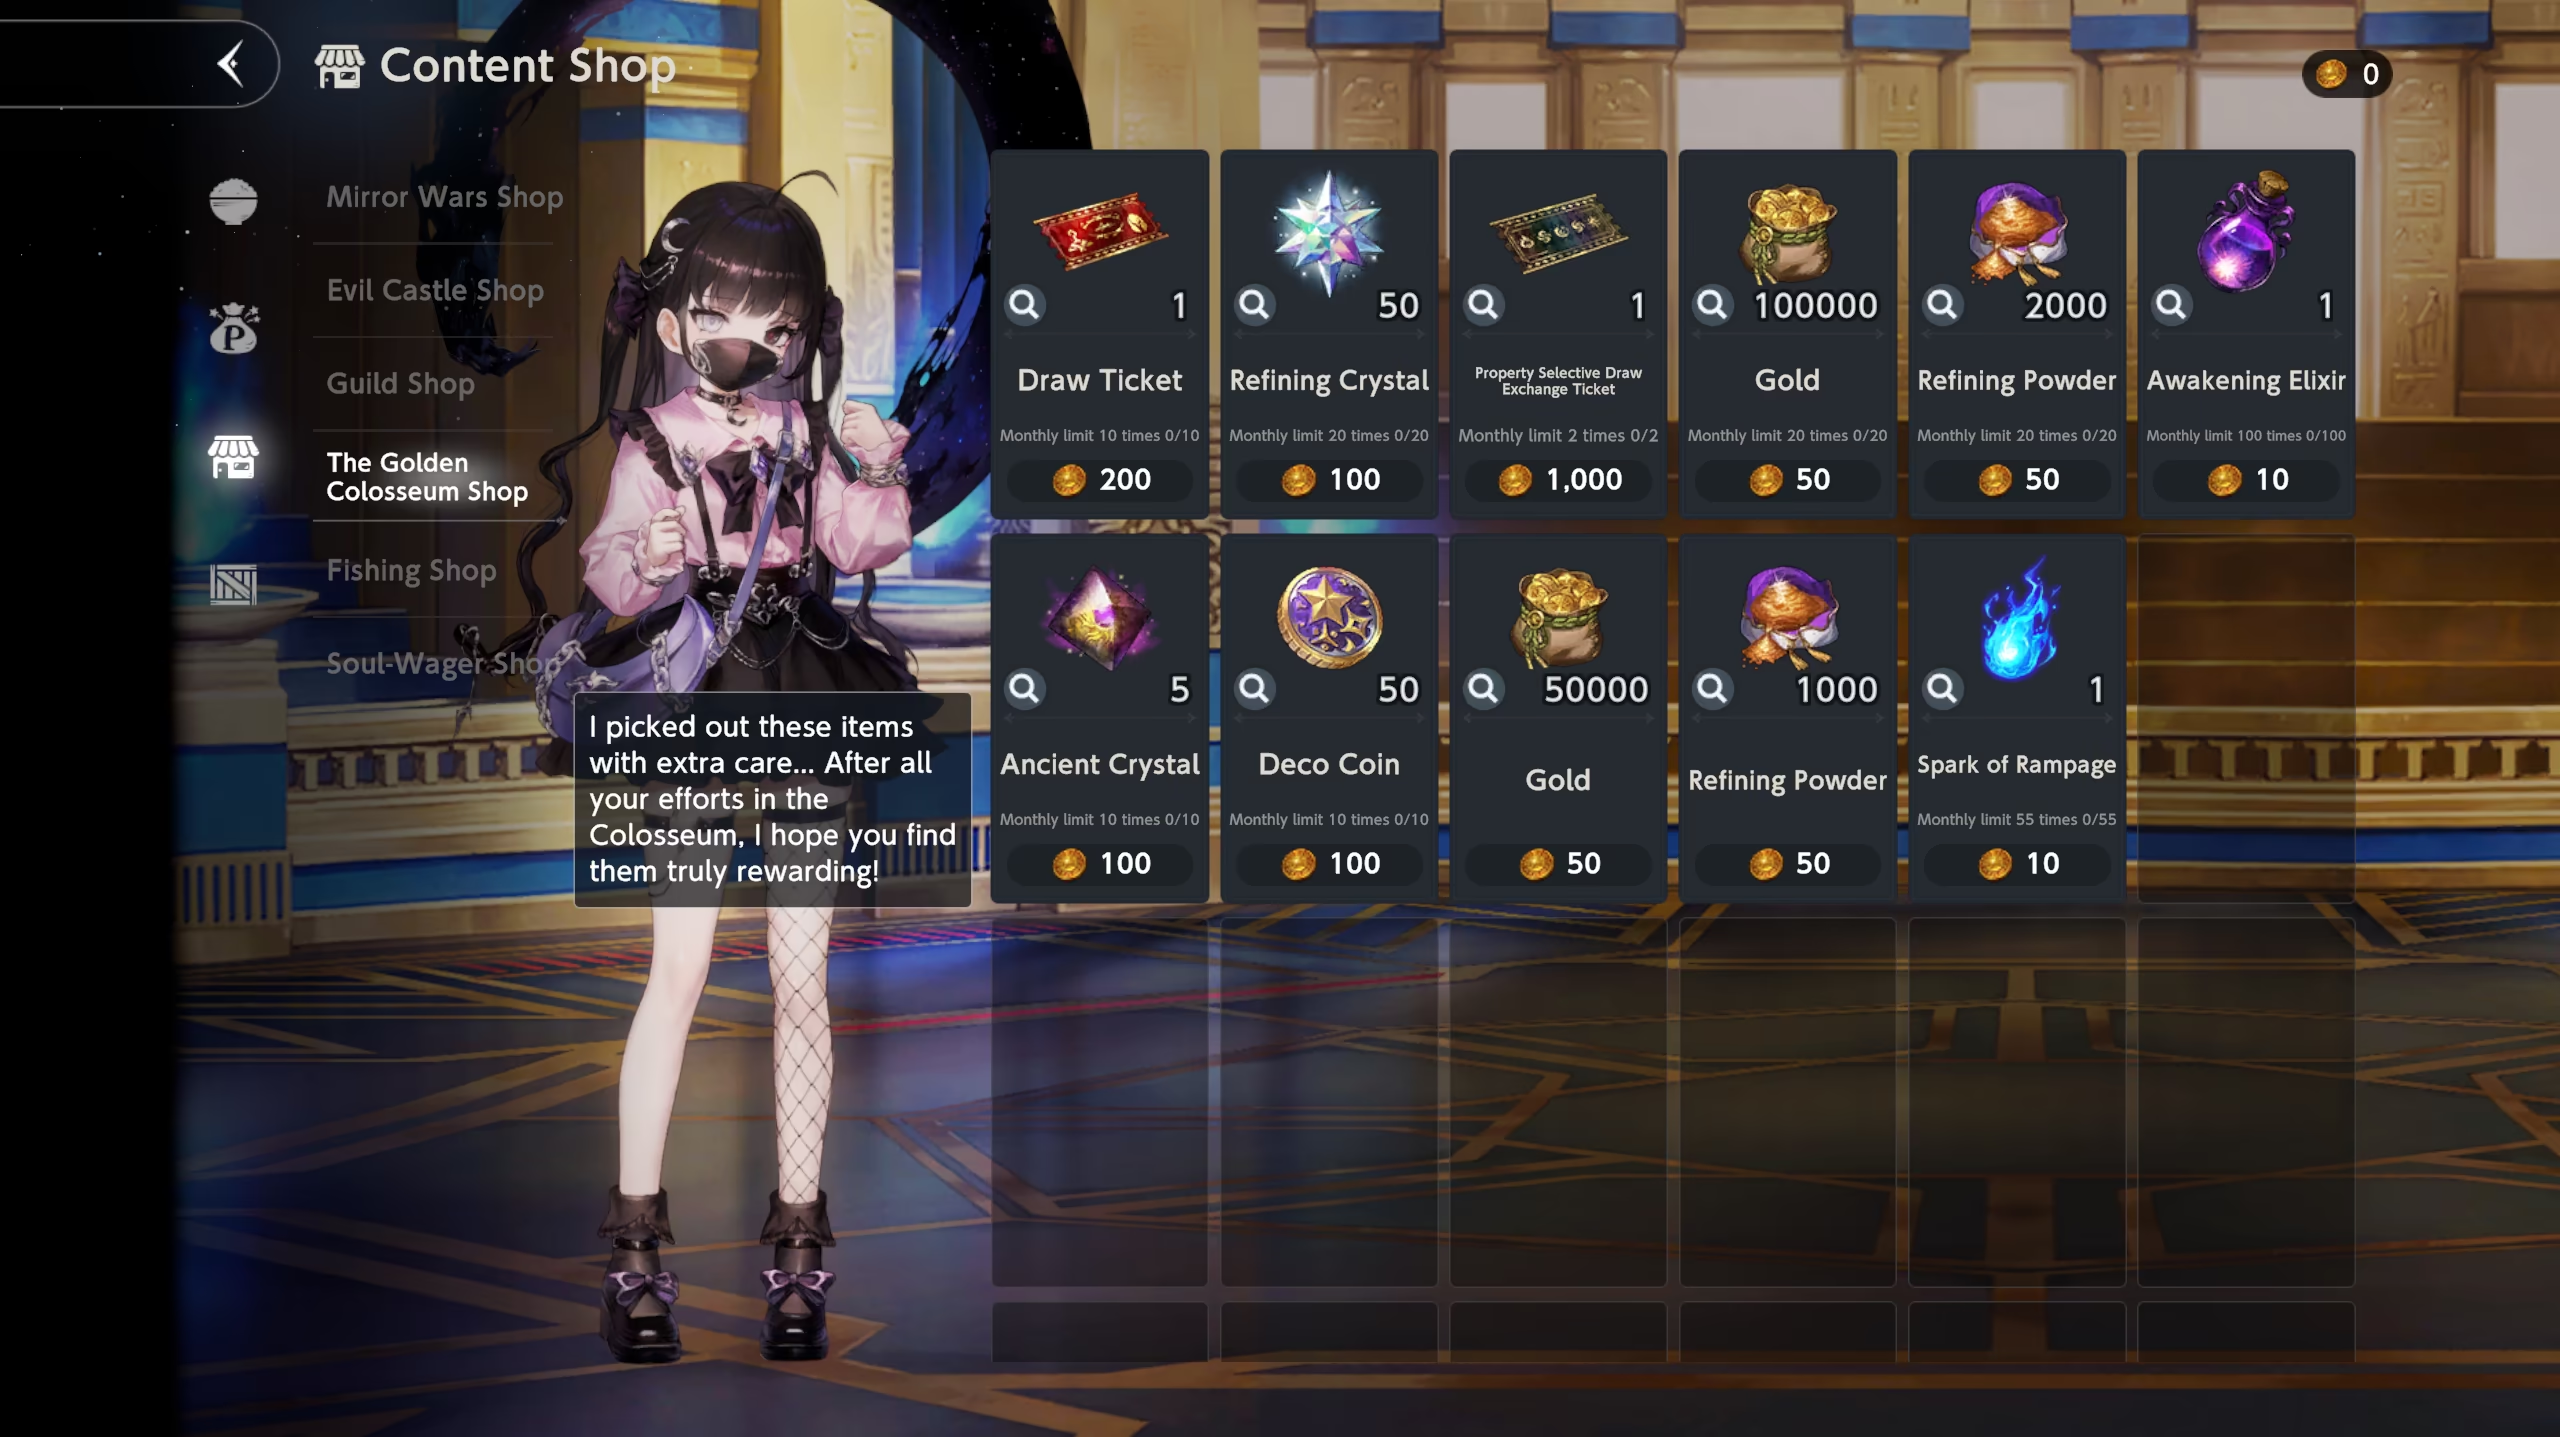
Shop Priority
Assuming you are reaching Platinum II (55% — 50% bracket) and completing all Missions, you will receive 2100 Aurum Coins per season, which translates to 8400 Aurum Coins per 4 weeks (roughly a month).
 Property Selective Draw Exchange Ticket x2 — 2000 Aurum Coins
 Spark of Rampage x55 — 550 Aurum Coins
 Draw Ticket x10 — 2000 Aurum Coins
 Refining Crystals x1000 — 2000 Aurum Coins
 Ancient Crystals x50 — on leftovers — 1000 Aurum Coins
Optional (if you have extra Aurum Coins):
 Awakening Elixir x100 — 1000 Aurum Coins
 Gold x2M — 2000 Aurum Coins
 Refining Powder x40K — 1000 Aurum Coins
- Total without optional: 7550 Aurum Coins
- Total with optional: 11550 Aurum Coins
Assuming you are reaching Sapphire I (10% — 12.5% bracket) and completing all Missions, you will receive 2500 Aurum Coins per season, which translates to 10000 Aurum Coins per 4 weeks (roughly a month).
- Spark of Rampage x55 — 550 Aurum Coins
- Refining Crystals x1000 — 2000 Aurum Coins
- Draw Ticket x10 — 2000 Aurum Coins
- Gold x2M — 2000 Aurum Coins
Optional:
- Awakening Elixir x100 — if necessary — 1000 Aurum Coins
- Ancient Crystals x50 — on leftovers — 1000 Aurum Coins
- Property Selective Draw Exchange Ticket x2 — if necessary — 2000 Aurum Coins
- Refining Powder x40K — on leftovers — 1000 Aurum Coins
- Total without optional: 6550 Aurum Coins
- Total with spending on leftovers items: 8550 Aurum Coins
- Total with optional: 11550 Aurum Coins
Related Links
- Blessing Codex | Brown Dust II Database by Souseha
- Brown Dust 2 Wiki | Gamekee
- 系列·黄金竞技场 by pennyosa | Bilibili
- pennyosa | YouTube
- Arca Live Forum
- GemMog | YouTube
- VioletRose | YouTube
- Colden Colosseum: Champion Guide by blanketninja