
Fiend Hunter is an activity revolving around defeating a Boss that becomes stronger with each level. Defeating the Boss successfully grants various rewards.
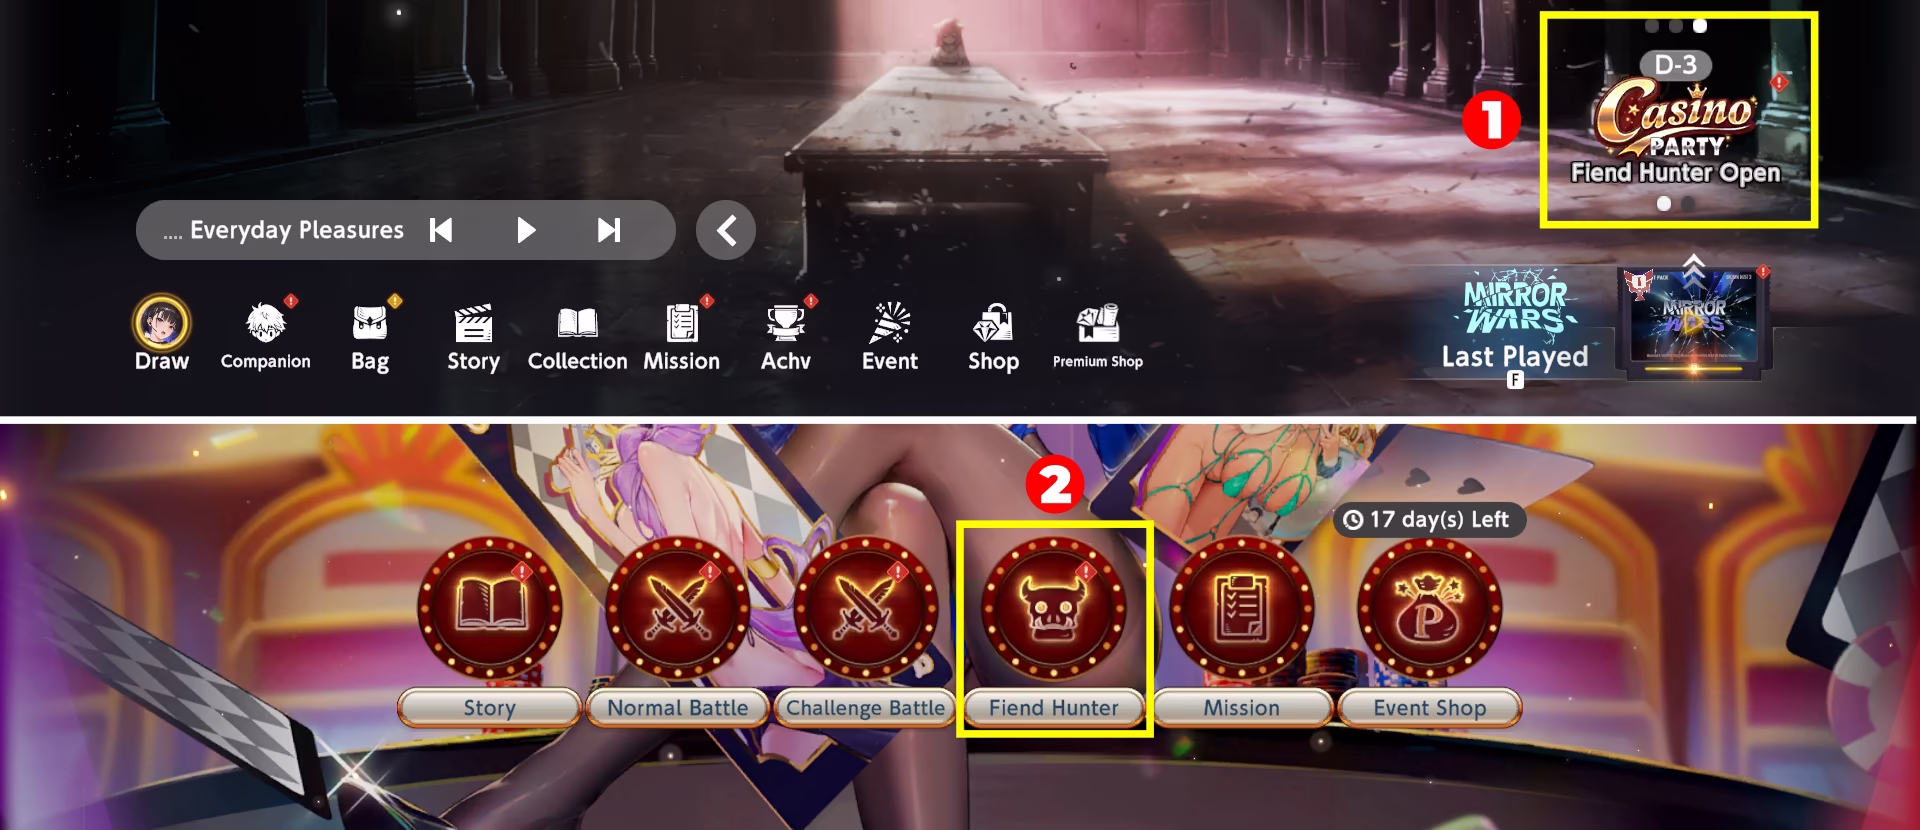
To access the game mode, press the Season Event logo, then click the corresponding button.
Image Guide
Fiend Hunter Menu
Fiend Hunter Schedule
Fiend Hunter is Seasonal, biweekly content. Each Fiend Hunter season is separated into \(2\) phases, each lasting 1 week:
- Preparation Period, during which you can do Practice battles and cannot obtain Rewards.
- Hunting Period, during which you attack the Boss directly and gain Rewards based on your performance.
Event Schedule

The Fiend Hunter schedule completely aligns with Season Events; or, to be more precise, Fiend Hunter is a part of Season Events.
On the last day of the Hunting Period, a Settlement Period starts at 15:00 UTC, after which you can no longer challenge the Boss.
Boss
Each Season you fight a different Boss. Each Boss occupies specific tiles of a 3x4 battlefield grid, similar to Regular Battles.
Example of the tiles that are occupied by the Boss
You can also check the tiles by inspecting the Boss info in the Fiend Hunter Menu.
Image Guide
Boss Levels
Fiend Hunter Bosses have \(25\) initial Levels you can freely choose between in both Normal and Practice Battles. However, after defeating Level 25, you will face Level \(26\) — meaning the boss, in theory, has infinitely many Difficulty Levels.
Each new Level is progressively harder thanks to scaling parameters such as ![]() HP and
HP and ![]() ATK /
ATK / ![]() MATK.
MATK.
Boss Stats
Each Boss has its own predetermined Base Value, Initial Growth and Scale Growth parameters for ![]() HP and
HP and ![]() ATK or
ATK or ![]() MATK. These three parameters determine the Boss's Health and Attack potential on each Difficulty Level.
MATK. These three parameters determine the Boss's Health and Attack potential on each Difficulty Level.
Initial Growth is responsible for scaling immediately, starting from Level 2, while Scale Growth has a much greater impact at higher difficulties.
Stat Formula
\(\text{Value} = \text{round}[B \cdot (1+(L-1) \cdot R \cdot 0.01 \cdot L^S)]\)
- \(\text{B} \rightarrow \text{Base Value}\)
- \(\text{L} \rightarrow \text{Boss Level}\)
- \(\text{R} \rightarrow \text{Initial Growth Parameter}\)
- \(\text{S} \rightarrow \text{Scale Growth Parameter}\)
Formula Explanations & Limitations
- Rounding in the formula works as follows:
- For
 HP, rounding down to 3 significant figures is applied.
 - For
 ATK and
  MATK, rounding to the nearest integer is applied instead.
- For
- Parameters \(\text{B}\) and \(\text{S}\) are never changed based on the level. However, that does not apply to \(\text{R}\), which can change at Levels \(11\) and \(14\).
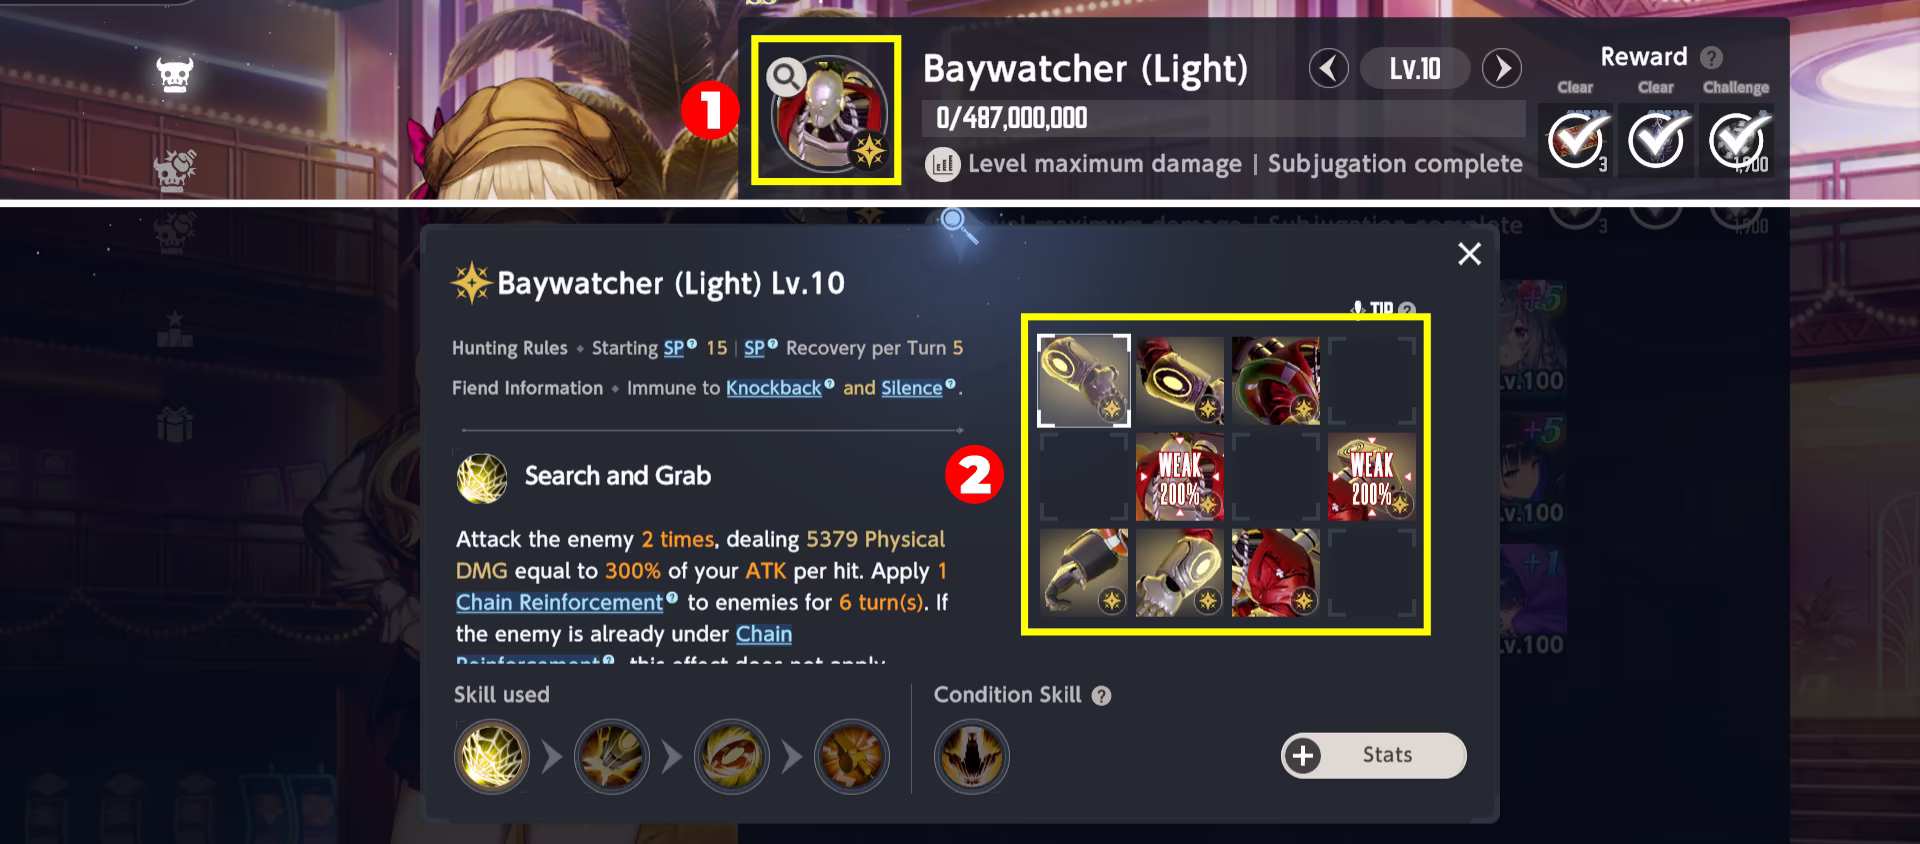
Boss Skills
All Bosses have two types of skills: Basic and Conditional Skills. Each Skill is "tied" to a specific body part of the Fiend Hunter Boss. You can check these Skills by inspecting the Boss in the Fiend Hunter Menu, just like the grid tiles.
Image Guide
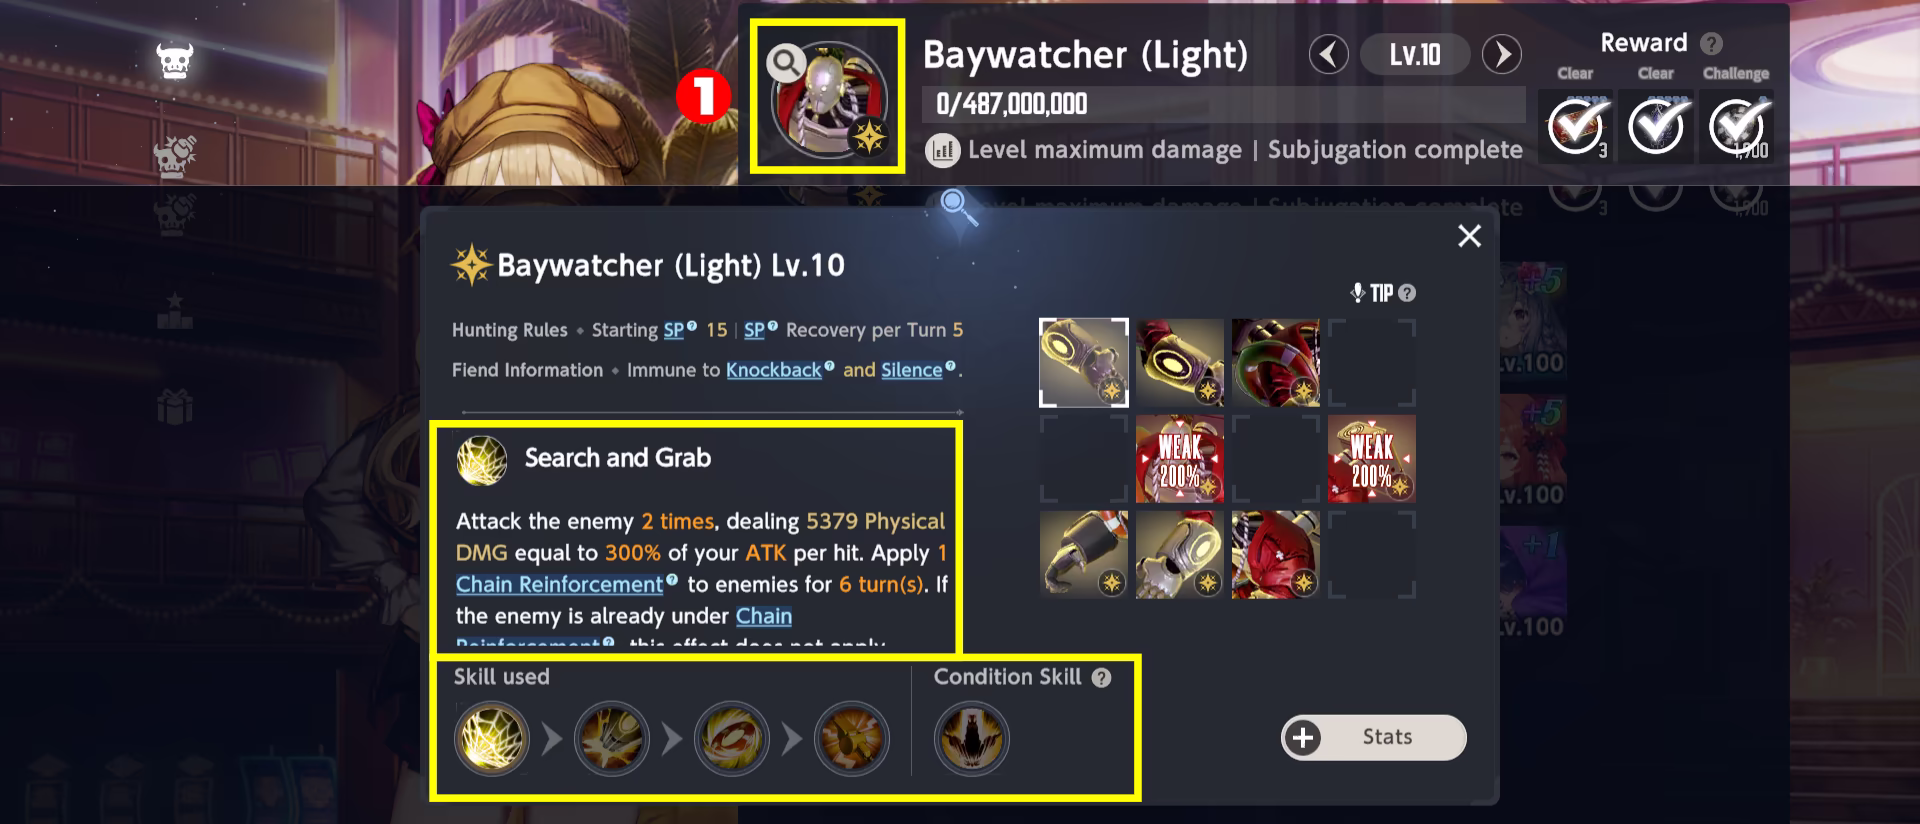
- Basic Skills are the ones that boss will definitely use during the fight.
- The final Basic Skill always causes Instant Death, preventing you from playing for an extended turn period.
- Conditional Skills are actions the Boss will use only if a particular condition is met.
- Conditional Skills can only be triggered a fixed number of times per battle or a fixed number of times per team.
- This type of Skill will be used instead of the next scheduled Basic Skill as soon as its condition is met, delaying the latter.
It is essential to understand the Skills in order to maximize your damage.
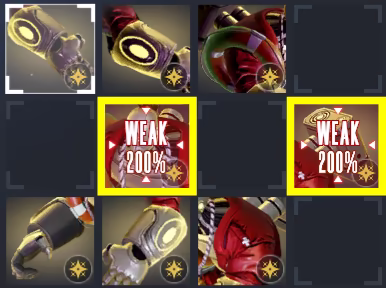
Weak Points
Weak Points are specific body parts that may or may not be present.
Each Weak Point takes additional damage and is displayed as text reading \(\textbf{WEAK}\) along with a Damage Increase multiplier.
Weak Points Display
Battle
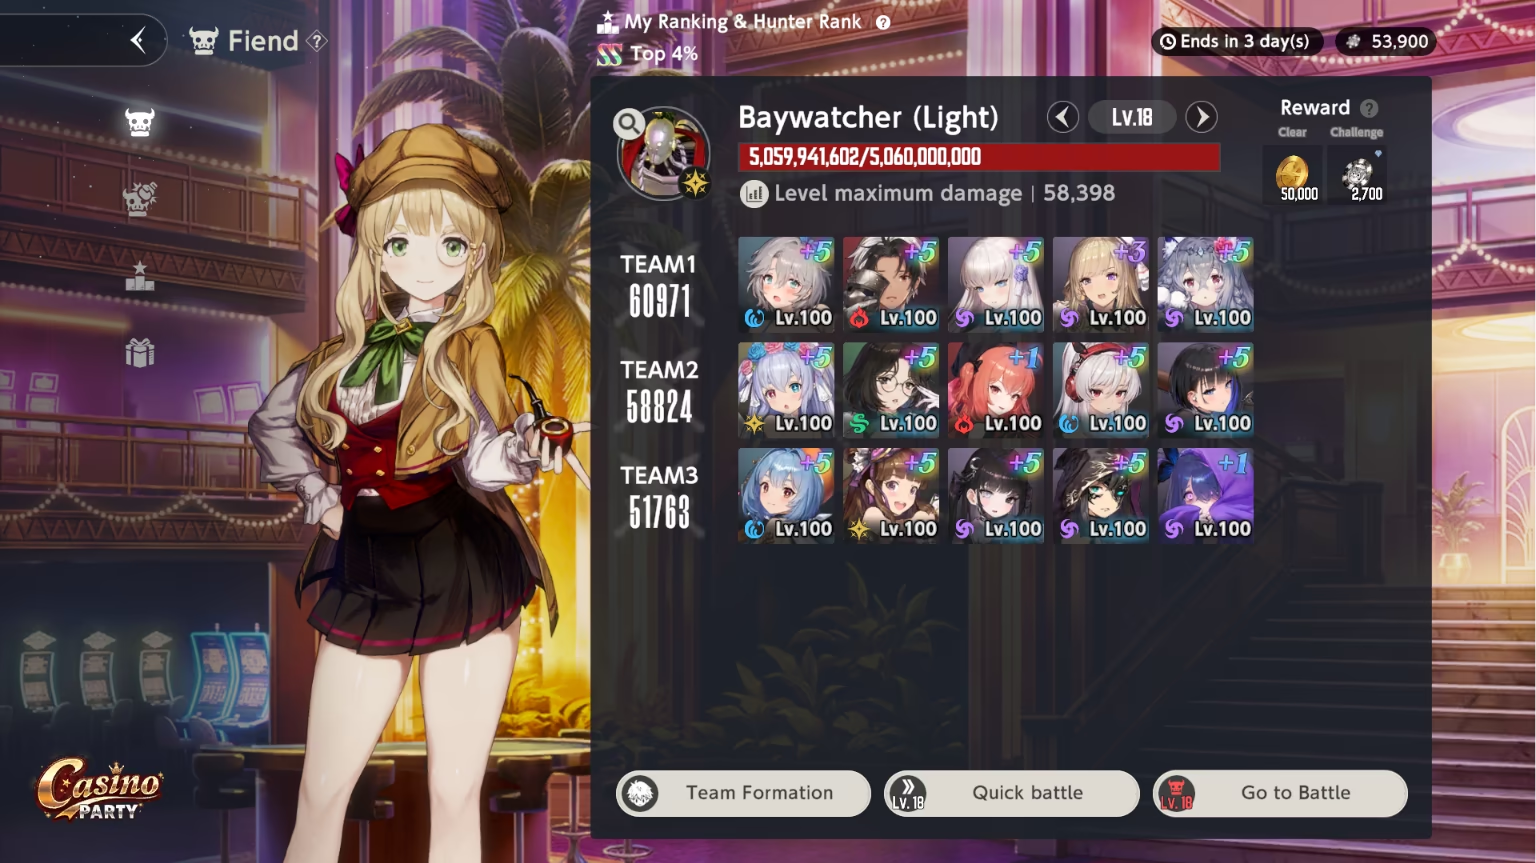
For the Battle, you can deploy up to 3 teams with 5 Companions in each. Each team goes strictly in the set order (Team 1 → Team 2 → Team 3).
You are also free to choose any difficulty you want to face, up to Level 25.
Once the Battle starts and Team \(1\) perishes, Team \(2\) replaces it; this continues until every team has perished.
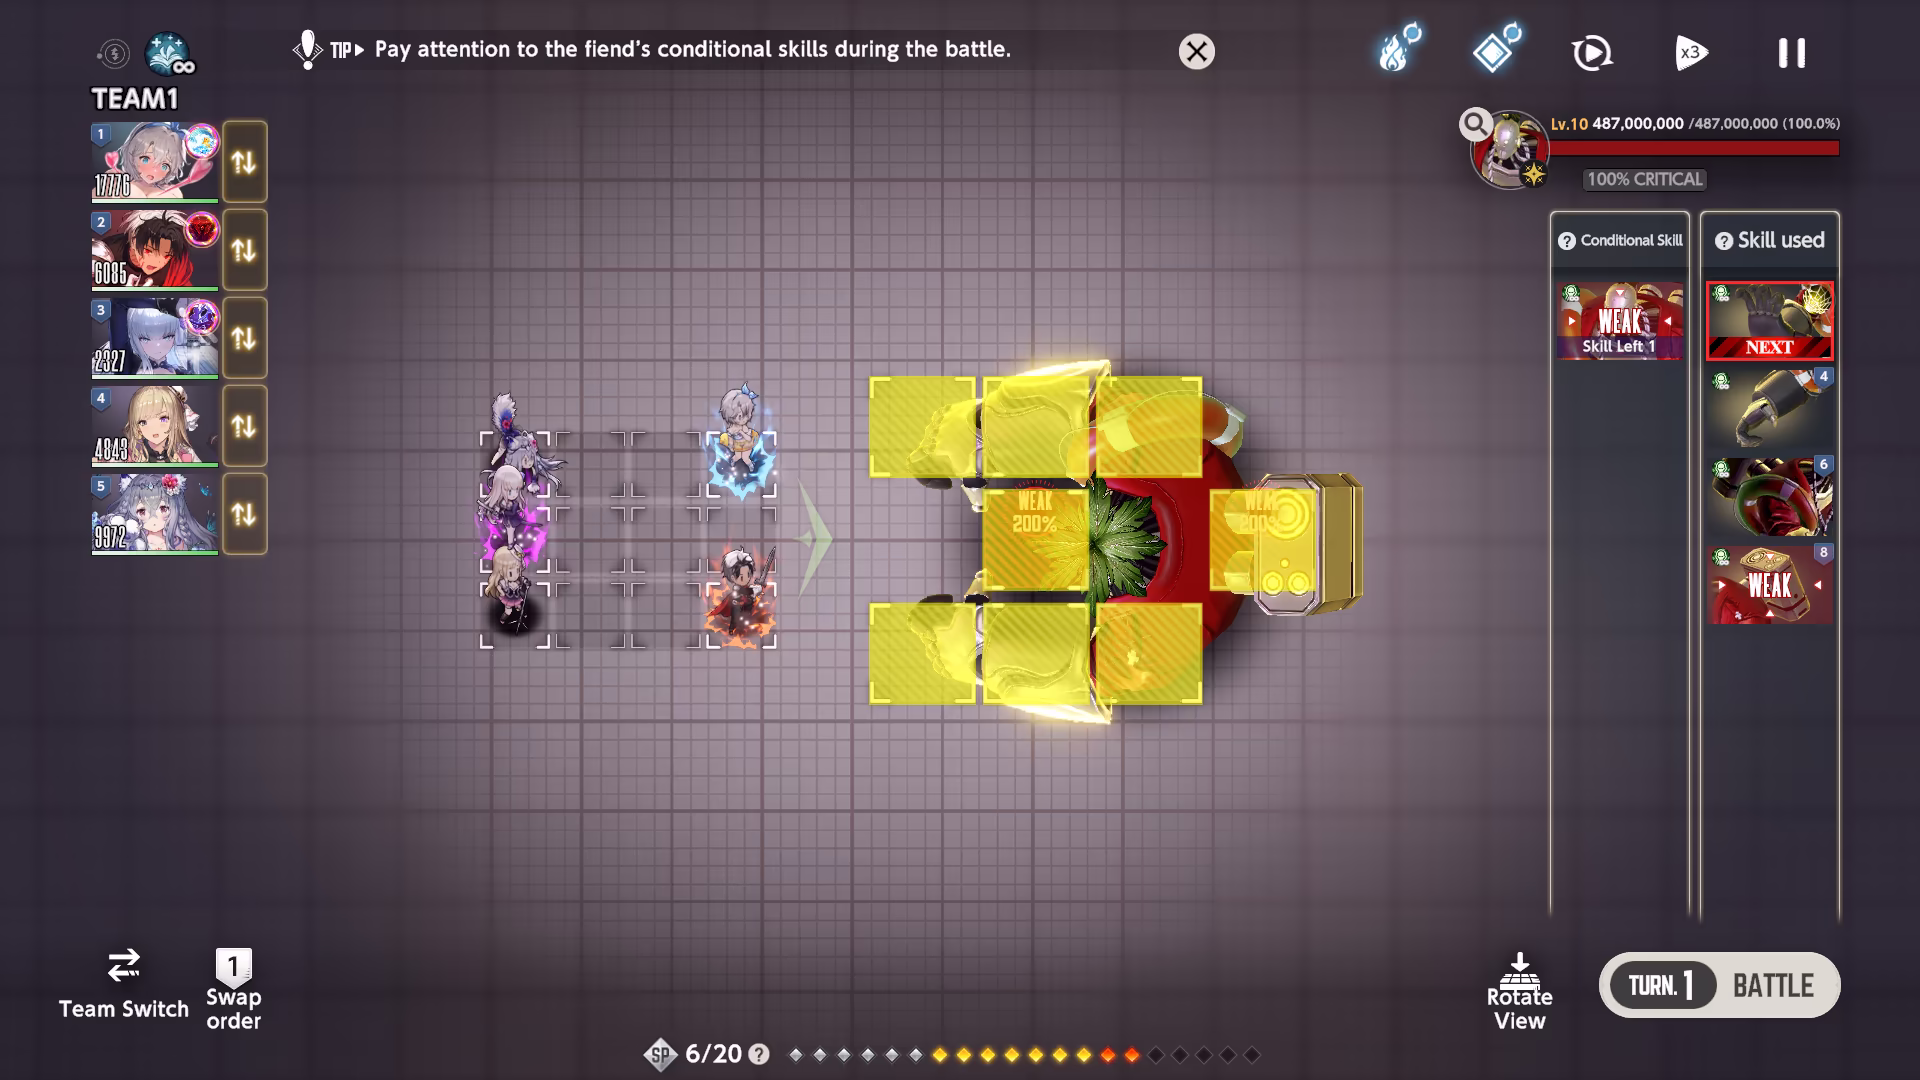
Fiend Hunter Battle
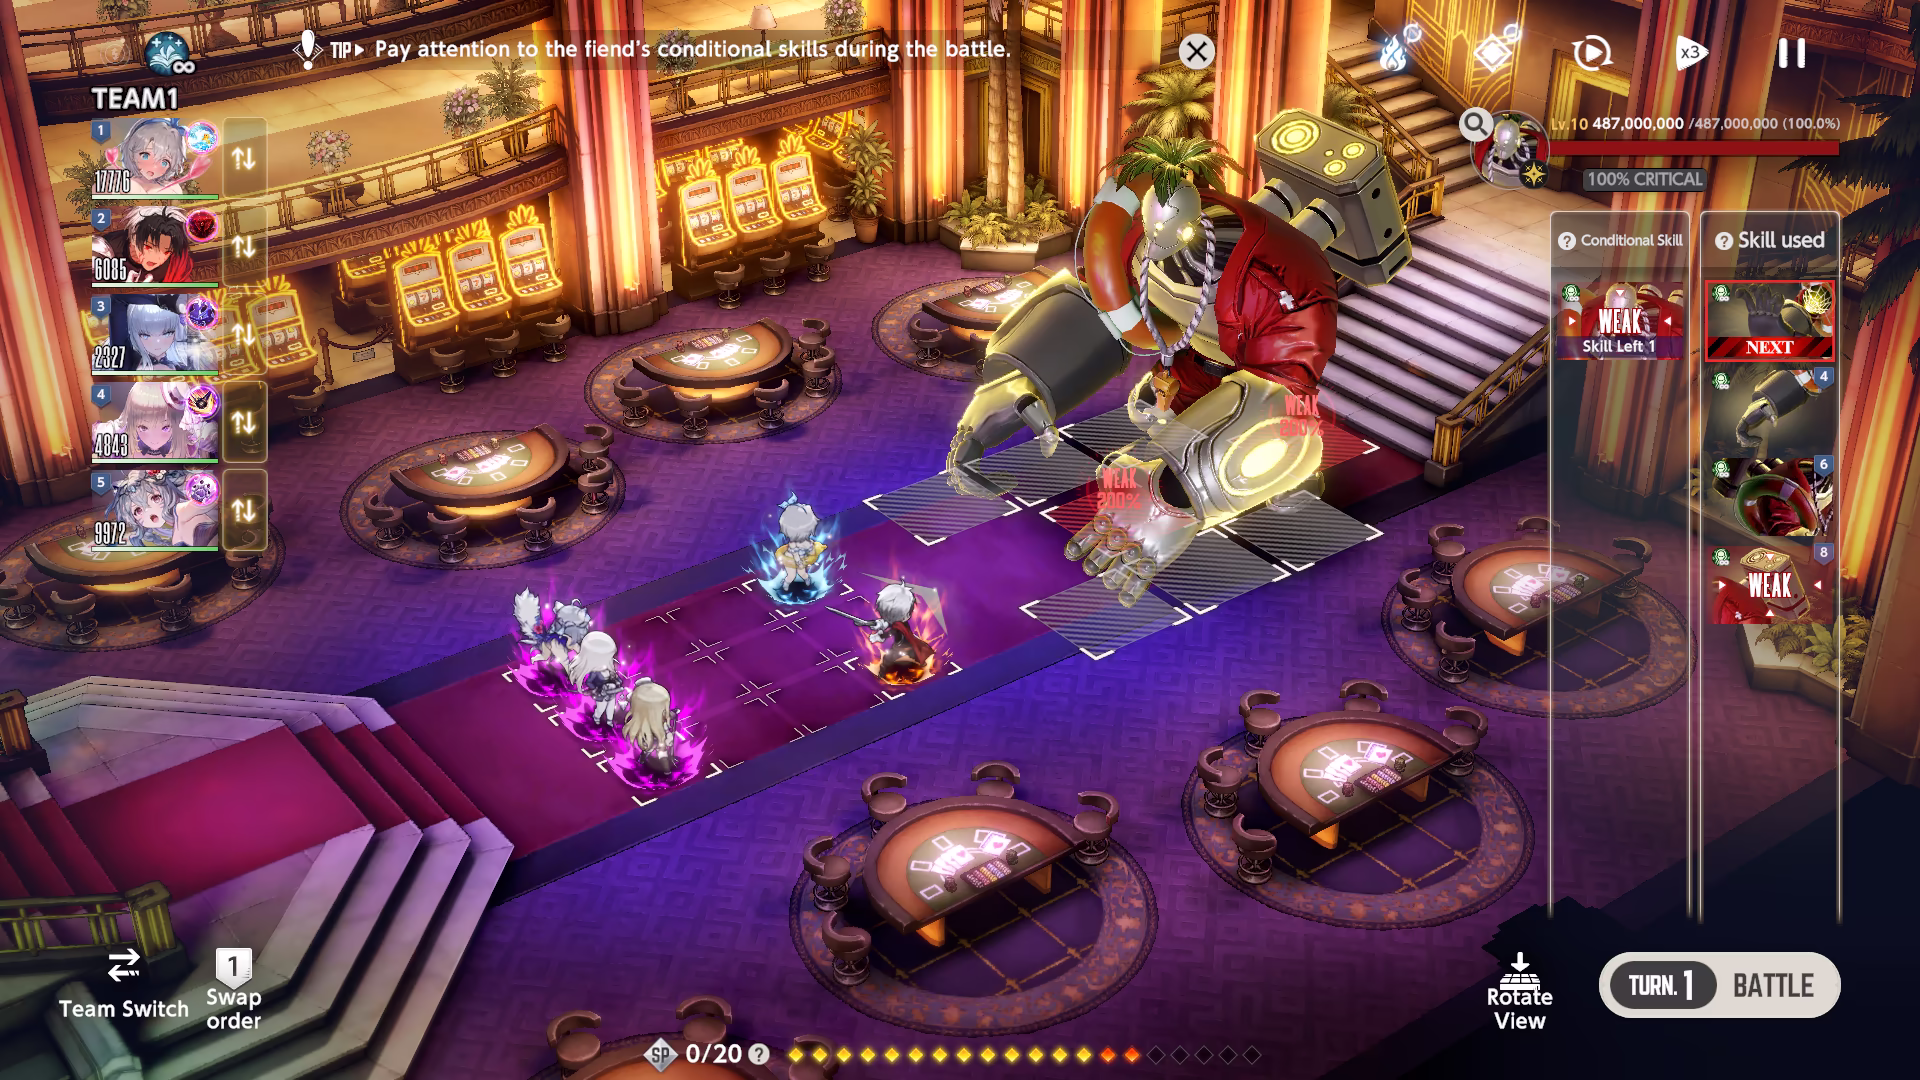
As mentioned earlier, the Boss has a set Skill pattern, which is displayed on the right side of the screen. You can also see the next Skill having \(\textbf{NEXT}\) label. Skills are used from top to bottom, with the exceptions of Conditional Skills.
Boss Skill Order

Combat Behavior
- Boss Tiles cannot be knocked back or silenced.
- Whenever a team dies from any source other than the Boss's final Basic Skill, the Boss Skill cycle continues, meaning the Boss will not reset their Skills.
- This implies that teams should aim to survive until that final Basic Skill.
- Characters cannot evade Boss hits. The only way to not get hit is to position your Companions correctly.
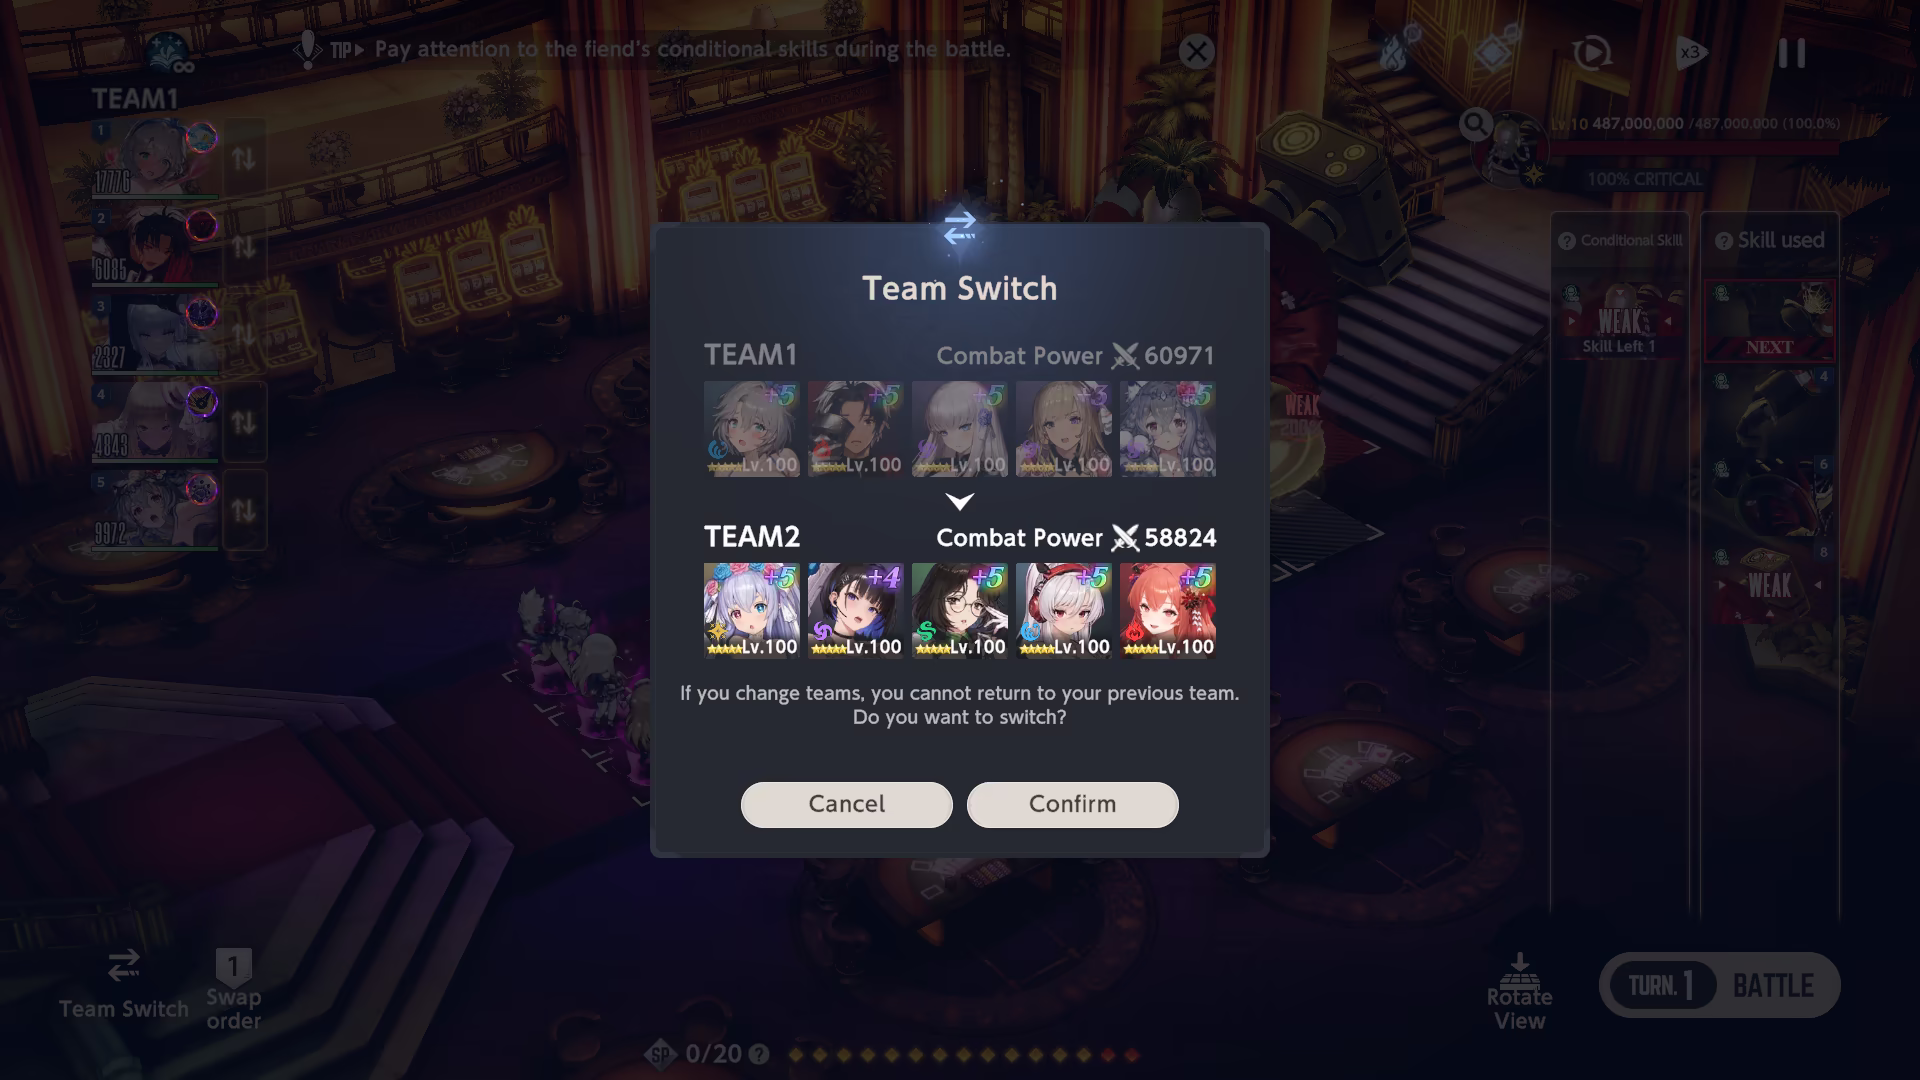
Team Switch
You have the ability to quickly switch the teams in Fiend Hunter. Switching only goes forward from Team \(1\) to Team \(2\) to Team \(3\), with no option to bring a previous team back.
Switching acts as an external Instant Death mechanic; therefore, it does not refresh the Boss's Skills.
This feature is overall rarely used, with the sole exception of saving time at high levels when you do not wish to climb higher but still want to claim your daily rewards.
Team Switch Warning Menu
Damage Mechanic
Since you can challenge any Difficulty Level, it is possible that you won't deal enough damage to clear the entire run.
If this happens, you will automatically defeat all levels whose HP thresholds are lower than the damage you dealt. Your full damage score will then carry over and be applied to the next level.
Example
Assume the Boss named Baywatcher has \(487\text{M}\) ![]() HP at Level \(10\), and \(714\text{M}\)
HP at Level \(10\), and \(714\text{M}\) ![]() HP at Level \(11\).
HP at Level \(11\).
If you challenge Level \(15\) but only manage to deal a total of \(\bf{500\textbf{M}}\) damage:
- You will completely defeat Levels \(\bf{1}\) through \(\bf{10}\) (since \(500\text{M}\) is greater than \(487\text{M}\)).
- You will deal that same \(500\text{M}\) damage to Level 11, leaving it with \(214\text{M}\) HP.
Any subsequent attempts to deal damage during the same day will have no impact, unless your new damage is higher than your previous record.
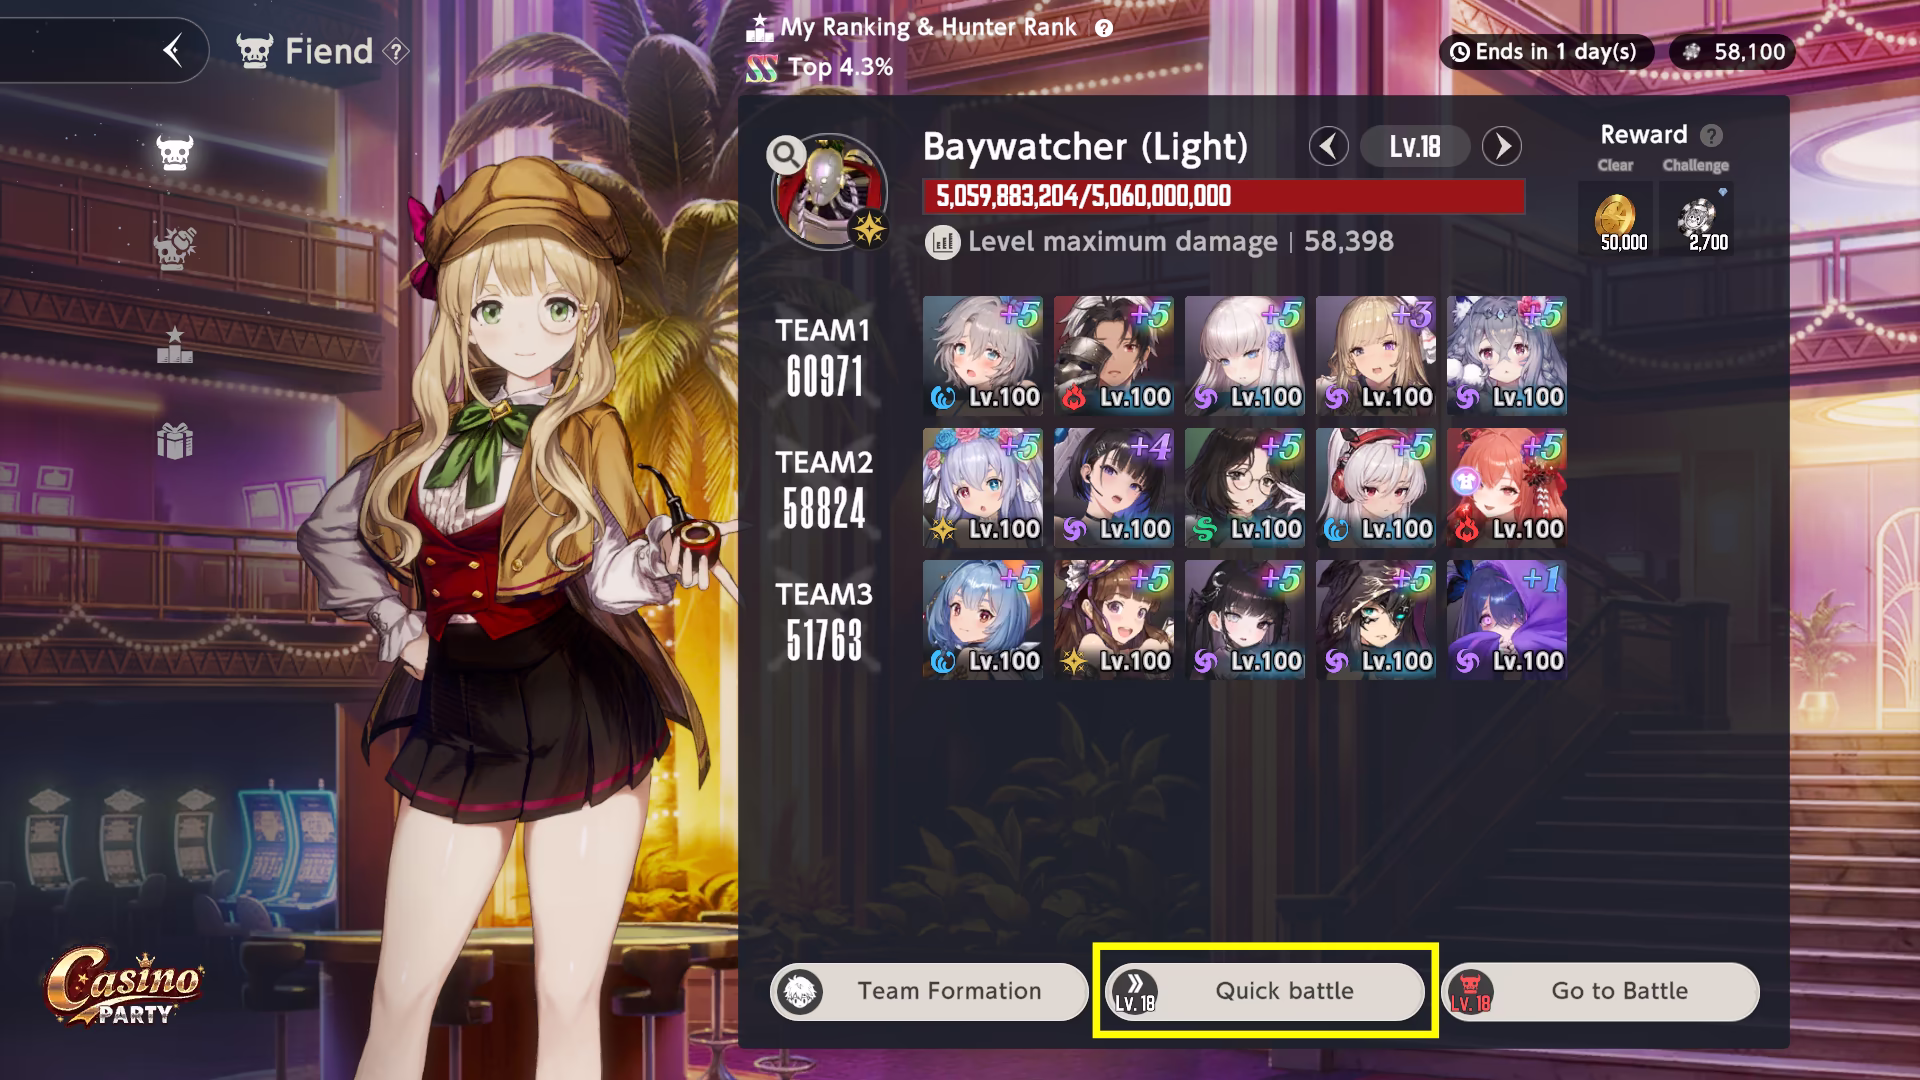
You can continue dealing damage to the boss the following day, either by attacking manually or by using the Quick Battle feature.
Quick Battle
Quick Battle allows you to instantly apply your highest recorded damage from the previous day. However, the system only saves this damage record for the highest level your damage actually reached, not the level you originally clicked on.
Using the example from above, even though you challenged Level 15 on Day 1, your damage only reached Level 11. Therefore, on Day \(2\), you will have Quick Battle unlocked only for Level \(\bf{11}\).
Once you use Quick Battle, you will deal that same \(500\text{M}\) damage and defeat Level \(11\).
However, you will no longer be able to Quick Battle Level \(\bf{12}\) because your damage history never successfully reached it on Day 1, meaning you must challenge it manually.
Quick Battle Button Location
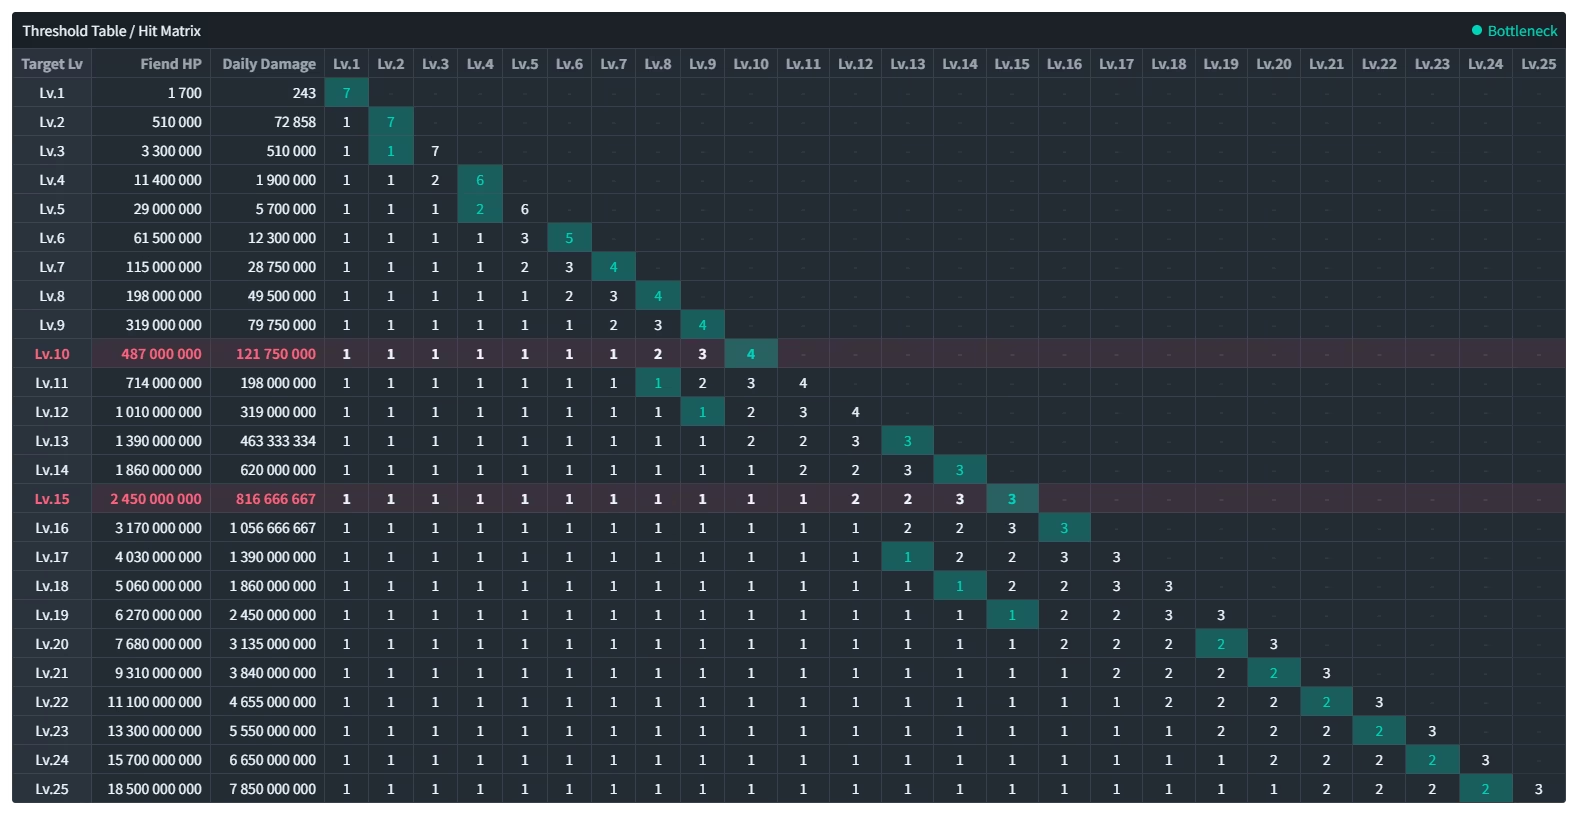
You can check how much daily damage you need to clear a specific Level using Souseha's Database or Author's Fiend Hunter Sheets.
An Example of Fiend Hunter Damage Threshold Chart
Rewards
Similar to Season Events, Fiend Hunter has Clear (Kill) Rewards and Challenge (Daily) Rewards.
- Clear Rewards contain
 Draw Tickets,
  Tears of Goddess,
  Refining Powder and
  Gold.
Gold. - Challenge Rewards contain Event Currency.
Similar to the Damage behavior, you can obtain Challenge Rewards once per day per Difficulty Level. This means you automatically gain the Challenge Rewards for Levels \(1 - 10\) upon clearing them all at once, alongside the Level \(11\) reward on the first day, as shown in the previous example.
- Level \(1\): \(3\) Draw Tickets
- Level \(2\): \(3\) Draw Tickets
- Level \(3\): \(3\) Draw Tickets
- Level \(4\): \(3\) Draw Tickets
- Level \(5\): \(3\) Draw Tickets
- Level \(6\): \(3\) Draw Tickets
- Level \(7\): \(3\) Draw Tickets
- Level \(8\): \(3\) Draw Tickets
- Level \(9\): \(3\) Draw Tickets
- Level \(10\): \(3\) Draw Tickets & 1 Tear of Goddess
- Level \(11\): \(50\text{K}\) Gold & \(30\text{K}\) Refining Powder
- Level \(12\): \(50\text{K}\) Gold & \(30\text{K}\) Refining Powder
- Level \(13\): \(50\text{K}\) Gold & \(30\text{K}\) Refining Powder
- Level \(14\): \(50\text{K}\) Gold & \(30\text{K}\) Refining Powder
- Level \(15\): \(50\text{K}\) Gold & \(30\text{K}\) Refining Powder
- Total:
- \(30\) Draw Tickets
- \(150\text{K}\) Refining Powder
- 1 Tear of Goddess
- \(250\text{K}\) Gold
- \(30\)
- Level \(16\): \(50\text{K}\) Gold
- Level \(17\): \(50\text{K}\) Gold
- \(\dots\)
- Level \(1\): \(1000\) Event Currency
- Level \(2\): \(1100\) Event Currency
- Level \(3\): \(1200\) Event Currency
- Level \(4\): \(1300\) Event Currency
- \(\dots\)
Ranking
Since Fiend Hunter is a competitive PvE game mode, it features a ranking system.
Rankings are determined by the remaining Boss HP percentage, accurate up to \(0.01\%\), and rewards are distributed once the season is over.
Ranking Rewards
- Rank \(1\): \(5\) Draw Tickets & \(300\)
 Refining Crystals & "Victory! Marianne 4" sticker & Boss Gold Trophy
 - Rank \(2 - 10\): \(5\) Draw Tickets & \(300\) Refining Crystals & "Victory! Marianne 3" sticker & Boss Silver Trophy
- Rank \(11 - 100\): \(5\) Draw Tickets & \(300\) Refining Crystals & "Victory! Marianne 2" sticker & Boss Bronze Trophy
- Rank \(101 - 1000\): \(4\) Draw Tickets & \(300\) Refining Crystals & "Victory! Marianne 1" sticker & Boss Tarnished Bronze Trophy
- Rank \(101 -\) Top \(5\%\): \(3\) Draw Tickets & \(250\) Refining Crystals & "Victory! Marianne 1" sticker
- Top \(5.1\% - 10\%\): \(3\) Draw Tickets & \(200\) Refining Crystals
- Top \(10.1\% - 30\%\): \(3\) Draw Tickets & \(150\) Refining Crystals
- Top \(30.1\% - 50\%\): \(3\) Draw Tickets & \(100\) Refining Crystals
- Top \(50.1\% - 100\%\): \(3\) Draw Tickets & \(50\) Refining Crystals
Return and Break Seasons
Break Season
Whenever a bug is found that heavily impacts rankings, a Break Season is introduced in place of a normal one.
During Break Season, you will receive the rewards for the Rank 1 (except the sticker and trophy) regardless of your personal ranking as long as you participated in the Fiend Hunter at all.
You can spot a Break Season by checking in-game notifications or noticing the "Break Season" label within the Fiend Hunter menu itself.
Break Season

After some time, Return Season will be introduced, featuring the same Boss.
...Even if this is Break Season...
...you still should fight the Boss on a daily basis.
- You still get all resources from Clear Rewards.
- You also gain Event Currency that will not be obtainable during Return Season, so you will want to clear out the Event Shop.
Return Season
Return Season is a rerun of the Break Season after the bug fix.
There is no fixed amount of time between Break and Return Seasons. It also runs independently of the regular Fiend Hunter cycle. That means you should check Maintenance / Developer Notes for their schedule (if any).
Similar to Break Season, Return one also has a label in the menu. Additionally, you can access the rerun season via the Home Screen.
Return Season & Access Guide


Since this is a rerun, no Preparation Period is given; instead, it starts directly from Hunting Period and lasts for the entire duration of the current Fiend Hunter Boss's Preparation Period.
This ensures you do not have two Boss fights on a daily basis, but essentially forces you to attack different Bosses for three weeks straight (Hunting Period of the Boss №1 → Preparation Period of the Boss №2 & Hunting Period for Return Season → Hunting Period of the Boss №2).
Ban System
Since a Return Season happens later in the timeline, new costumes released in the interim could change the meta for that specific Boss.
To ensure fair play, a Ban System is introduced for Return Seasons.
Banned Costumes List During Return Season
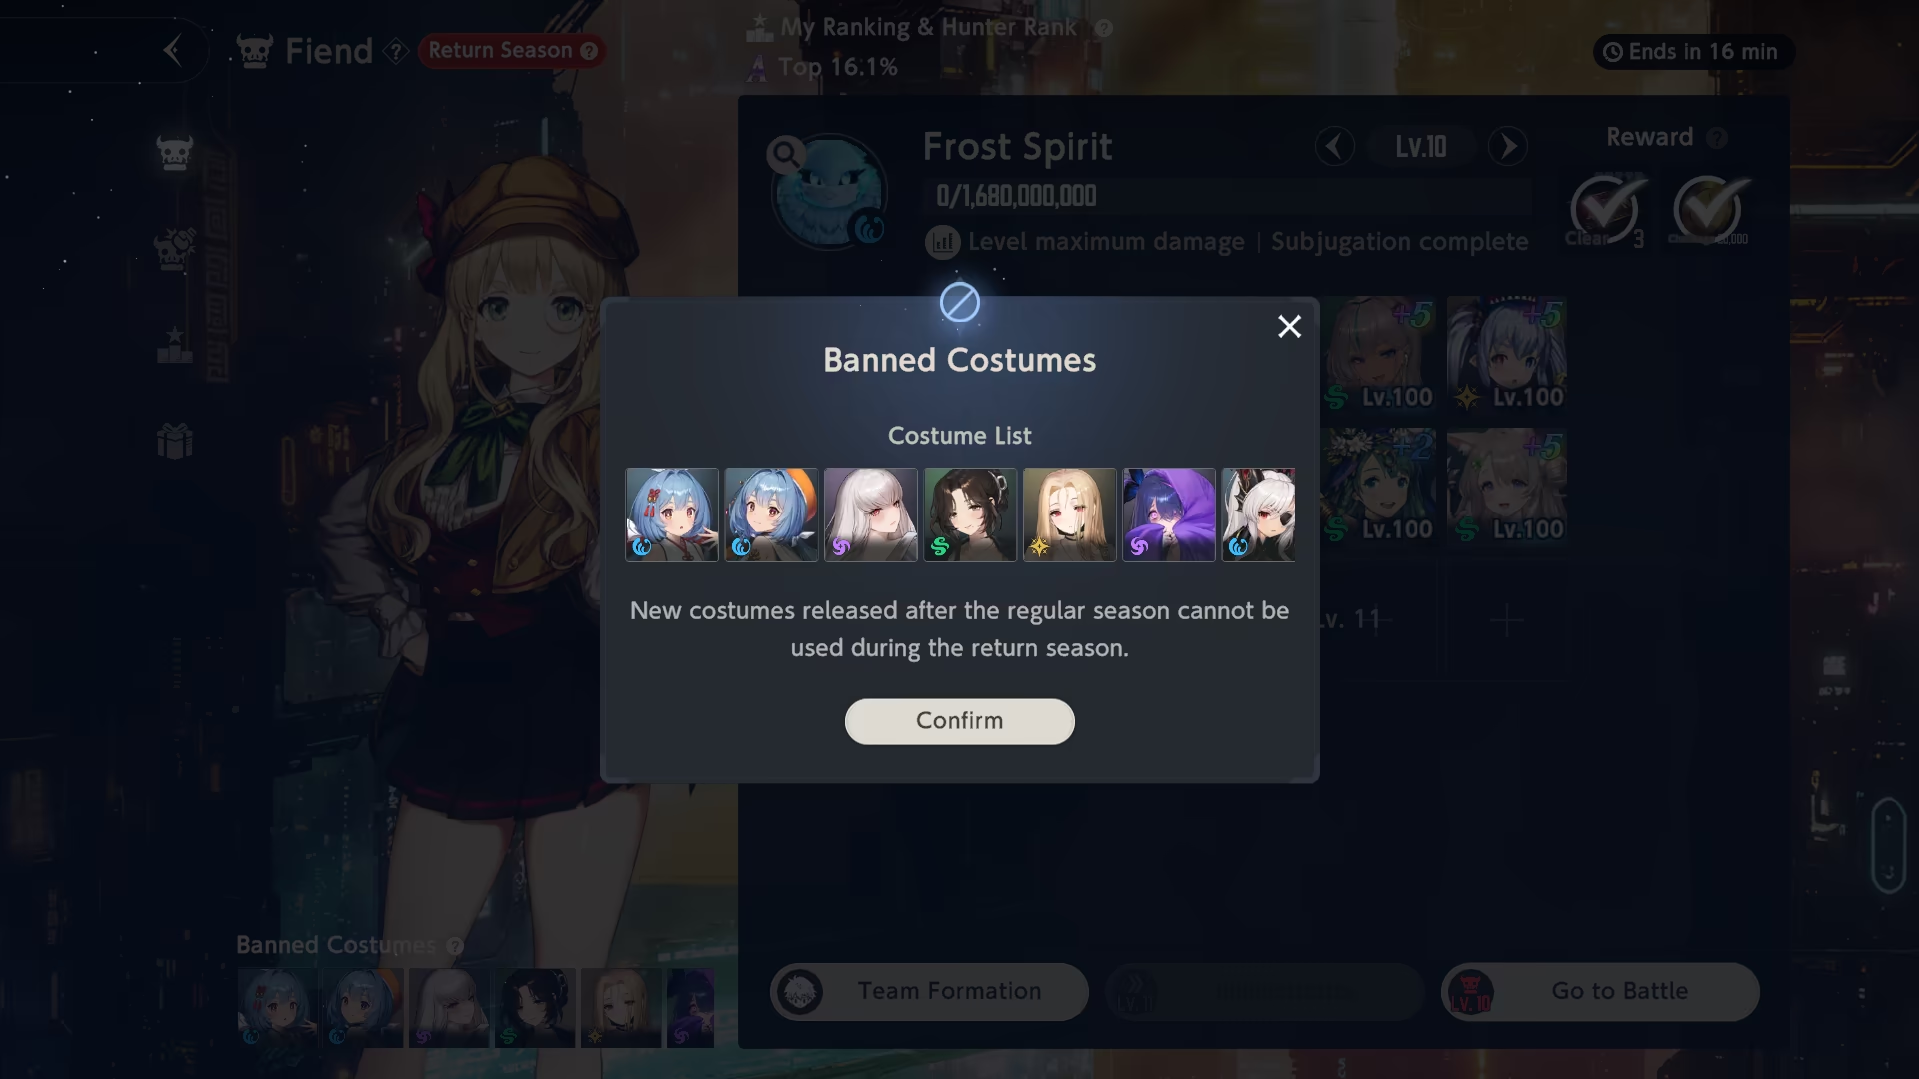
This system forbids using Companions (or individual Costumes) for the Boss.
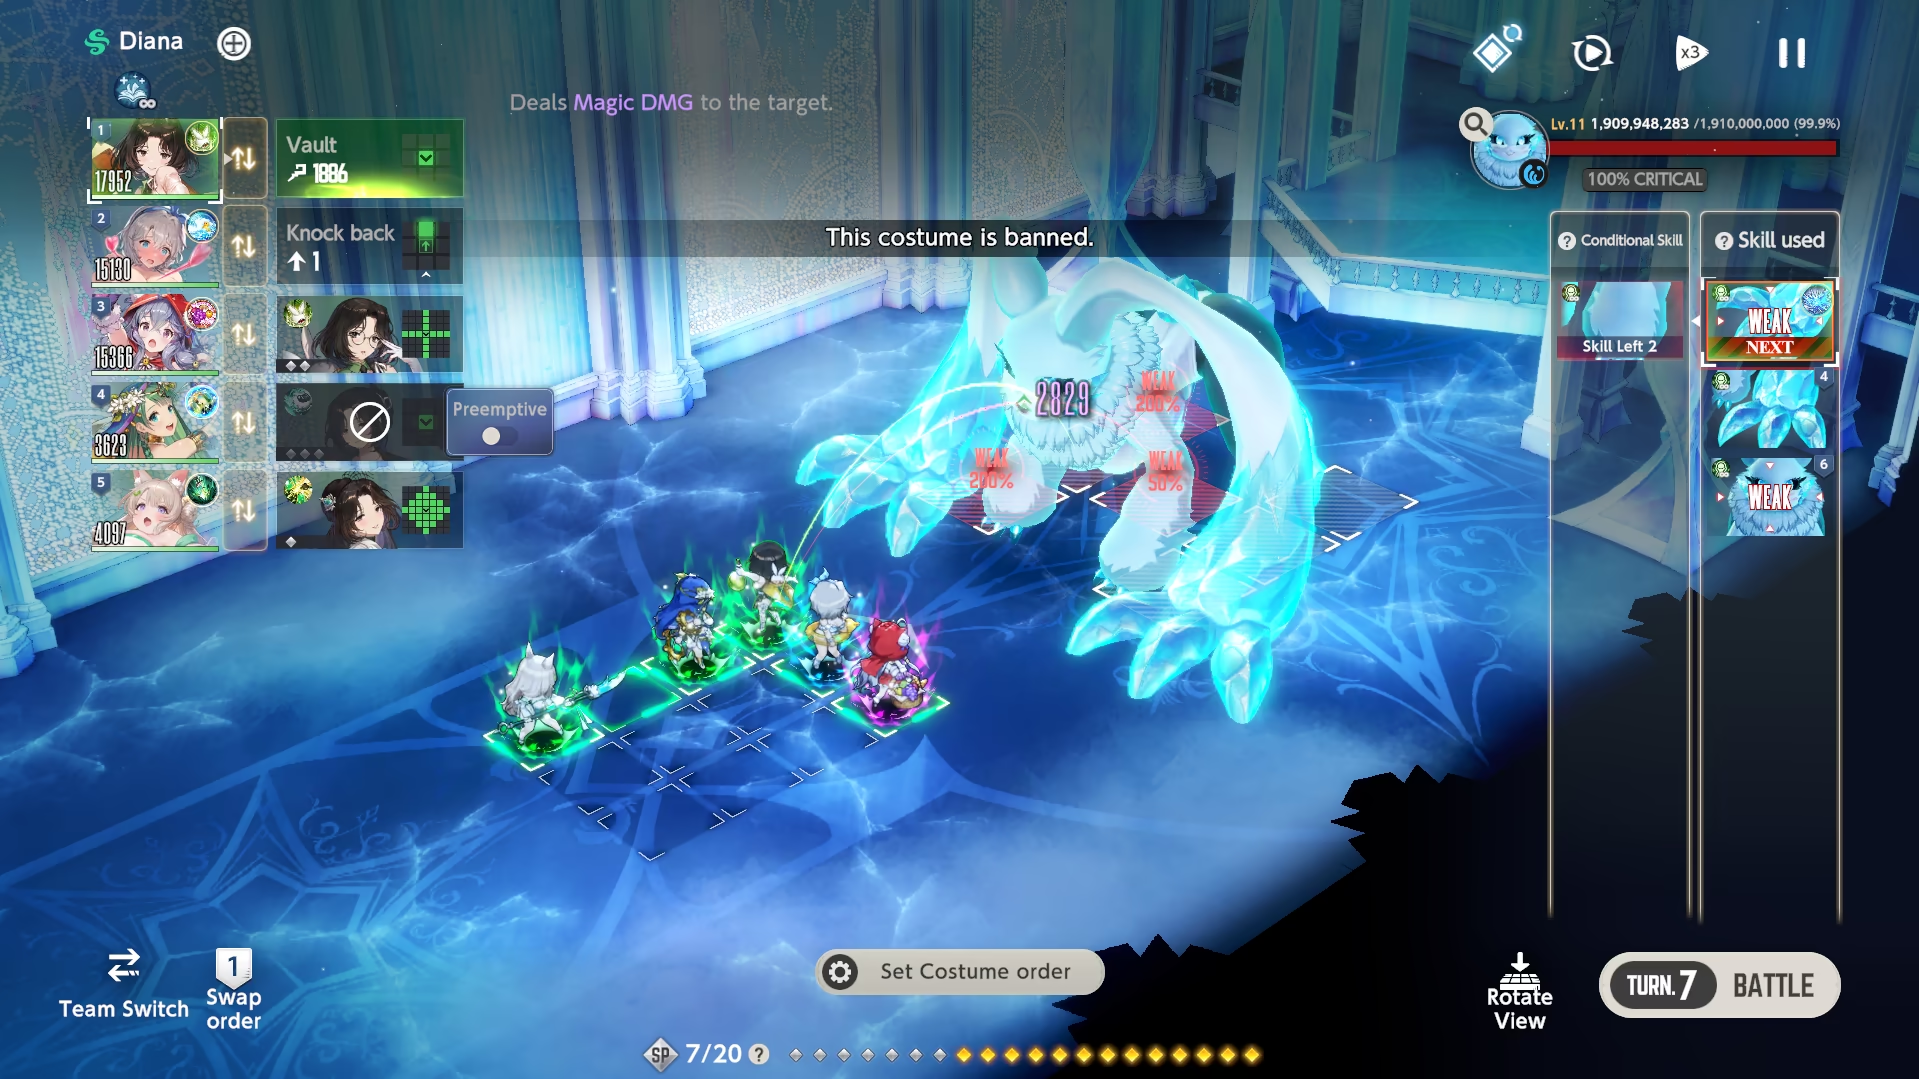
If all of a Companion's costumes are banned, they cannot be deployed for battle. Otherwise, if only one of their many Costumes is banned, you are allowed to deploy the Companion, but using the banned Costume will be prohibited.
Ban System in Action
...Even if this is a Return Season...
...you still should fight the Boss on a daily basis.
- You still get all resources from Clear Rewards, even if you claimed them during the Break Season.
Fiend Hunter Guide
Since figuring out the best strategy for Fiend Hunter can be tricky for the average player, you have a few options:
-
Option 1: Follow YouTube Guides
- Pod for more newbie-friendly clears;
- Shimonami しもなみ for more advanced clears.
-
Option 2: Follow Souseha's Database Templates
It acts as a sort of forum where players can share their clears for the specific Boss.
-
Option 3: Follow Arca Live Forum
This option is similar to the second; however, it is a Korean forum. Therefore, you should use a translator, but generally speaking, images do not need any translation.
-
Option 4: Check Official Discord Forum
If you are a part of the Official Brown Dust II Discord Community, you can visit #fiend-hunter-tips to find the guides from Pod and other players.
Related Links
- Brown Dust II Fiend Hunter Data by BotAn
- Fiend Season Calculator | Brown Dust II Database by Souseha
- Pod | YouTube
- Shimonami しもなみ | YouTube
- Formation Templates | Brown Dust II Database by Souseha
- Arca Live Forum
- Official Brown Dust II Discord