
Battle System
Brown Dust II is a turn-based strategy in which you can position your characters, as well as choose characters' skills to defeat the enemies.
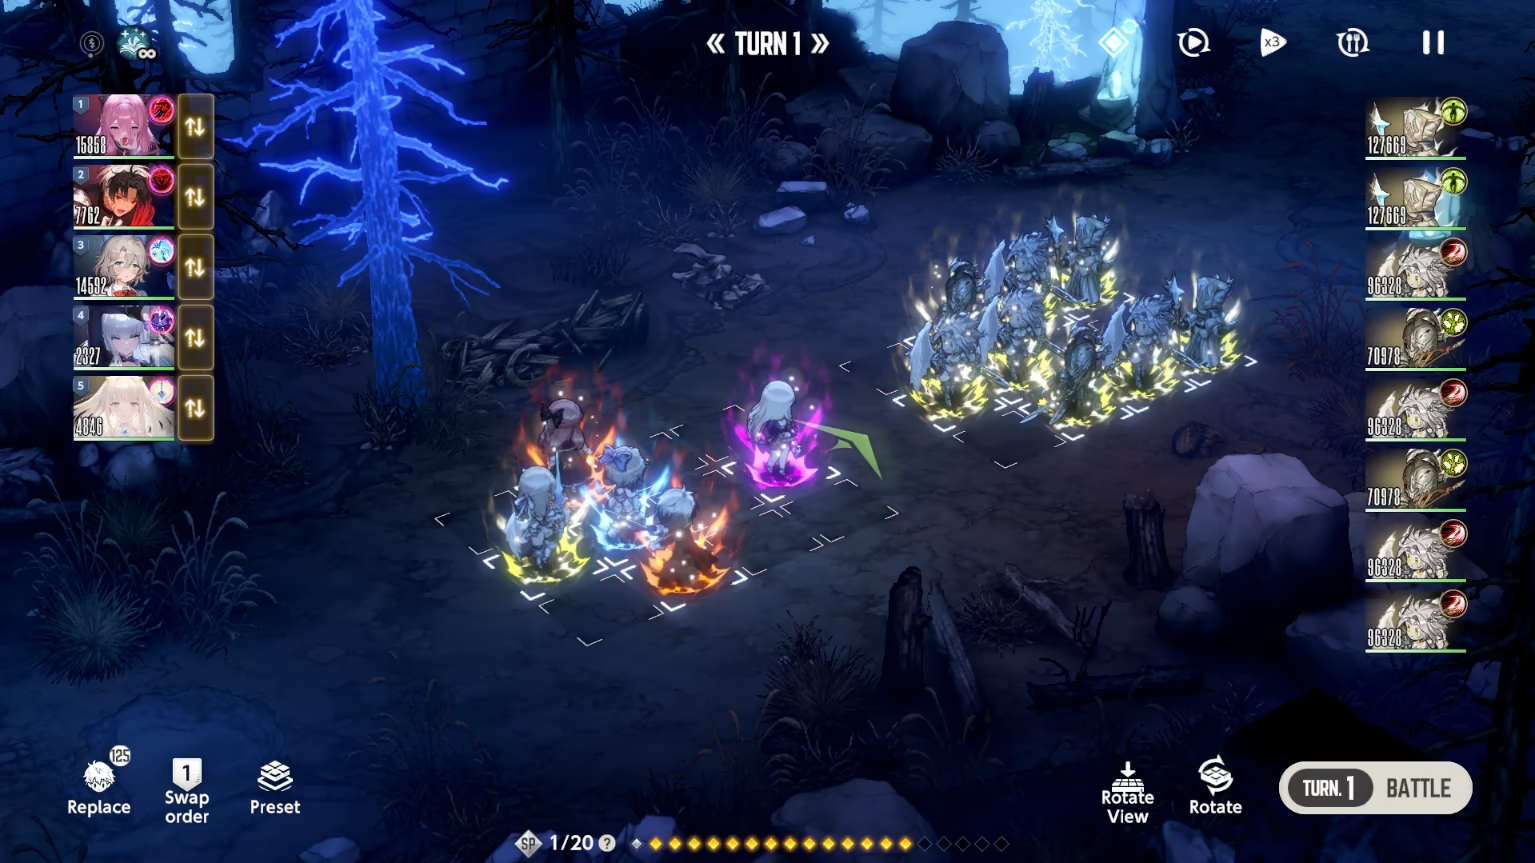
Basics
Turns mechanic
- For all PvE content, you attack on odd turns (1, 3, 5, ...), while enemy attacks on even turns (2, 4, 6, ...).
- During turns, you don't have to do anything; characters use skills automatically; all preparation (positioning, skill choices) must be made pre-turn.
- You can make those preparations only ** pre-turn **. Enemy turn is followed instantly after yours.
- Turn progression only goes after you confirm your choices with the "Turn X Battle" button in the bottom right corner of the battle screen.
Battlefield
Grid System
- In general content (such as Story or Evil Castle Towers), you can use 5 characters on the field.
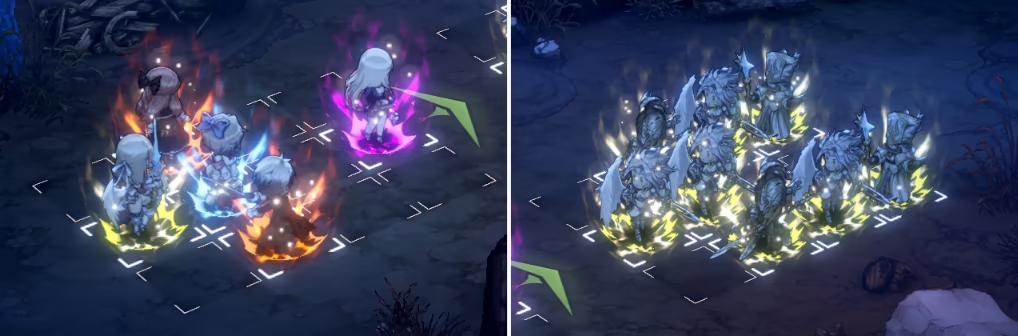
- The field is a 3x4 rectangular grid, in which you can place your characters however you like.
- To swap character positioning, click and drag the chibi model of a character to the needed tile.
Guild Raid offers 5x5 square grid and 7 characters per team.
Golden Colosseum, on the other hand, has a field changing depending on the season from 3x3 square to 5x5 square with different numbers of characters allowed.
3x4 Grid Image
Targeting Logic
Before understanding where your character's attack lands, you need to understand how the character targets the enemy.
- Each costume has its own Range — tiles that are affected by the action of the costume.
- For each costume (except supports with
 Range), there is Main Target which is displayed by
  down arrowhead.
Main target is the one that actually gets targeted by your character, and the rest of the AoE impact is calculated based on the position of that Main Target.
As for the Main Target, there are two main types of determining one.
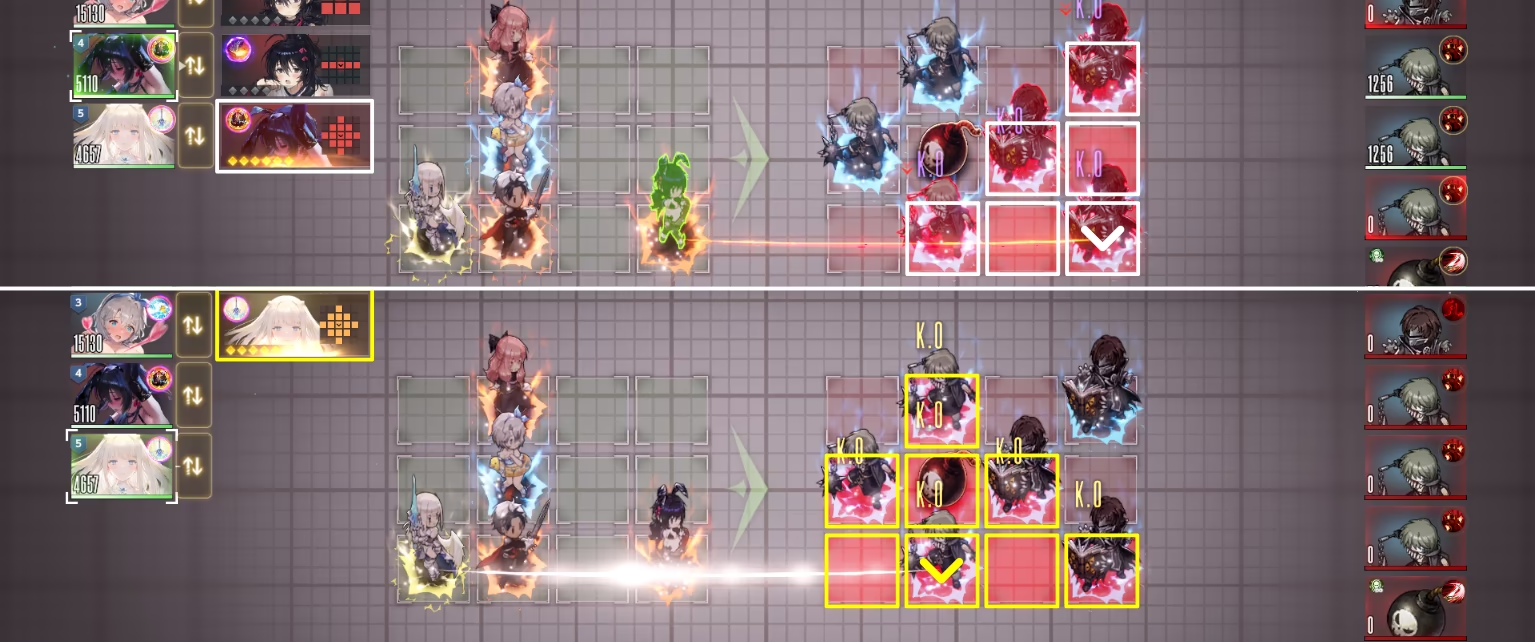
- First is Very Front, meaning your character will target the closest enemy in the same column.
- Second is Vault, meaning your character will target the second closest enemy in the same column, "vaulting" over the first one.
- If there's only one enemy in the column, it will be targeted instead.
You can check Target type and Costumes AoE either in the Companion tab or directly in the battle by clicking the character card.
Target type information in-battle

Very Front / Vault difference
Advanced Targeting Logic
There are a few ways one can change their targeting logic from the "normal" one.
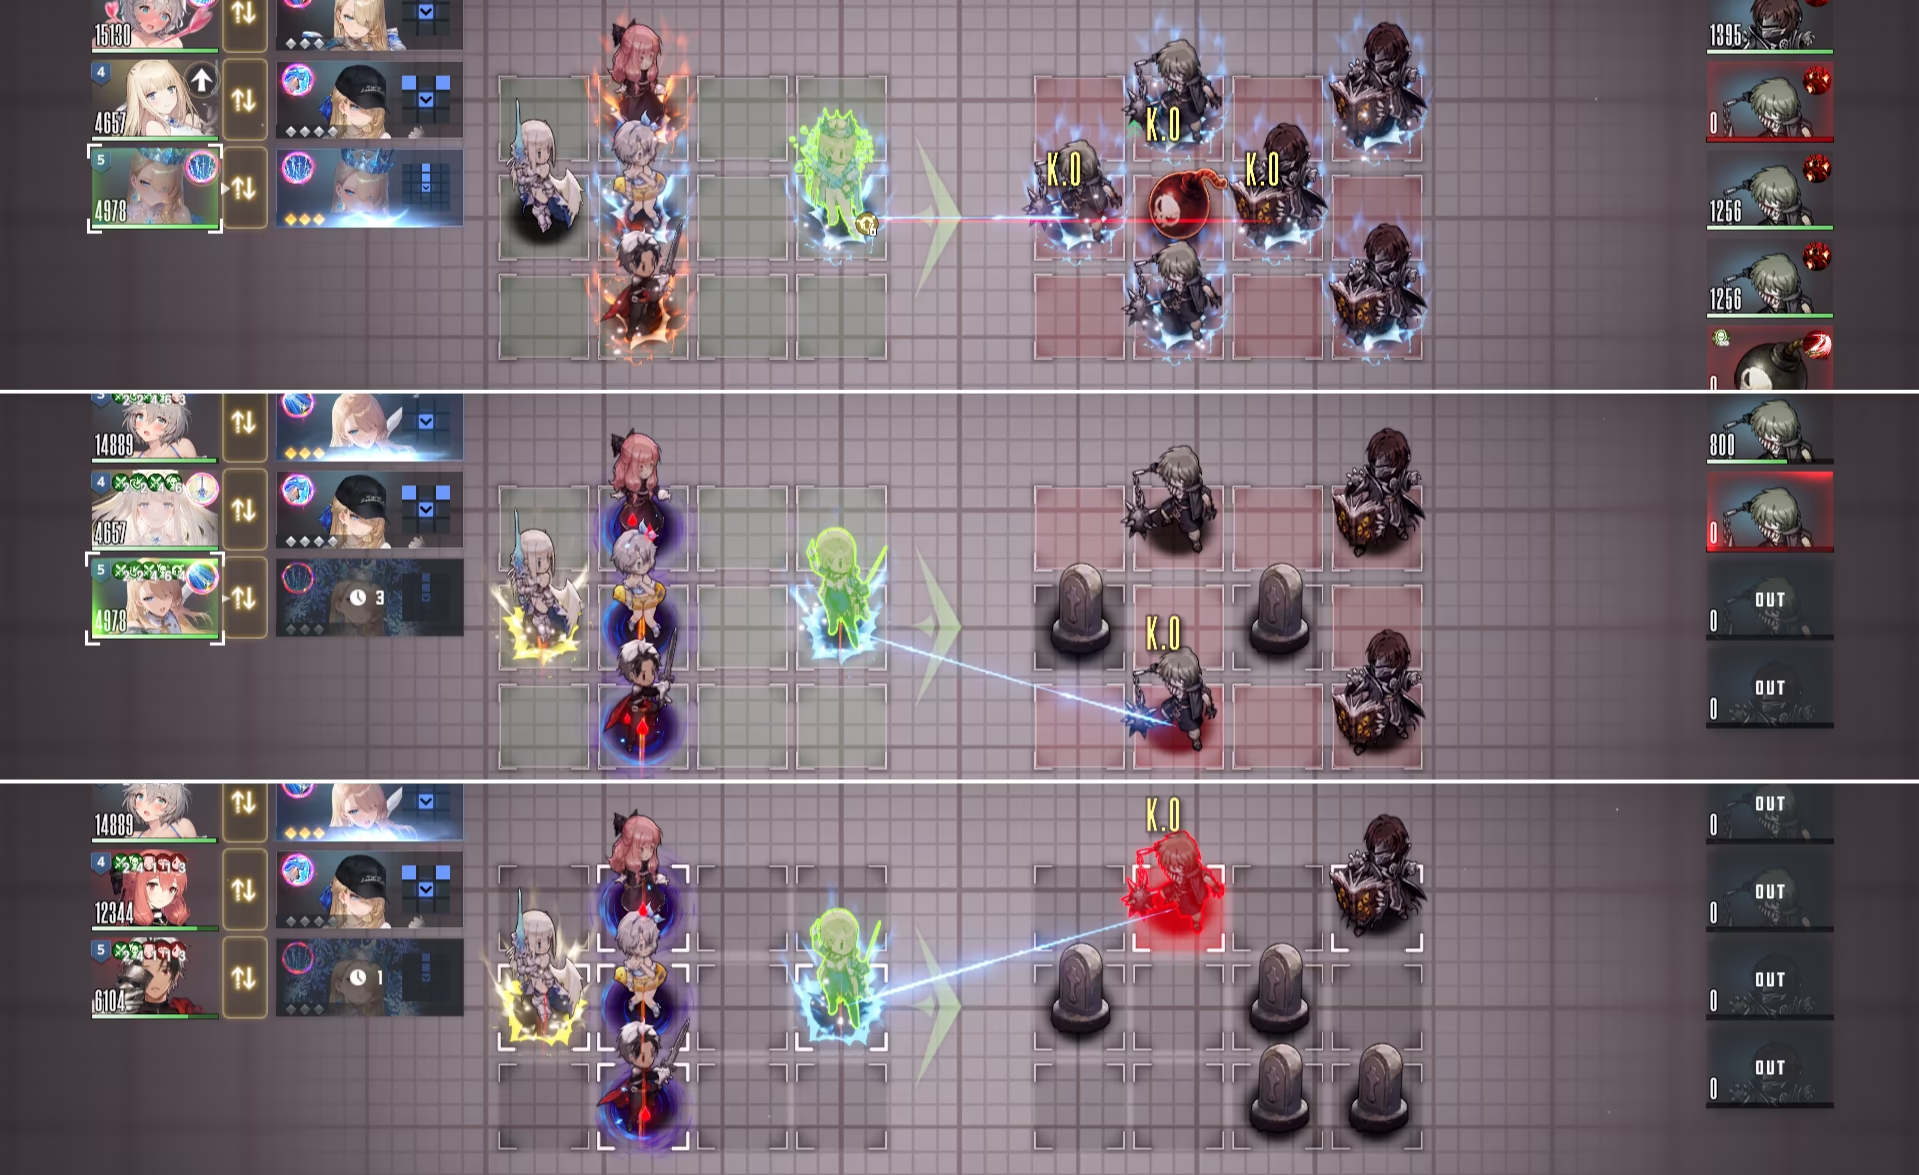
- Having Taunt or Concentrated Fire status effects makes you attack the enemy with that status effect regardless of your attack type (Very Front, Vault).
-
The Target Avoidance status effect makes your enemy not target your character if there are other options on the field.
-
If there is no enemy in the same column as your character, the column on the right (to the character) takes priority instead. Thus, it is possible to attack the enemy in the rightmost column from the leftmost one.
- If there is no enemy in the right column either, the left one takes priority.
Showcase Image
Damage Formula
\(\small\text{Damage} = \\\\ \text{\textcolor{ffe8aa}{ATK} [\textcolor{ffa6ff}{MATK} / \textcolor{orange}{HP}} \text{/ \textcolor{white}{Energy Guard}}]\\\\ \times \; \text{Skill\%} \\\\ \times \; (100\% + \text{\textcolor{ffe8aa}{ATK\%} Buffs} \times [100\% - \text{Pressure\%}] - \text{\textcolor{ffe8aa}{ATK\%} Debuffs}) \\\\ \times \; (100\% + \text{\textcolor{white}{CDMG\%}} + \text{\textcolor{white}{CDMG\%} Buffs} \times [100\% - \text{Pressure\%}] - \text{\textcolor{white}{CDMG\%} Debuffs} + 6 \times (\text{\textcolor{white}{Crit Rate\%}} - 100\%)) \\ \times \; (100\% + (10\% + \text{Increase Chain DMG\%}) \times \text{Chains}) \\\\ \times \; (100\% + \text{Target's Vulnerability Debuffs\%} + \text{DMG Increase\% Buffs}) \\\\ \times \; (100\% + \text{\textcolor{8A9A5B}{Property Damage\%}} + \text{Season Buff\%} + \text{\textcolor{8A9A5B}{Property Damage\%} Buffs} \times [100\% - \text{Pressure\%}]) \\\\ \times \; (100\% - (\text{Target's \textcolor{ffe8aa}{DEF\%}} + \text{Target's \textcolor{ffe8aa}{DEF\%} Buffs} \times [100\% - \text{Pressure\%}] - \text{Target's \textcolor{ffe8aa}{DEF\%} Debuffs})) \\\\ \times \; (100\% - \text{Target's DMG Reduction\% Buffs}) \\\\ \times \; (100\% - \text{Target's \textcolor{8A9A5B}{Property Resist\%}})\\\\ \times \; (100\% + \text{Weak Point\%}) \\\\ \times \; (100\% + \text{Support Bonus\%})\)
Chain Mechanic
Every time the enemy or boss tile is hit, 1 chain stack is applied. Chains increase damage by 10% for each chain stacked on the enemy (considering that base damage without any chains is 100%).
Chains are very important for content such as Fiend Hunter and Guild Raid.
- Poolside Guardian Zenith increases those 10% to a maximum of 20% for the single tile.
- Chains last for 1 turn and are reset after, except some seasons of Golden Colosseum.
- Chains have cap of 100, except Last Night.
- Chain increases are added to the same multiplier; thus, it is a buff with diminishing returns.
- Effect called Chain Reinforcement adds +1 chain per hit.
Example
- The Curse Celia without any buffs hits 7 times and provides 7 chains.
- The Curse Celia with buff from Masquerade Bunny Celia (1 Chain Reinforcement) provides 14 chains instead.
- The Curse Celia with buffs from Masquerade Bunny Celia and Pure White Blessing Refithea (2 Chain Reinforcement) provides 21 chains instead.
Team Setup
As said above, you can freely change the positioning of characters and their order before your turn. These are important features to maximize your damage while minimizing the enemy's.
- To change the position, drag the chibi model of a character to the desired tile.
- To change the order of characters, use the Swap Order feature, or it's quick
 shortcut
Why does it matter?
- Some supports have limited Range / Aura, meaning you need to fit other units within that range to receive buff (like Medical Club Teresse, Adventure of the Unknown Diana, Refithea)
- Enemy layout can require DPS on different columns for better AoE coverage.
- Enemies can be too strong for some characters to survive but fine for others within the same team.
- Usually supports should go before DPS to maximize your damage; however, not every support is just a support, meaning order sometimes is required to be changed.
- Some unique conditional abilities, such as Laid-Back Lifeguard Nebris, require fine-tuning the team order to receive better buffs.
In-Battle Information
In battle, you can obtain a lot of information about your units and enemies. Moreover, there are a lot of small QoL features which ease your understanding of the battle, as well as mechanics which may be useful for completing the stages overall.
Character / Enemy skills, stats and status effects
-
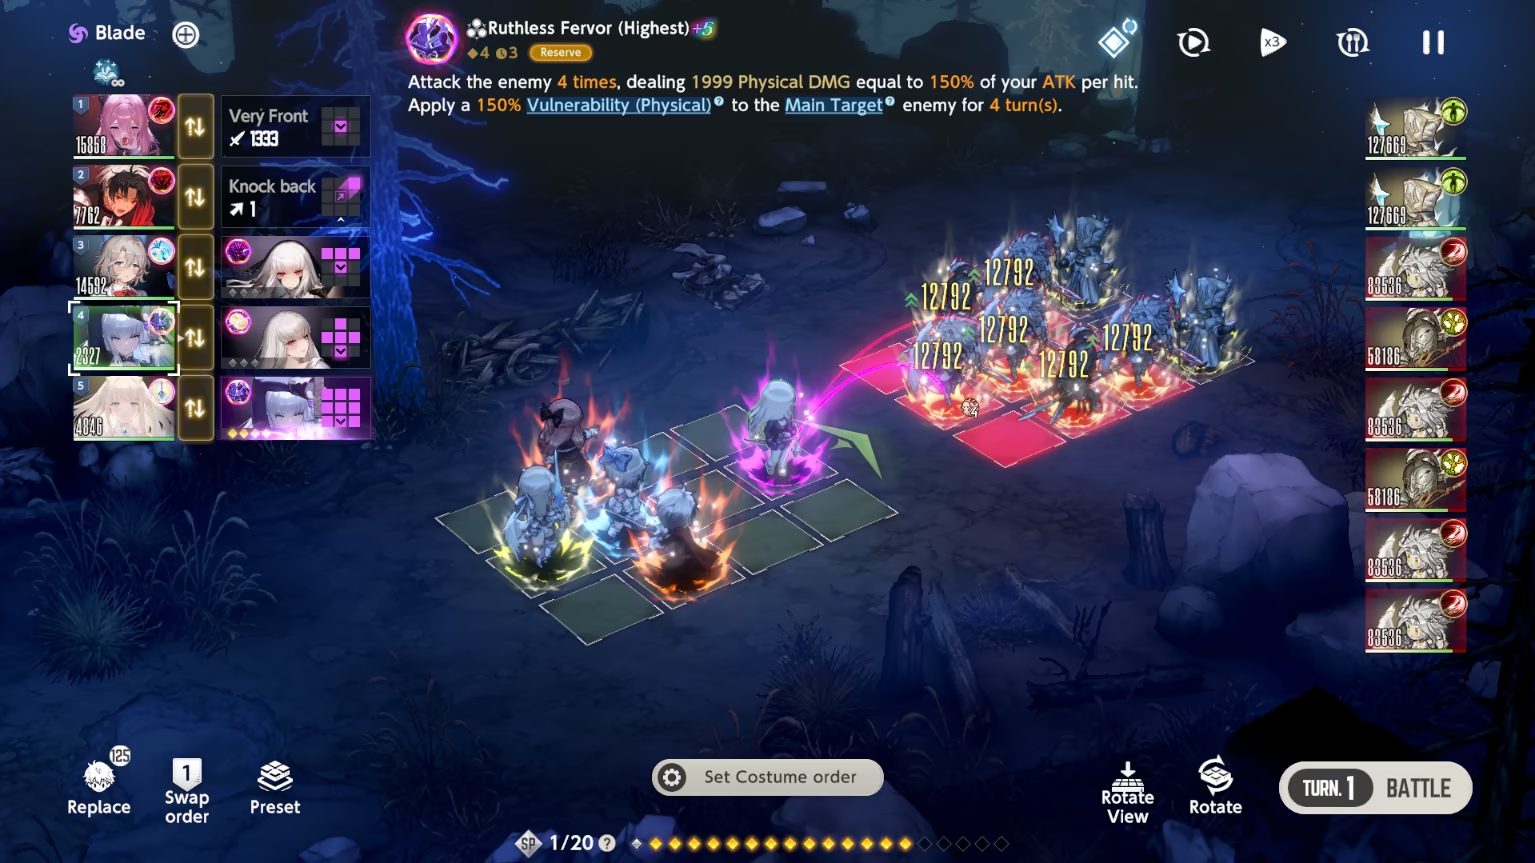
To access the information about skills, press on either chibi model or card, and press the skills under "Basic Attack" and "Knockback" options to learn more about them on top of the screen.
When you do so, you can view raw damage (with no calculated impact from actions in the turn) and highlighted area of effect on the field.- If, instead of damage, K.O is displayed, it means raw damage is enough to kill the opponent.
-
 Magic Damage is displayed in magenta color and
  Physical is displayed in yellow.
 -
This way, you can switch actions for your characters as well.
Skills screenshot
Skills Cooldown
Each costume has some cooldown, during which you cannot use it again. Cooldown for any costume is displayed in its description, and active cooldown is displayed in place of a costume button, covering it.
Image Display

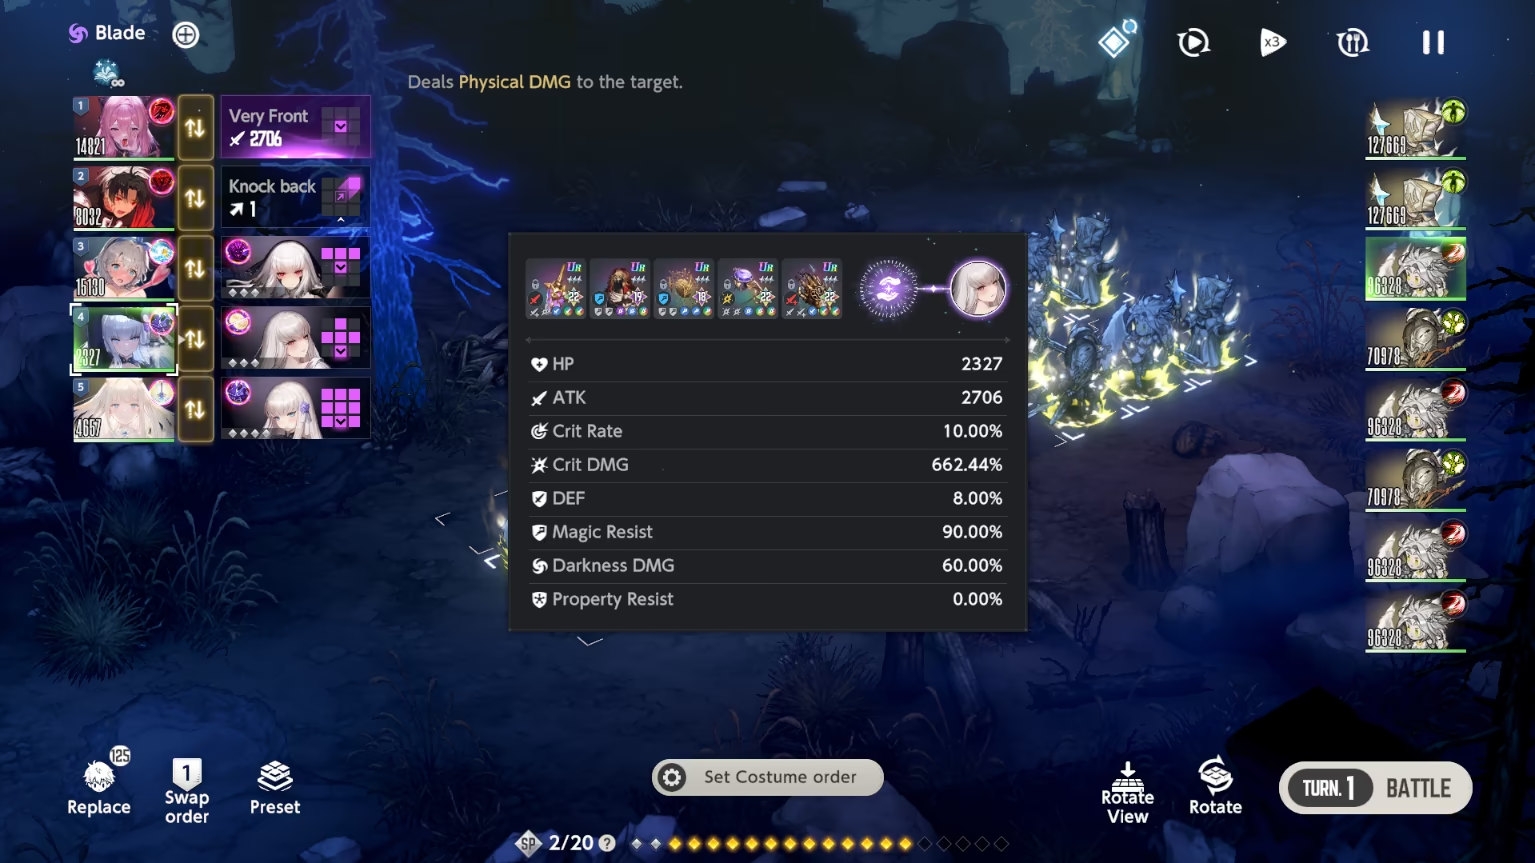
- To access the information about stats, press on the chibi / card, then press
 plus icon in the top corner of the screen (left for your units, right for enemies).
Displayed information includes all stats at the given moment (with all current buffs applied), gear and bond.
Stats screenshot
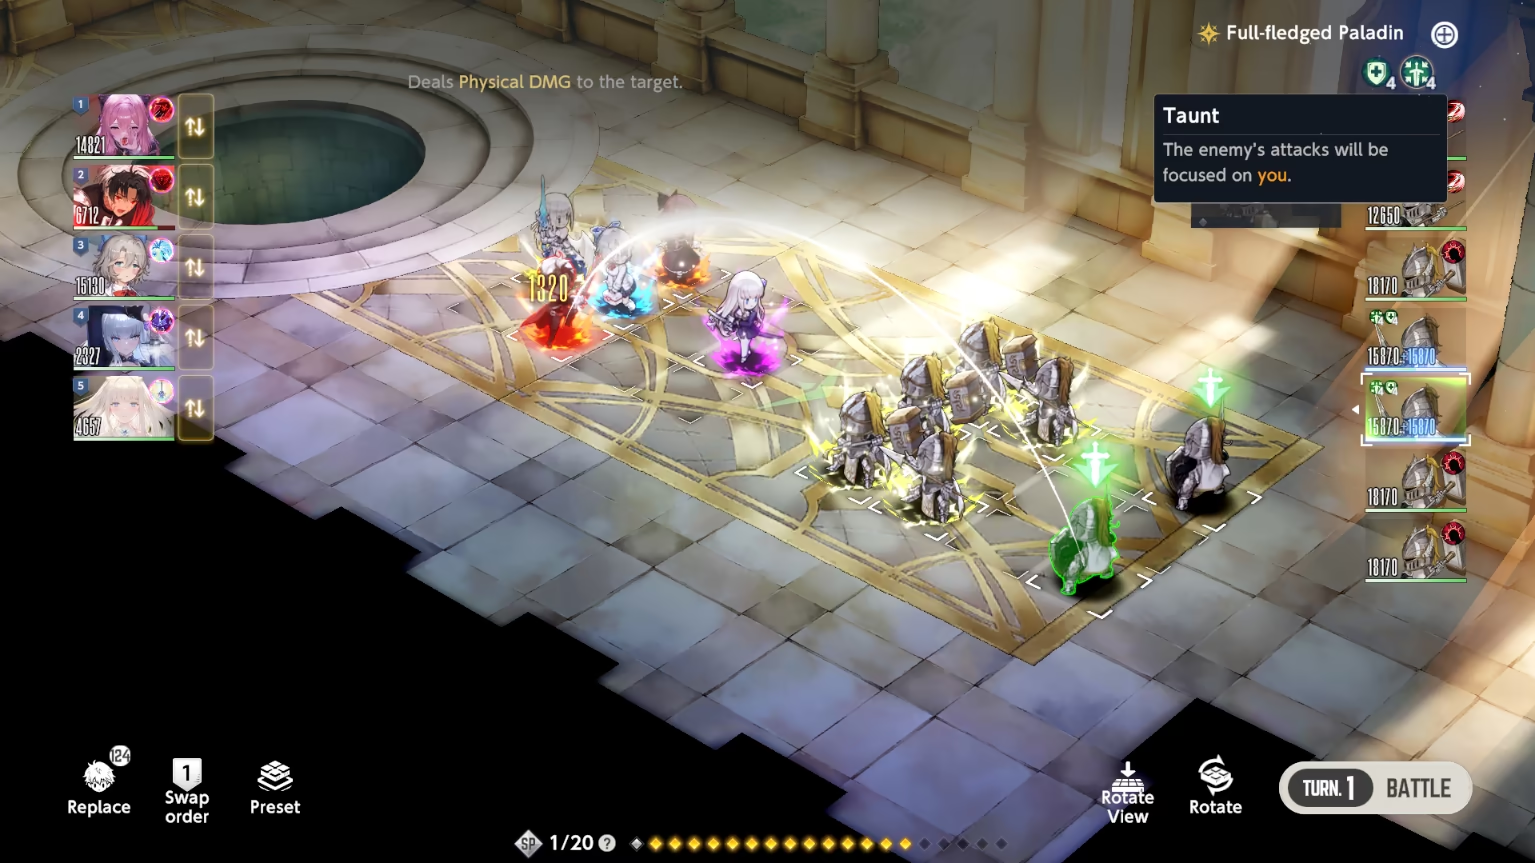
- To access the information about status effects, do the same thing except instead of clicking on the plus, click on the icons right below, such as
 (which is the Taunt effect) or others.
Status Effects screenshot
Property
Property is displayed in 3 ways.
- First, it is shown near character name as a icon (
 Water,
  Fire,
Fire,  Wind,
Wind,  Light,
  Darkness and
  Neutral).
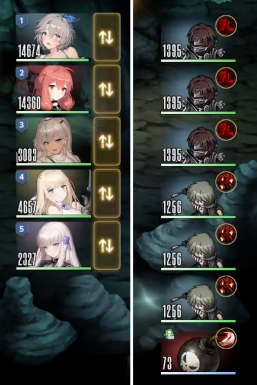
 - Second, it is displayed as a light tint on the character's card. According to the property, the tint is changed to resemble the main color of the property.
Tint display: All 5 properties on our side and Water & Fire on the enemy
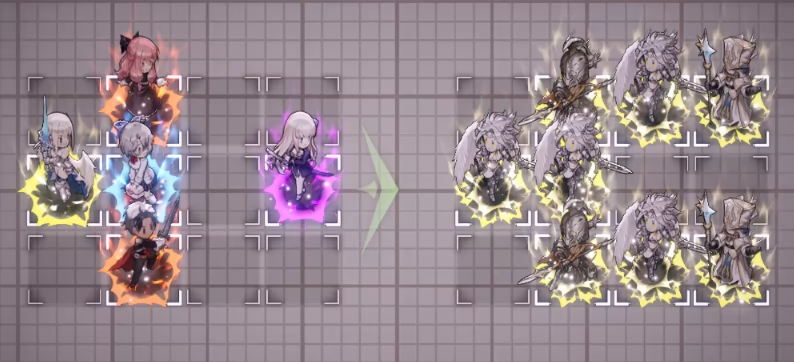
- Third, it is displayed as glow under character / enemy whenever they are going to use the ability (skill). Similar to tint in cards, this glow also changes the color depending on property, but is brighter in a sense.
Glow display: Light, Water, Fire and Darkness
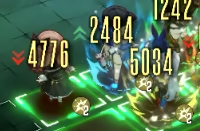
- Property advantage / disadvantage also is displayed during skill / damage preview, and are shown as
 and
and  accordingly. If you have neither advantage nor disadvantage, no icon will show up, similar to attacking a neutral character.
Advantage, disadvantage and basic damage display
Knockback
Knockback is one of the possible actions for a character for a turn. It exists in some skills, but, generally speaking, every character has a knockback option regardless. It allows you to move an enemy on the battlefield to create a more comfortable setup for your DPS.
There are a few rules to it:
- Each character has different knockback for 1 tile and applied to 1 enemy. Furthermore, there are some costumes that can target more enemies or have a bigger distance.
- Knockback always deals 1 DMG to the Main Target no matter the buffs applied.
- If the tile to which you try to knockback into is occupied by an enemy or tombstone, knockback will not take effect.
- If the basic knockback results in an enemy colliding with another, the latter one receives damage equal to 25% Max HP of knocked back enemy. Different costumes that utilize knockback will have greater numbers.
- Knockback shares the same damage type as character; meaning, Diana will have Magical Damage from knockback, and Teresse will have Physical Damage.
- Knockback damage (for the one bumped INTO) is affected by Crit (Rate / DMG), Property (dis)advantage (DMG / Resist), DEF/MRES, Augmentation / Enemy Vulnerability, Chains and Weak Point bonuses.
- Knockback damage (for the one bumped INTO), as any other HP-related skill, has 50k cap taken before applying any other buffs. Means, if a knocked-back enemy's HP is 2,000,000, only 50k will be taken into calculations instead of the expected 2m.
- Knockback adds Chain to main target, similar to basic attack, although the one bumped into DOES NOT receive a chain stack.
- Knockback damage (for the one bumped INTO) cannot be evaded. However, Main Target with Evade active cannot be knocked back.
- In Fiend Hunter / Guild Raid, you cannot knock back (move) boss tiles. Also, some enemies have knockback immunity, which negates knockback action on them completely.
- Attempts to knock back an enemy out of grid (out of bounds) will have no effect.
Knockback showcase
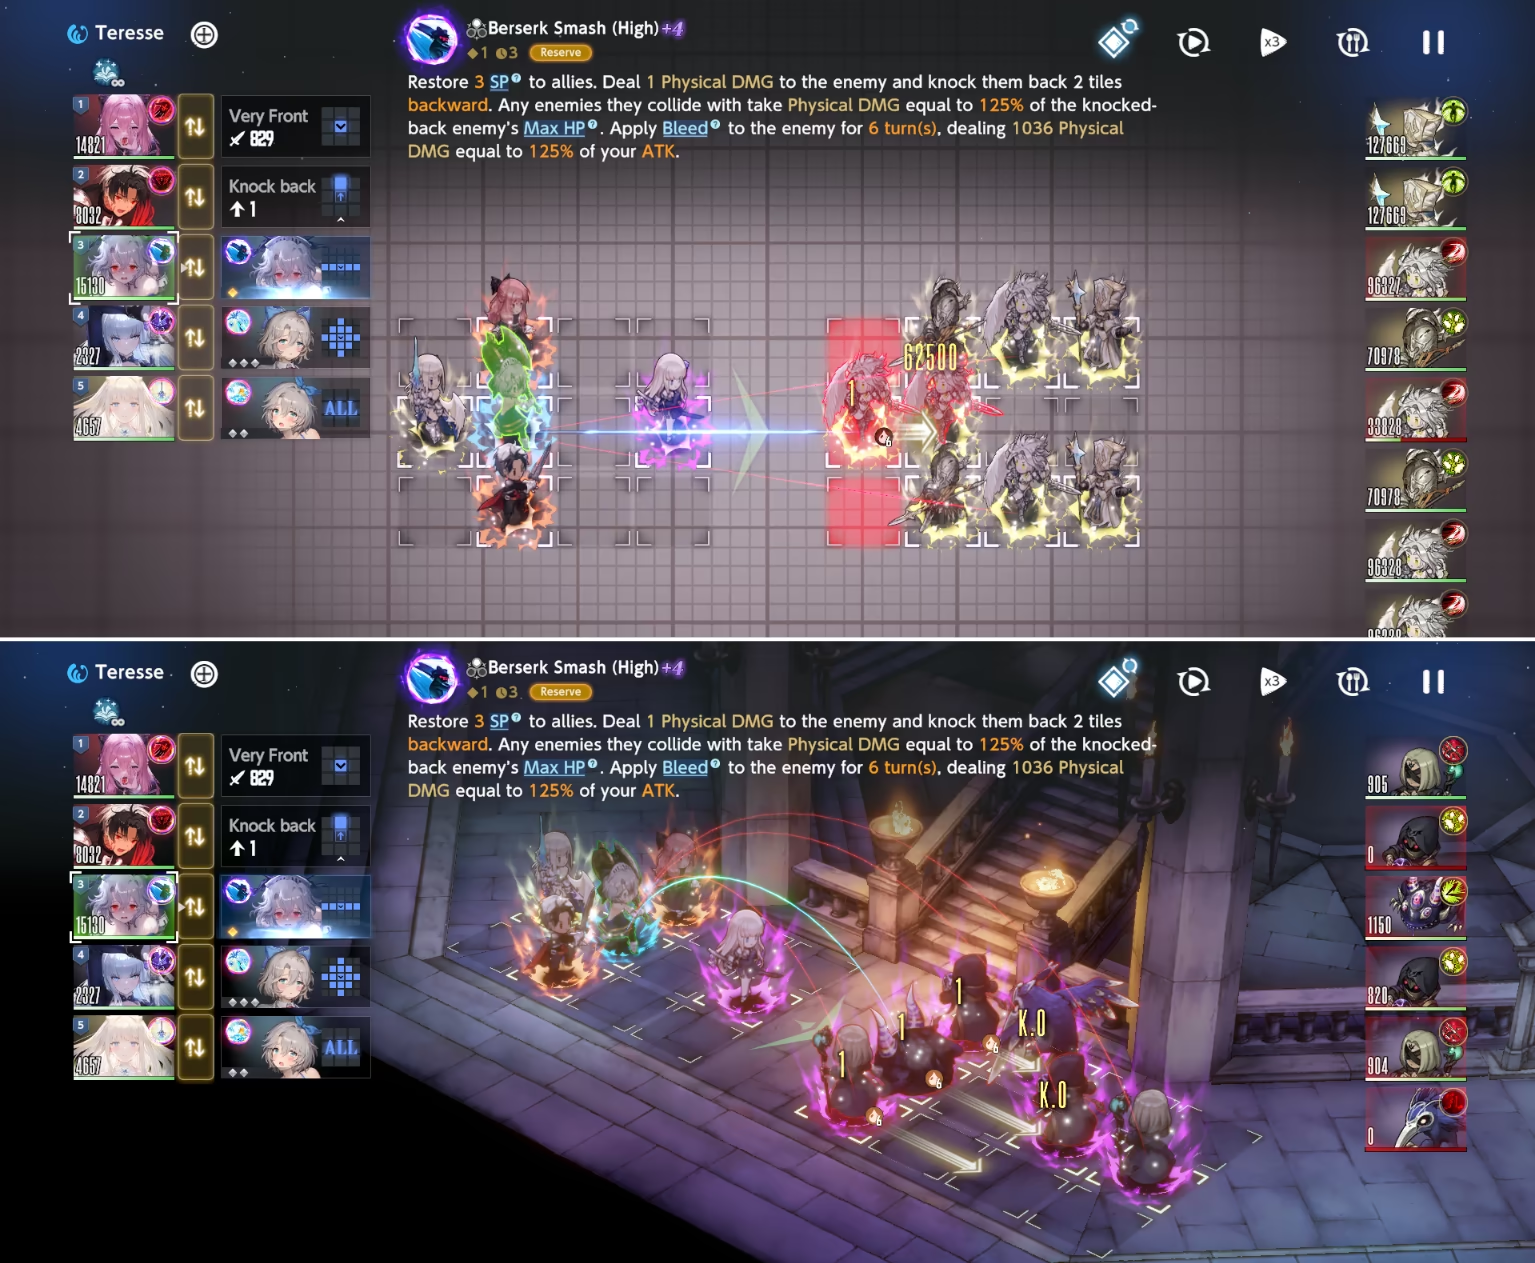
Knockback damage
62,500 damage in the first image is shown due to the cap of 50k HP, mentioned above, multiplied by 125% (Teresse Skill %).
\(50 000 \times 1.25 = 62 500\)
Targeting Lines
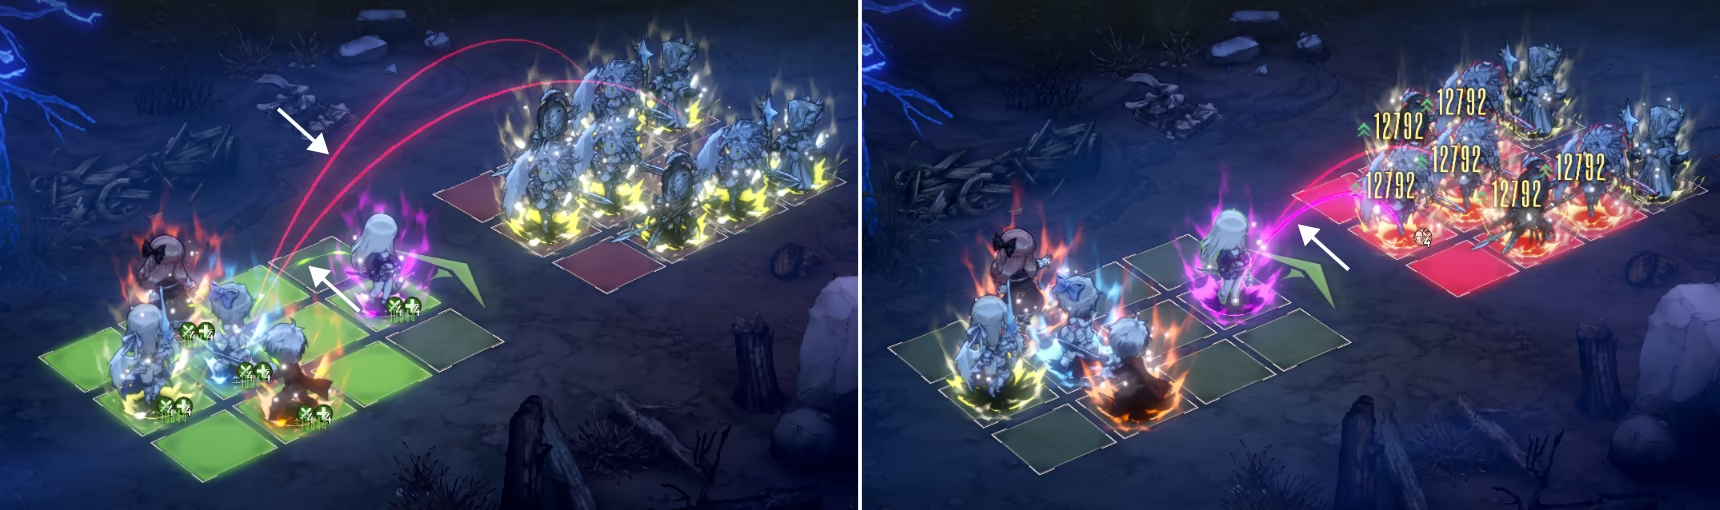
Pretty small and slightly underappreciated feature that tells you who is given character targets and by whom they are targeted.
- Green lines are related to actions from teammates / your characters, aka supports.
- Red lines are related to enemies who will hit your character with their skill in the following round
- Colorful lines are related to main target of an attack. Their color depends on the property (see above).
Targeting Lines display
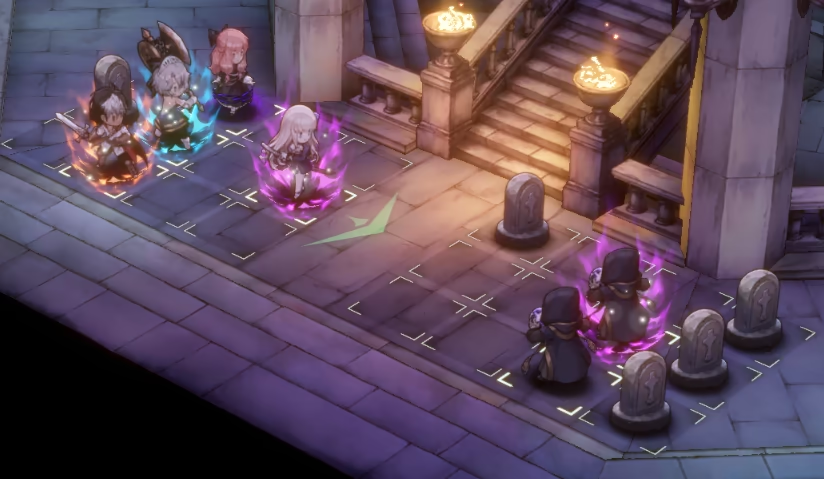
Tombstones
A tombstone is created when a character on the field dies (becomes fatigued) in the place of that character.
- Tombstones are created only for initial units on the battlefield. That means that summons do not create tombstones.
- The only exception to this rule is explosives, which do not leave a tombstone upon being destroyed.
- Self-destruct skills, as well as death from counter, create the tombstone at the place where the character was last pre-action.
- Tombstones cannot be knocked back.
- Tombstones prevent enemies from passing through them (with knockback skills)
- Tombstones do not suffer damage/deal damage to knocked enemies.
Tombstones on the field
Battle UI

Environmental Effects
This icon itself does not mean anything, but next to this icon, all environmental effects are listed. They can be (but are not limited to):
 Collection Bonus
 Death Time Effect
 Evil Castle Environmental effects
Auto Burst
This feature automatically enables the Burst for your Costumes.
- It prioritizes Costume activation over Burst, meaning if there is a lack of SP, Burst will not be activated.
- If a few Costumes have Burst, it will prioritise activation of the first in the order. Meaning, supports have higher priority in Burst activation over DPS.
To reselect Burst choice, simply click on the character and use arrows to remove the Burst.
Auto Skill
This feature automatically picks the costume to activate in the following turn.
- It tries to activate costumes in order of characters in a team (from first to the last).
- It also tries to activate costumes shown in Companion / Pre-battle screens first, meaning it will keep turn 1 settings almost every time.
- If you do not have enough SP, the skill (costume) will not be picked.
- If you do have SP but for a cheaper costume only, that costume will be picked instead.
To reselect costume choice, simply click on the character and choose a different costume.
Overall, this feature is considered to be a time-saver, since setting up skills yourself is a much bigger hustle. Aside from that, it is a flexible feature which doesn't lock your selected skill order, so you should have no issues.
Auto Battle Feature
This feature allows you to complete battles automatically.
- It locks your input from the battle completely, so in case you want to change anything, you must disable auto-battle first.
- It uses initial positioning, Auto Skill, and Auto Burst Feature.
- It has a small countdown before launching the battle.
It is NOT recommended to use Auto Battle, because
- It takes longer than actually just pressing the battle button with no preparation
- It does not care about the enemy and positioning, meaning you will likely run into issues sooner or later.
- Auto Battle does not teach you how to be a good player.
Game Speed Feature
With that button, you can change the speed your battles are going at.
Minimum is x1, maximum is x3.
To switch, simply press the button a few times.
Autofeed Feature
This feature allows you to heal minor damage by consuming cooked (and raw) food
While it sounds good on paper and no longer requires people to go to the Inn, it is simply not worth the result.
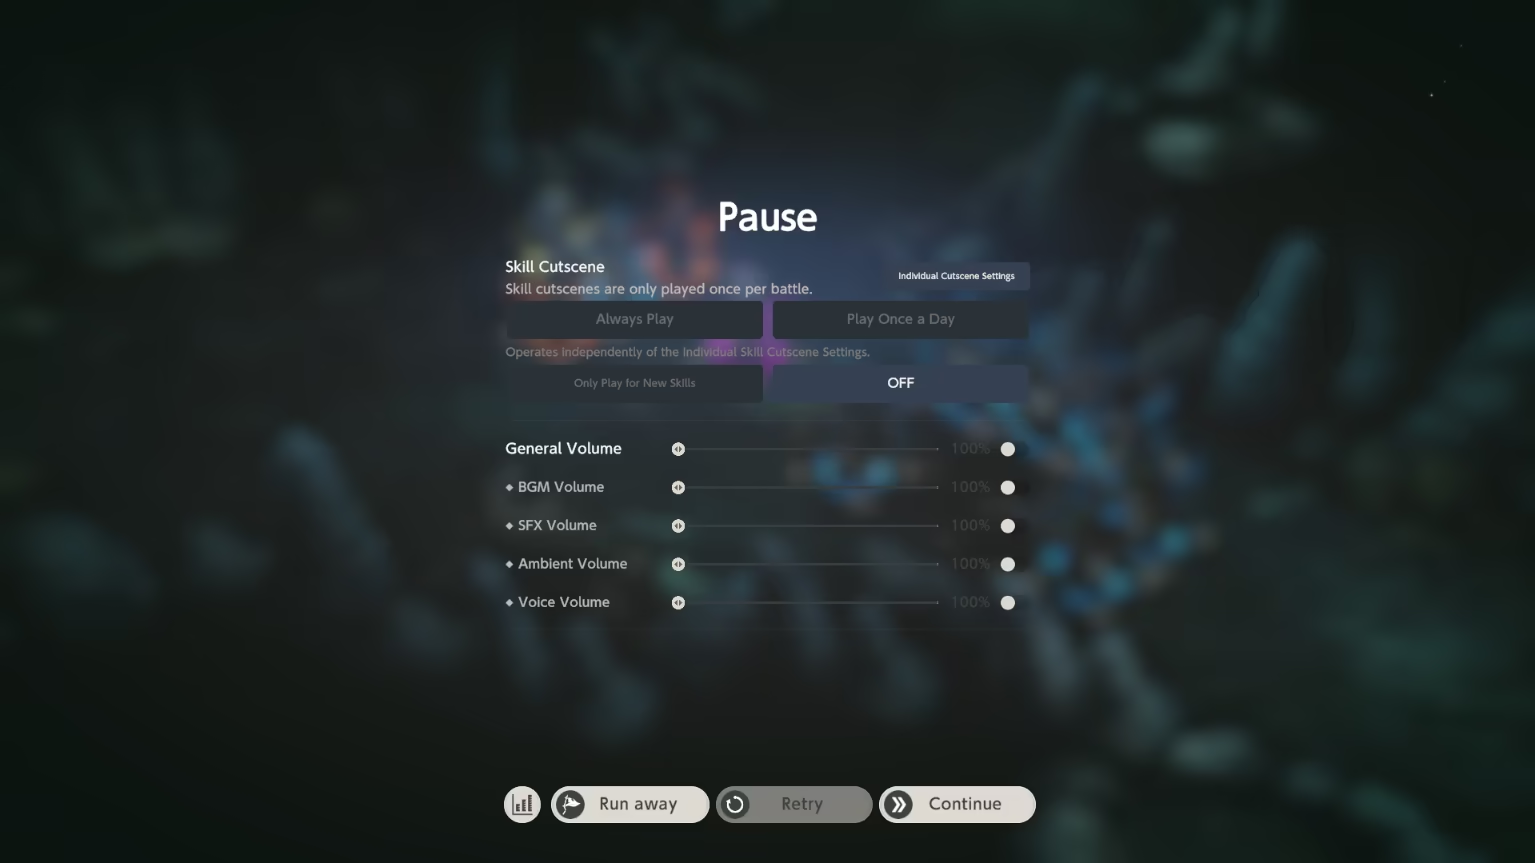
Pause Feature
Quite a self-explanatory feature allowing you to pause during your battle.
Here, you can:
- Adjust Skill cutscenes display
- Change Volume settings
- Check
 Battle Statistics
 - Restart the battle or previous turn
- You cannot rollback to previous turn in Tower of Salvation.
- Run away from the battle.
Pause Menu Image

Replace Feature
Feature allowing you to replace your characters during battle preparation.
To replace a character, pick it from the list and tap on the character you want to replace.
Image Guide
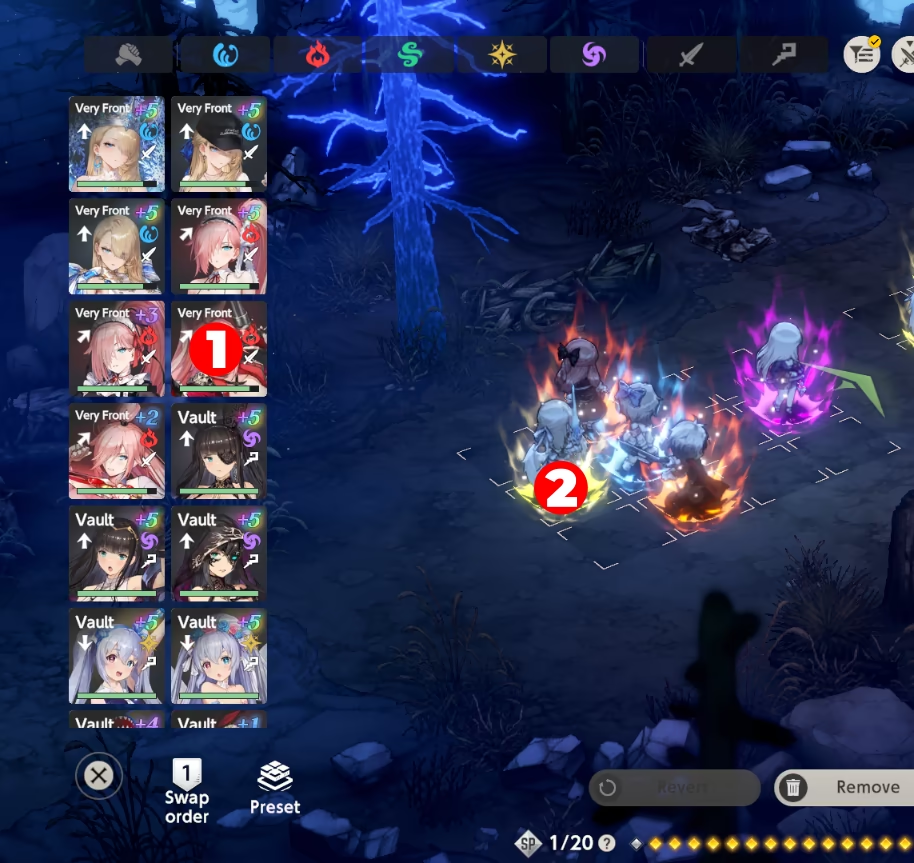
- You can filter characters to find the needed ones faster by using Property Filter on top or the filter button on the top as well.
- In case you need specific knockback, you can check it via icon (
 ) on each character.
 - You can also add characters instead of replacing in case you do not have the maximum amount in the field. In this case, click on an empty grid cell with the chosen character to place them.
- You cannot replace characters on Turn 3 onwards, except Tower of Salvation.
Borrow Feature
In some fights, you can use your Friend Support units to help you beat the fight.
The idea is completely the same, except for pressing one more button ( ).
).
Image Guide
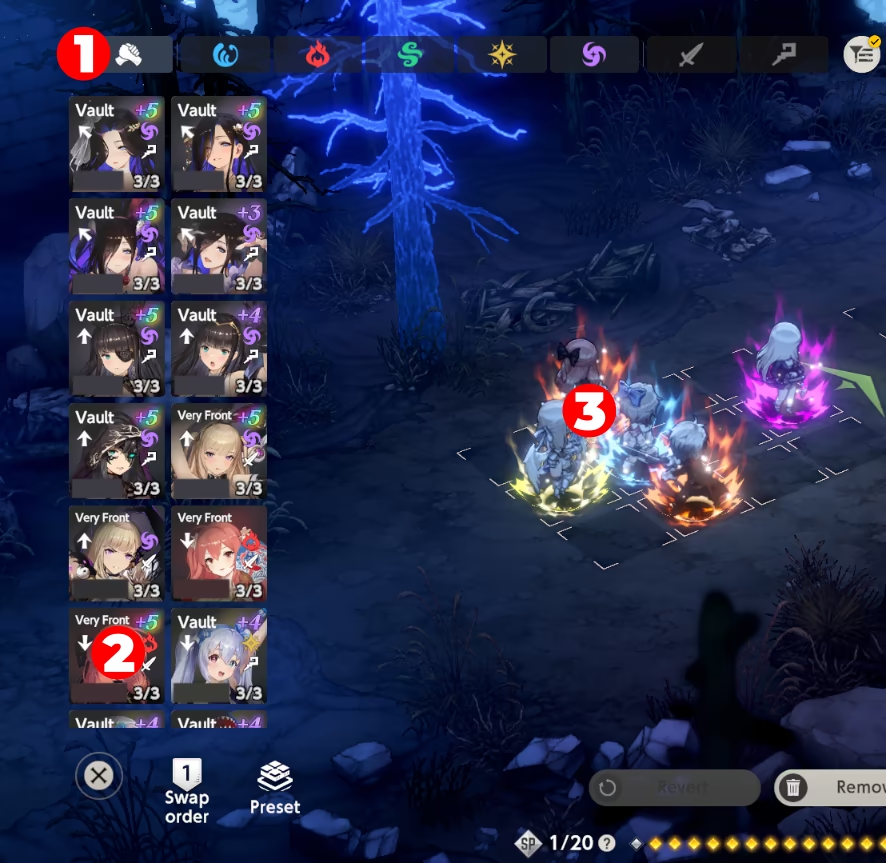
- Borrow is limited to 3 borrows per day per friend. That means if you have maximum friends (30), you can borrow up to 90 times per day.
- Borrow is available in:
- Normal Difficulty, Hard Difficulty, NPC Quests of Story Packs
- Hard Difficulty of Character & Event Packs
- Normal & Challenge Battles in Season Events
- Hunting Grounds & Path of Adventure Content Pack battles.
- You cannot have two of the same character on a team.
- You can borrow only 1 character per fight.
Swap Order Feature
This feature allows you to adjust the order in which your characters act.
It has 2 modes:  Insert and
  Replace.
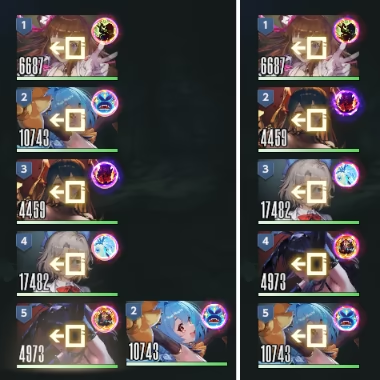
- Insert mode allows you to alter your order by inserting a desired character in a sequence. To do that, drag a character onto others.
- If you drag from bottom to top, you will put the chosen character before the character you drag onto.
Image Guide
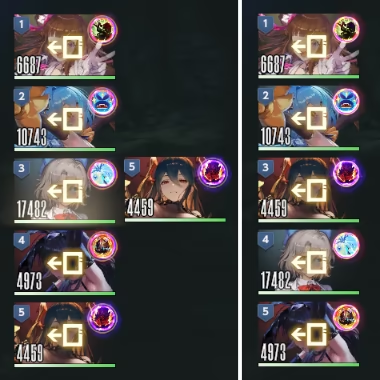
- If you drag from top to bottom, you will put the chosen character after the character you drag onto.
Image Guide
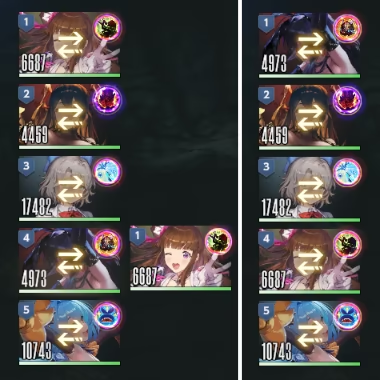
- Replace mode allows you to change the order of 2 costumes.
To do that, simply drag a character onto another to switch the order.
Image Guide
Replace Shortcut
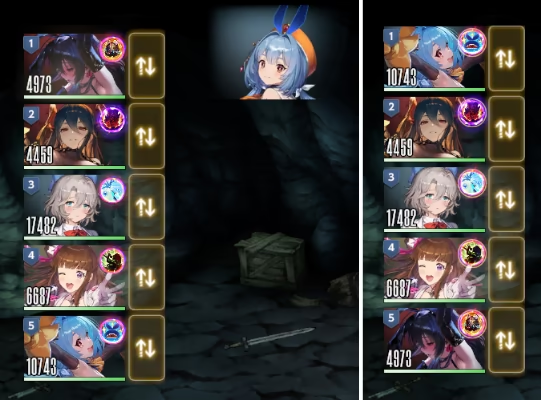
 To save time, you can access the Replace feature from the main battle menu via the icon next to the right of the character cards.
It functions completely identically to the feature explained above.
Image Guide
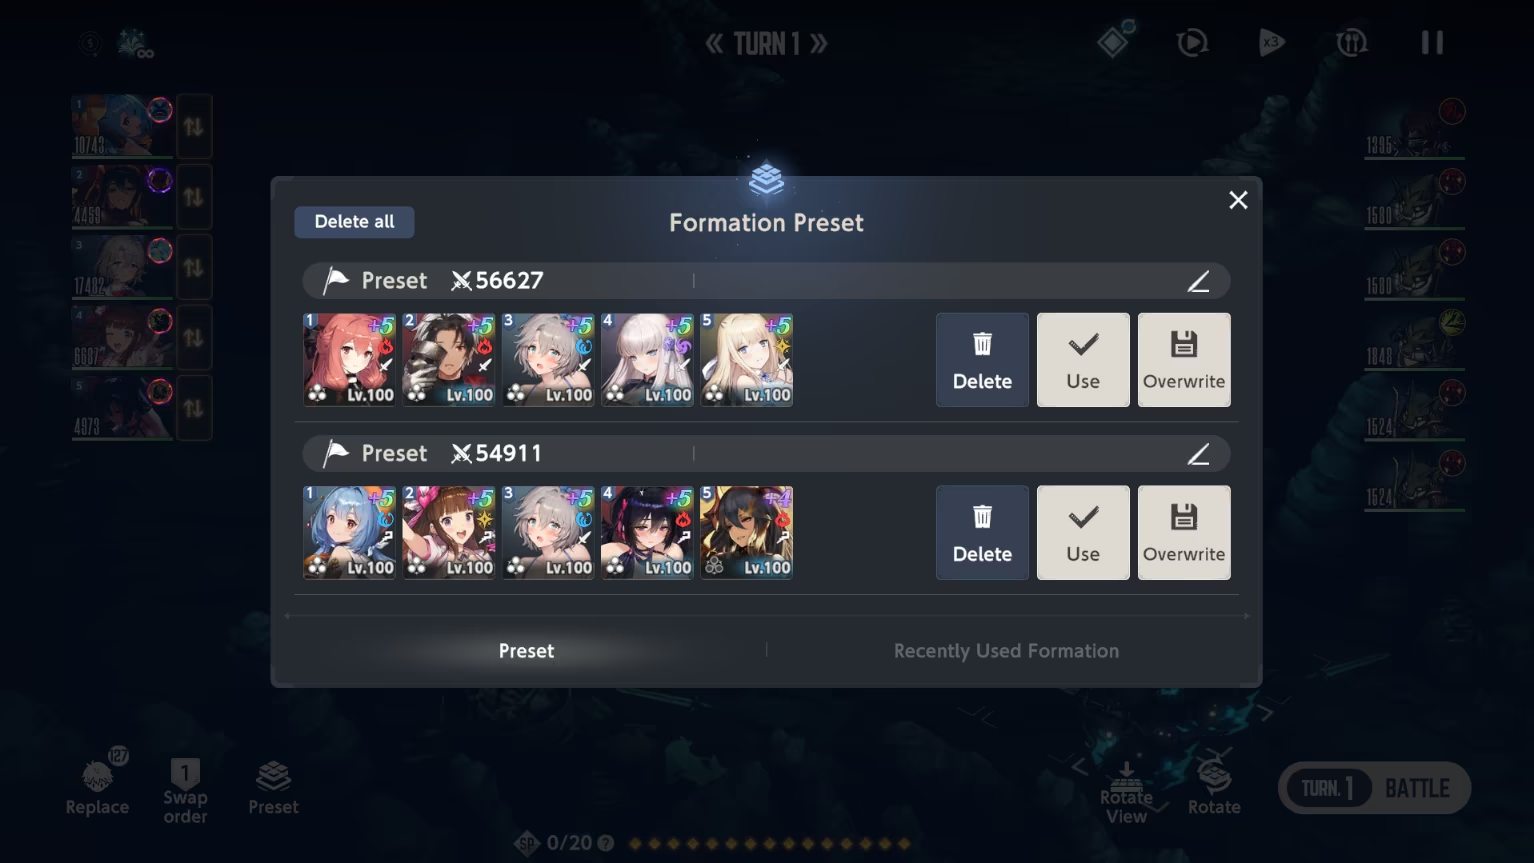
Preset Feature
This feature allows you to quickly load pre-saved teams.
- This includes characters, gear, order, and positioning.
- If preset gear was used by different characters, activating a preset will unequip those gear pieces and equip them on your team.
- Preset name and icon can be customized for your needs.
- You can delete or rewrite old presets in case you do not need them anymore.
- There are a total of 12 preset slots.
In addition to presets, you can use your own recently used teams in the second tab of the preset menu.
SP Bar
SP bar displays your Skill Points, which you use for using costumes' abilities.

 are available Skill Points.
 are Skill Points which will be used in the following turn, if you press Battle.
 are Skill Points which are not available for use, or, in other words, you do not have them.
Rotate View Feature
This feature allows you to change the battlefield view to the top one and replace surrounding backgrounds, allowing you to easily distinguish otherwise grouped enemies or allies.
In this mode, your units are always on the left side, while enemies are on the right.
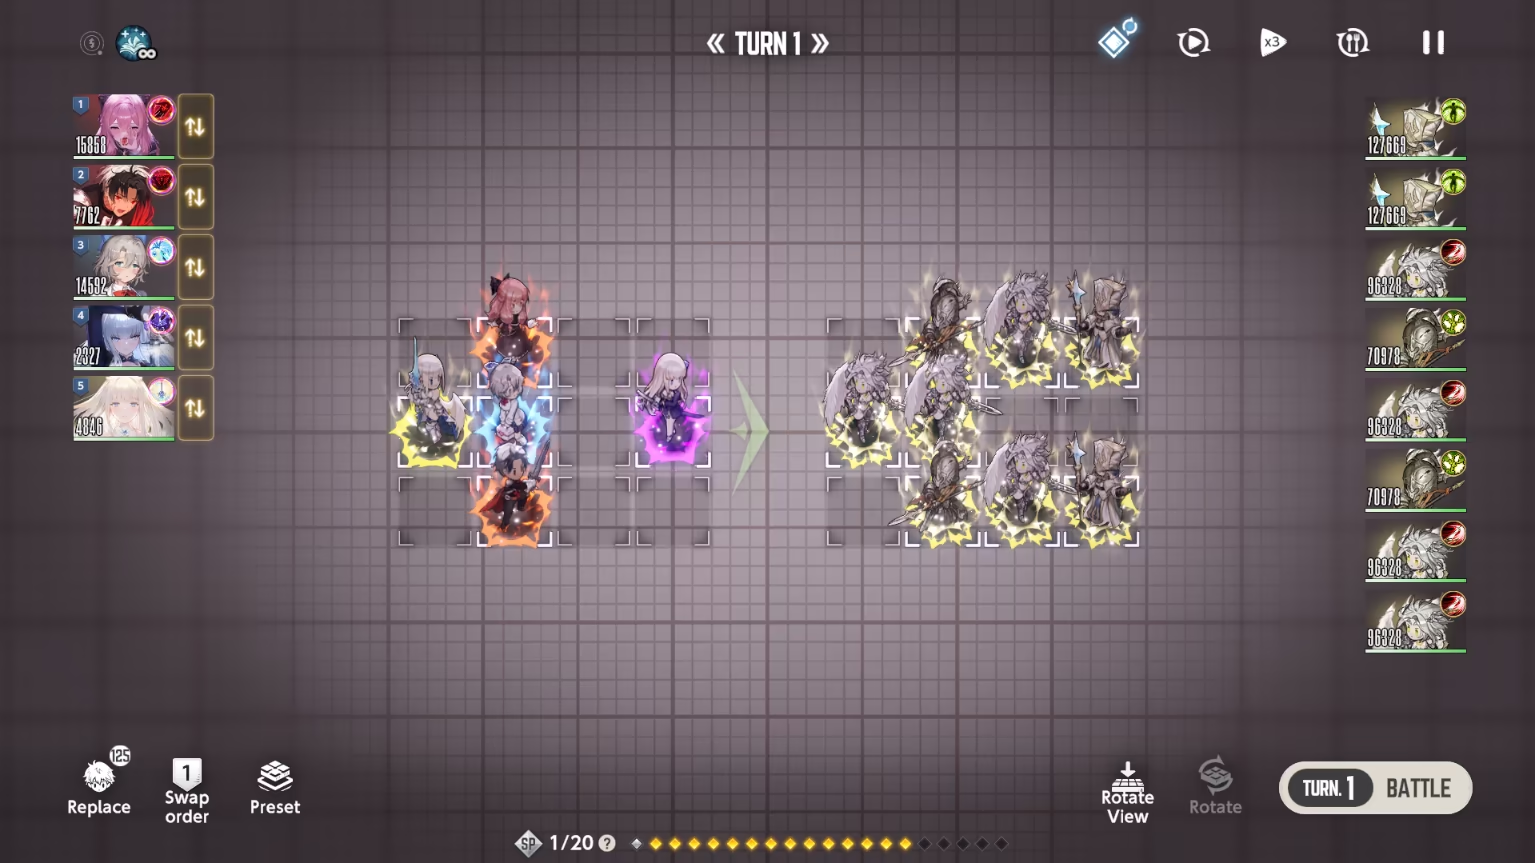
To go back to the original view, simply press the same button once again.
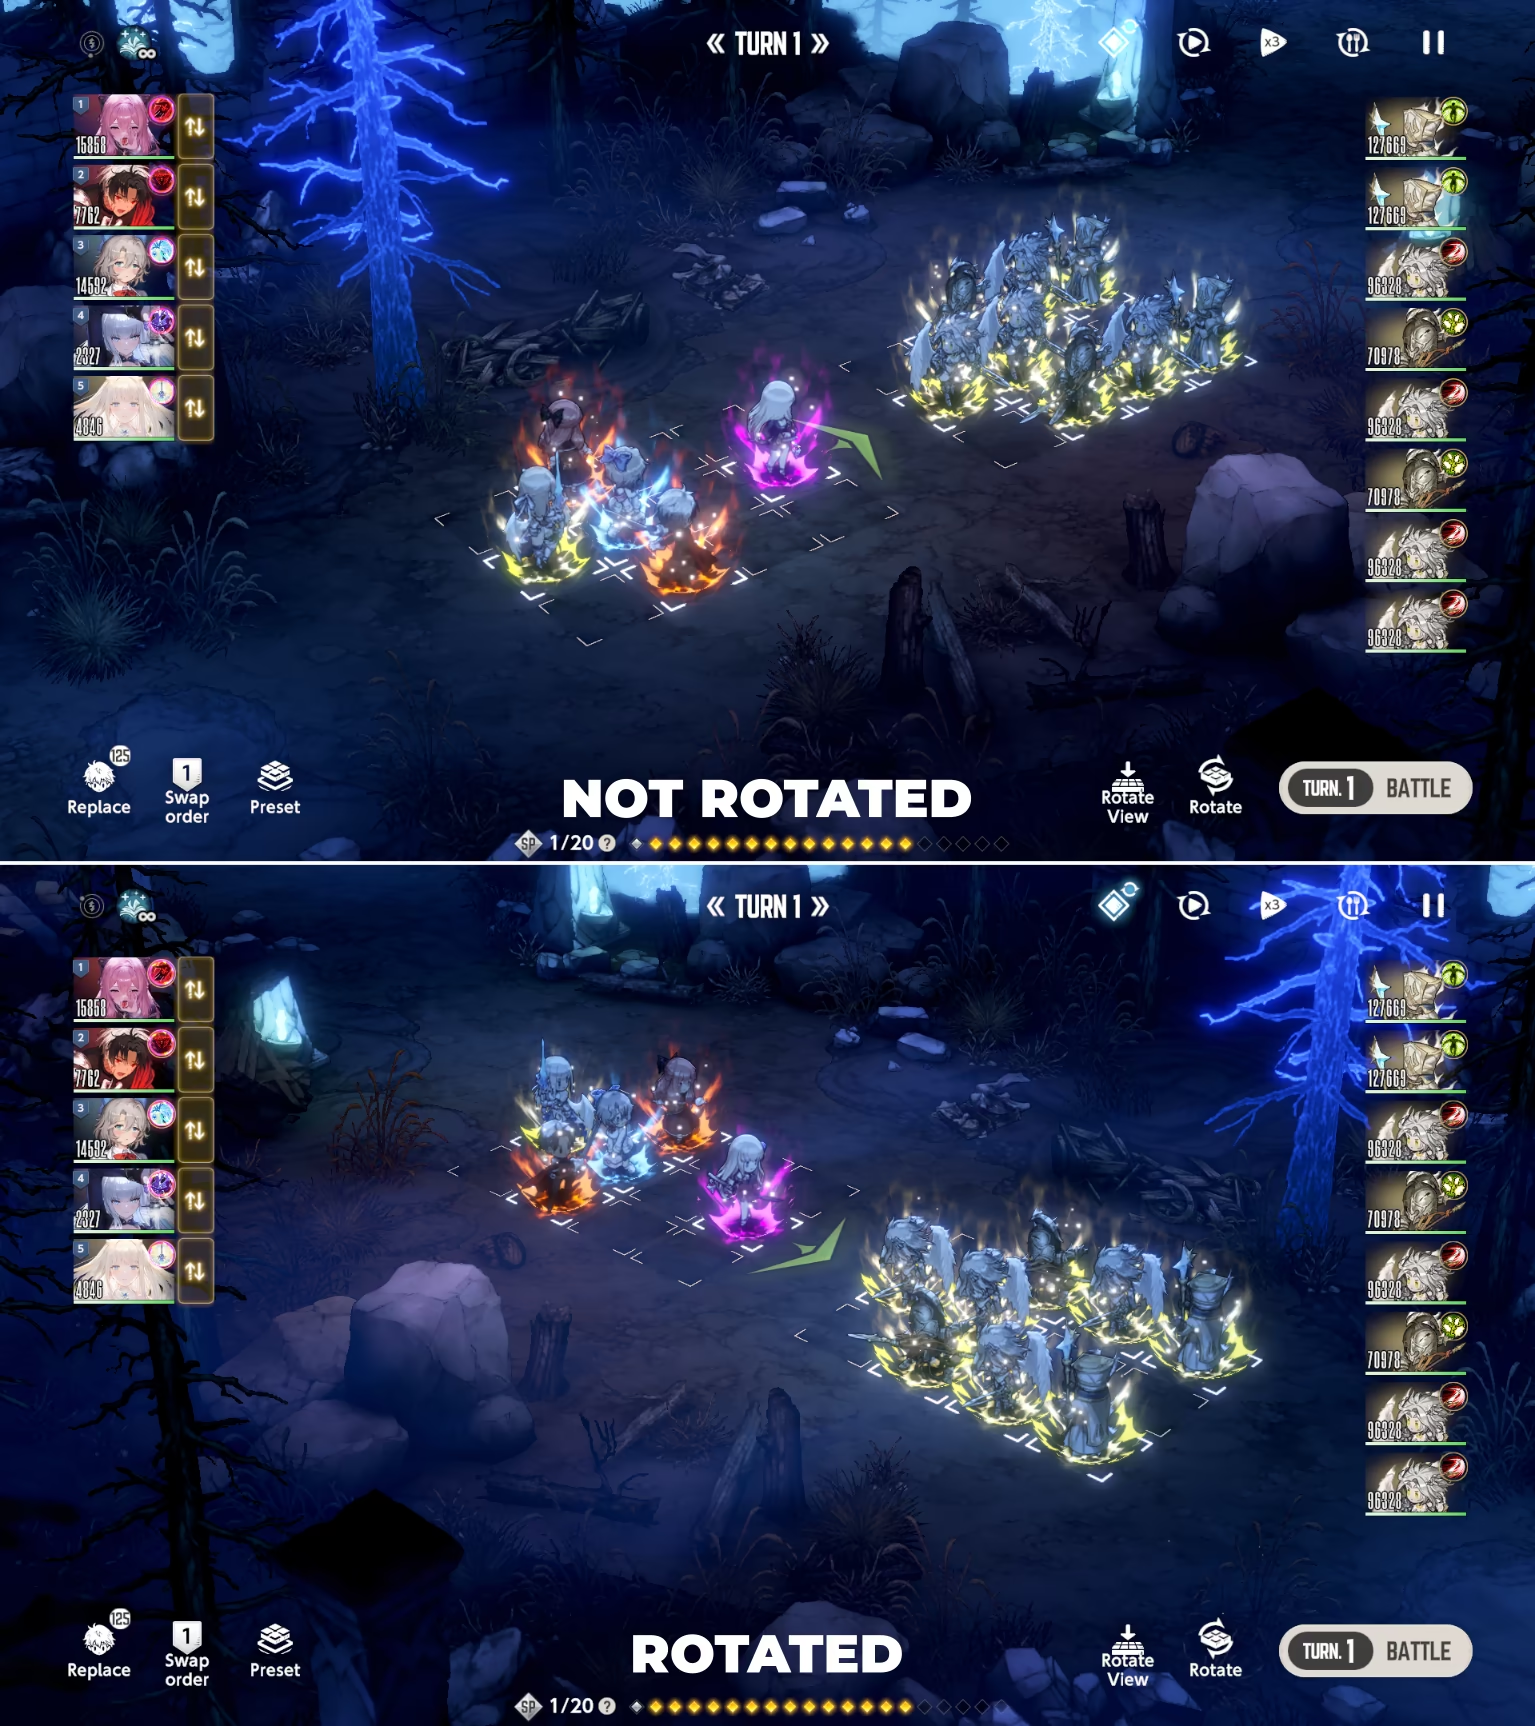
Rotate Feature
This feature allows you to rotate the field, changing your and enemy visual positioning while keeping the aesthetics of the surroundings. This can be useful for distinguishing grouped enemies, but Rotate View is better for this matter.
You cannot rotate the field with special bosses on it like Fiend Hunter or Guild Raid ones.
Feature Showcase
More Advanced Battle Features
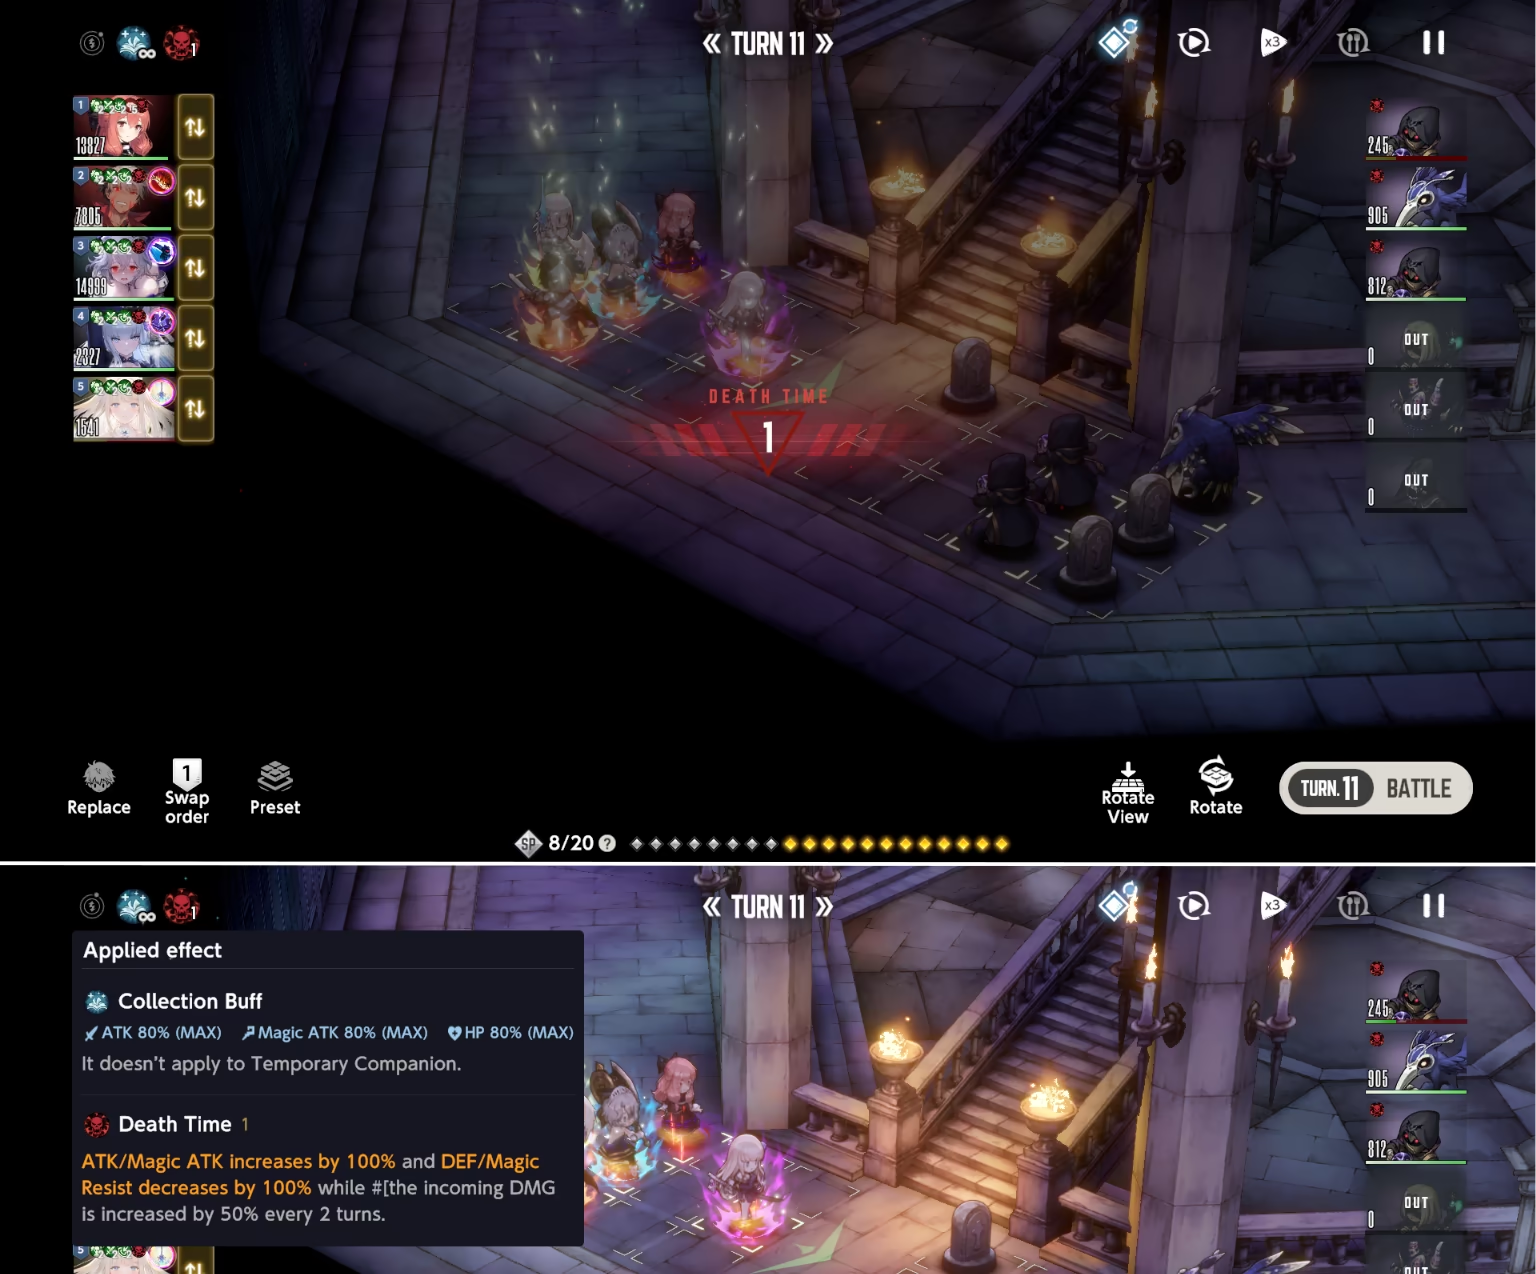
Death Time
Death Time is a feature that should prevent the game from having extremely long battles.
It appears after the 10th Turn in Story, Normal / Challenge Battles of Event, Mirror Wars, and Evil Castle. It also appears on different turns ** in Golden Colosseum (depending on the rule), and does NOT appear in Fiend Hunter and Guild Raid**.
Every 2 turns, every unit on the battlefield receives +100% ATK / MATK increase, as well as DEF / MRES decrease by 100% and Incoming Damage increase by 50%. This means that characters like Gynt and Remnunt will no longer be effective at locking down enemies with their ATK reduction.
Death Time can be accumulated with no limits on its amount, meaning in case of "0 DMG Bug", you can reach as many Turns as you want, although it's quite pointless.
Death Time showcase
 Set Costume order
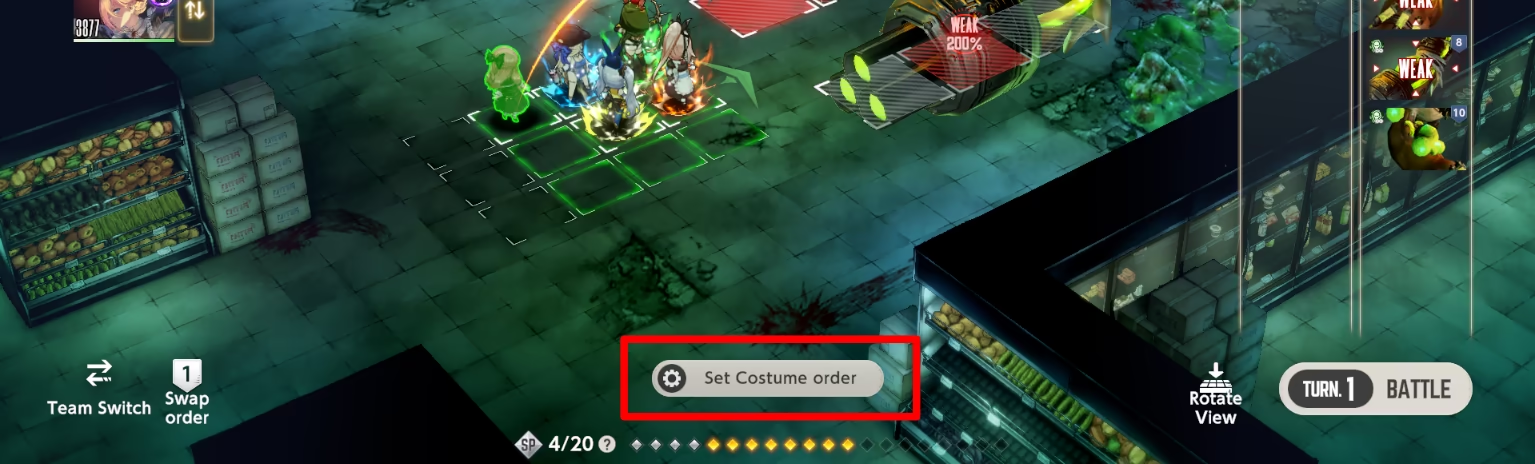
Set Costume order is a feature that allows you to make pre-determined skill order activation. This is useful when you're setting up Mirror Wars or repetitive fights in game modes as Fiend Hunter. If you have the feature active, you will see the icon in the character's card.
To use it, press the chibi character before turn 1 and press the Set Costume order button in the bottom part of the screen.
Image Guide
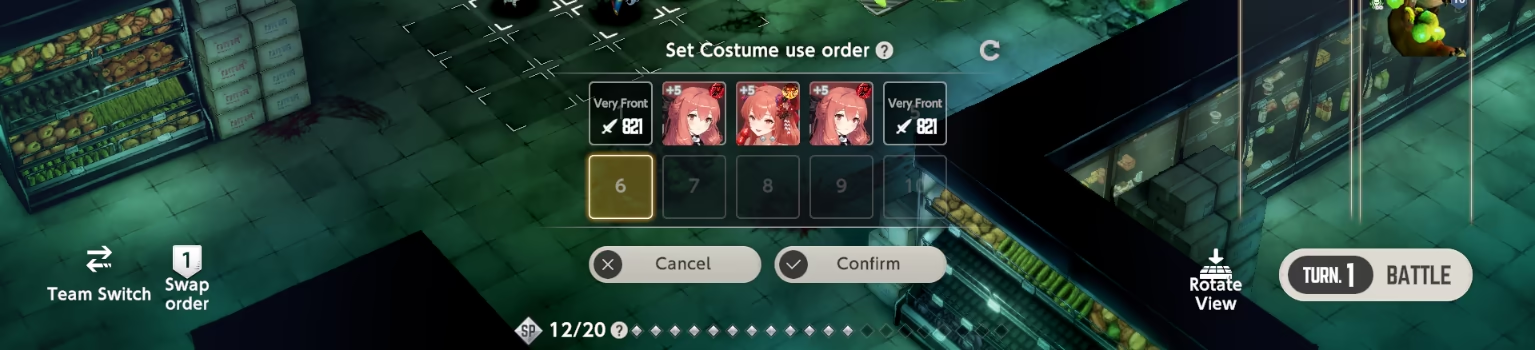
In the opened menu, you will see 10 slots, corresponding to each of your skill activations, where you can put any of the skills, basic attack, or knockback.
- Selection will override your manual attempts to choose a different skill during the given turn.
- Selection will be subject to game rules, meaning it won't activate the skill if you don't have enough SP or it's on cooldown.
- Selection can loop, meaning that, for example, putting Robin Hood Zenith and Poolside Guardian Zenith in the first two slots will provide you repeated usage until the last turn.
Set Costume order UI Image
Status Effects
Characters and enemies can have different status effects, which enhance, diminish, or modify character impact in a battle.
Most common status effects (in a Story Pack) are Taunt, Counter, Evade, Energy Guard, and Immunity.
- Taunt makes your incoming attacks ignore target logic and attack that specific enemy. Is removable by dispel units (Scheherazade, Yuri, Eleanner), unless the enemy has immunity.
 Counter makes your units receive damage when attacking the enemy. Often paired with Taunt. There are a lot of types of Counter, so read the ability to understand what type of it you're facing. Also dispellable by dispel units, unless the enemy has immunity.
  Evade completely disregards your attacks onto enemy. That means that any effects taking place with attacks (such as Dispel, DoT, etc) will not work on the enemy evading. To bypass the Evade, use Self-Destruction skills (Wiggle, Morpeah's summons).
 Energy Guard acts as a shield, increasing the current character's HP on top of cap. To bypass it, either use Dispel, deal True Damage, or just deal enough DMG to remove it.
 Immunity indicates that the character has immunity to some sort of actions, such as Weakness, Buff Removal, Knockback, etc.
Different Damage Types
There are a few types of unique damage in the game.
- Fixed DMG cannot crit. It is not affected by DEF, Magic Resist and DMG Taken Reduction / Increase, but is affected by Property DMG, Chain Effect, DMG Dealt Increase / Reduction and Death Time Effect.
- Consumed DMG also cannot crit. It is not affected by DEF, Magic Resist, DMG Taken Reduction / Increase and Energy Guard, but is affected by Property DMG, Chain Effect, DMG Dealt Increase / Reduction and Death Time Effect.
- Pure DMG is not affected by DEF, Magic Resist, DMG Taken Reduction and Energy Guard, but affected by Critical Hit, Property DMG, Chain Effect, DMG Taken Increase, DMG Dealt Increase / Reduction and Death Time Effect.