
The Soul Wager
The Soul Wager is an Auto Battler Inventory Management Content Pack. In it, your goal is to clear a set number of Boards (each consisting of several stages) within a limited number of attempts within the same Board.
The Soul Wager Screen
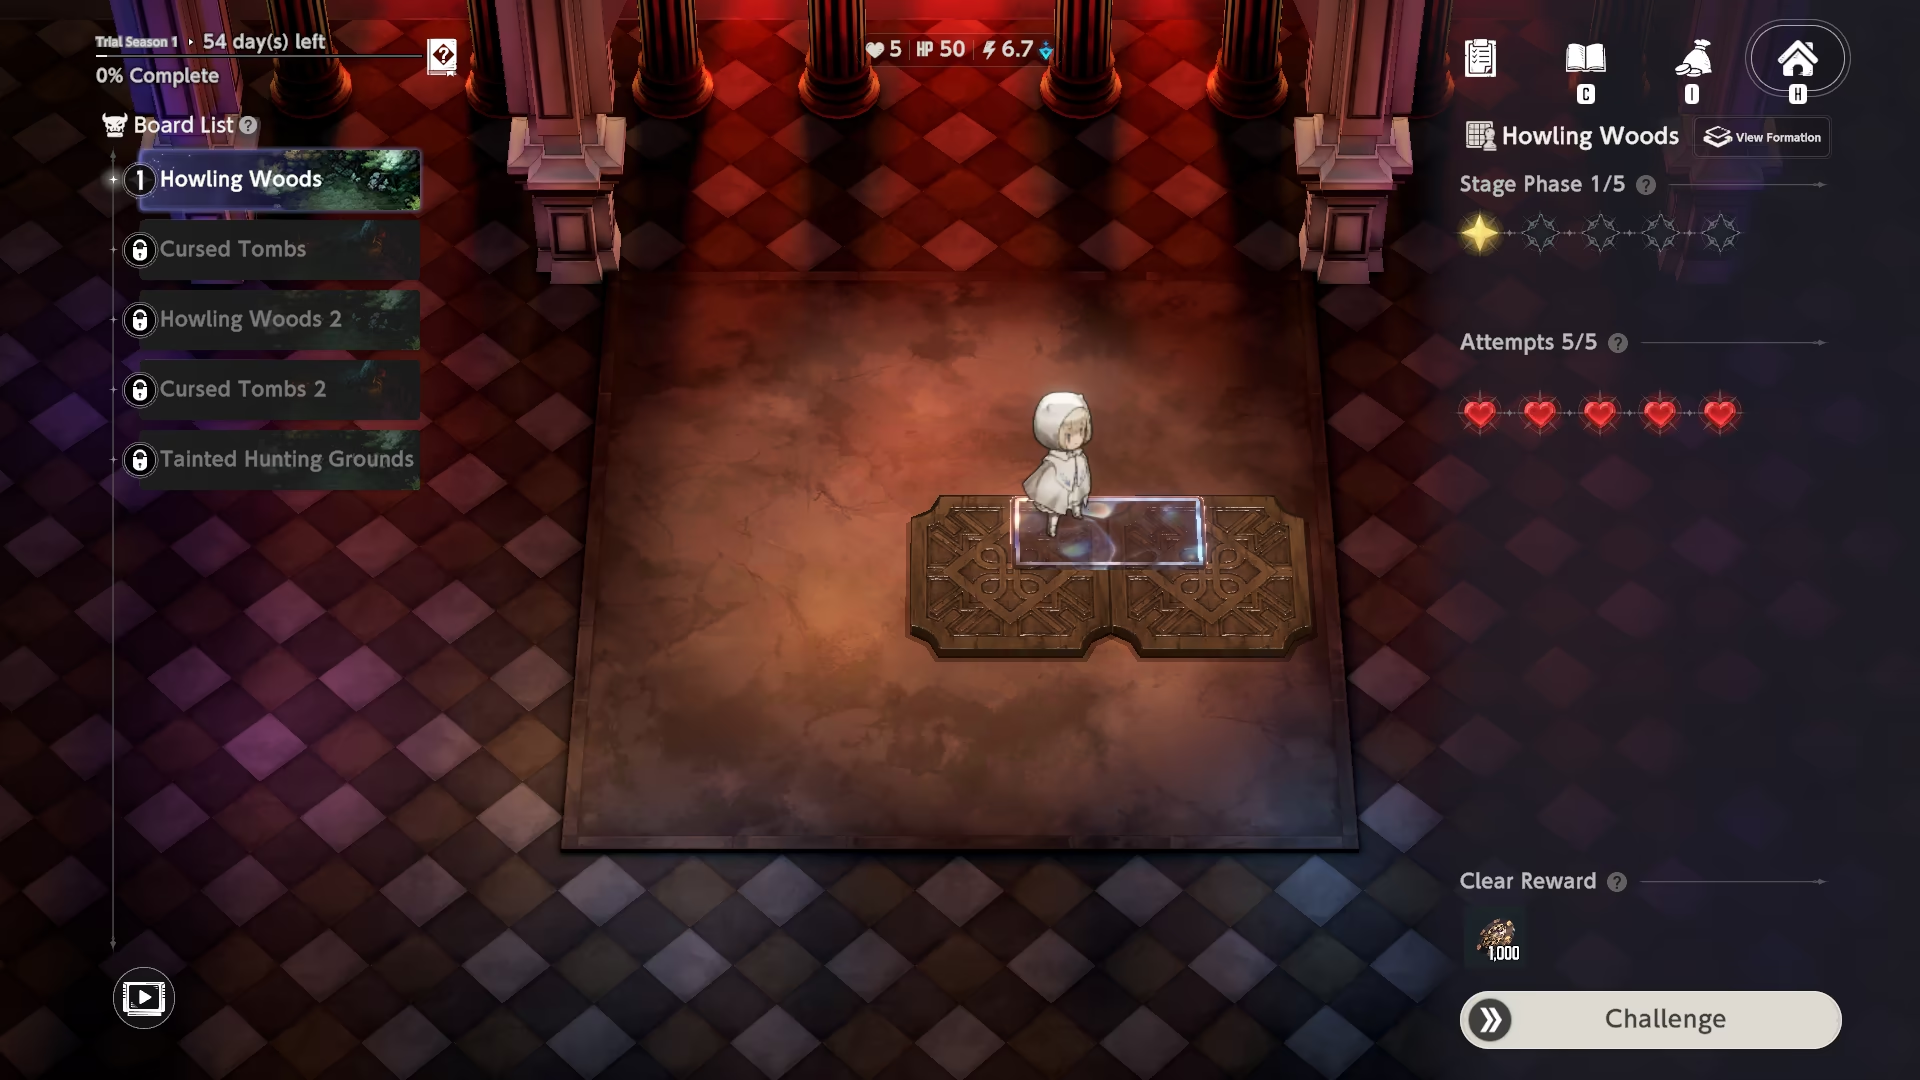
Basics
Unlock Requirements
The Soul Wager is unlocked upon clearing all Edge of Dimension Main Quests.
Overview
The Soul Wager is seasonal content, with each season lasting 8 weeks. During the season, you have unlimited attempts to clear all Boards, with each containing a fixed number of Phases (battles). To complete the Board, you must complete all Phases.
To do that, you must purchase Tiles, Units and Gear from the Soul Wager in-battle Shop, place them on the Main Field, and start the automated battle.
For any Victory or Defeat, you receive  Soul Tokens to continue your run (10 for a loss and 16 for a victory).
If you are defeated, the Battle Shop refreshes and the reroll counter resets, giving you a clean slate of options to try on your next attempt. However, if you lose all 5 of your  Attempts (Defeats), the current Board completely resets, sending you back to Phase 1.
If you complete the Board, you get  Alea Chips as shop currency to purchase resources for your general progression.
On the last day of the Season, a Settlement Period starts at 15:00 UTC, after which you can no longer participate in the Soul Wager.
Field
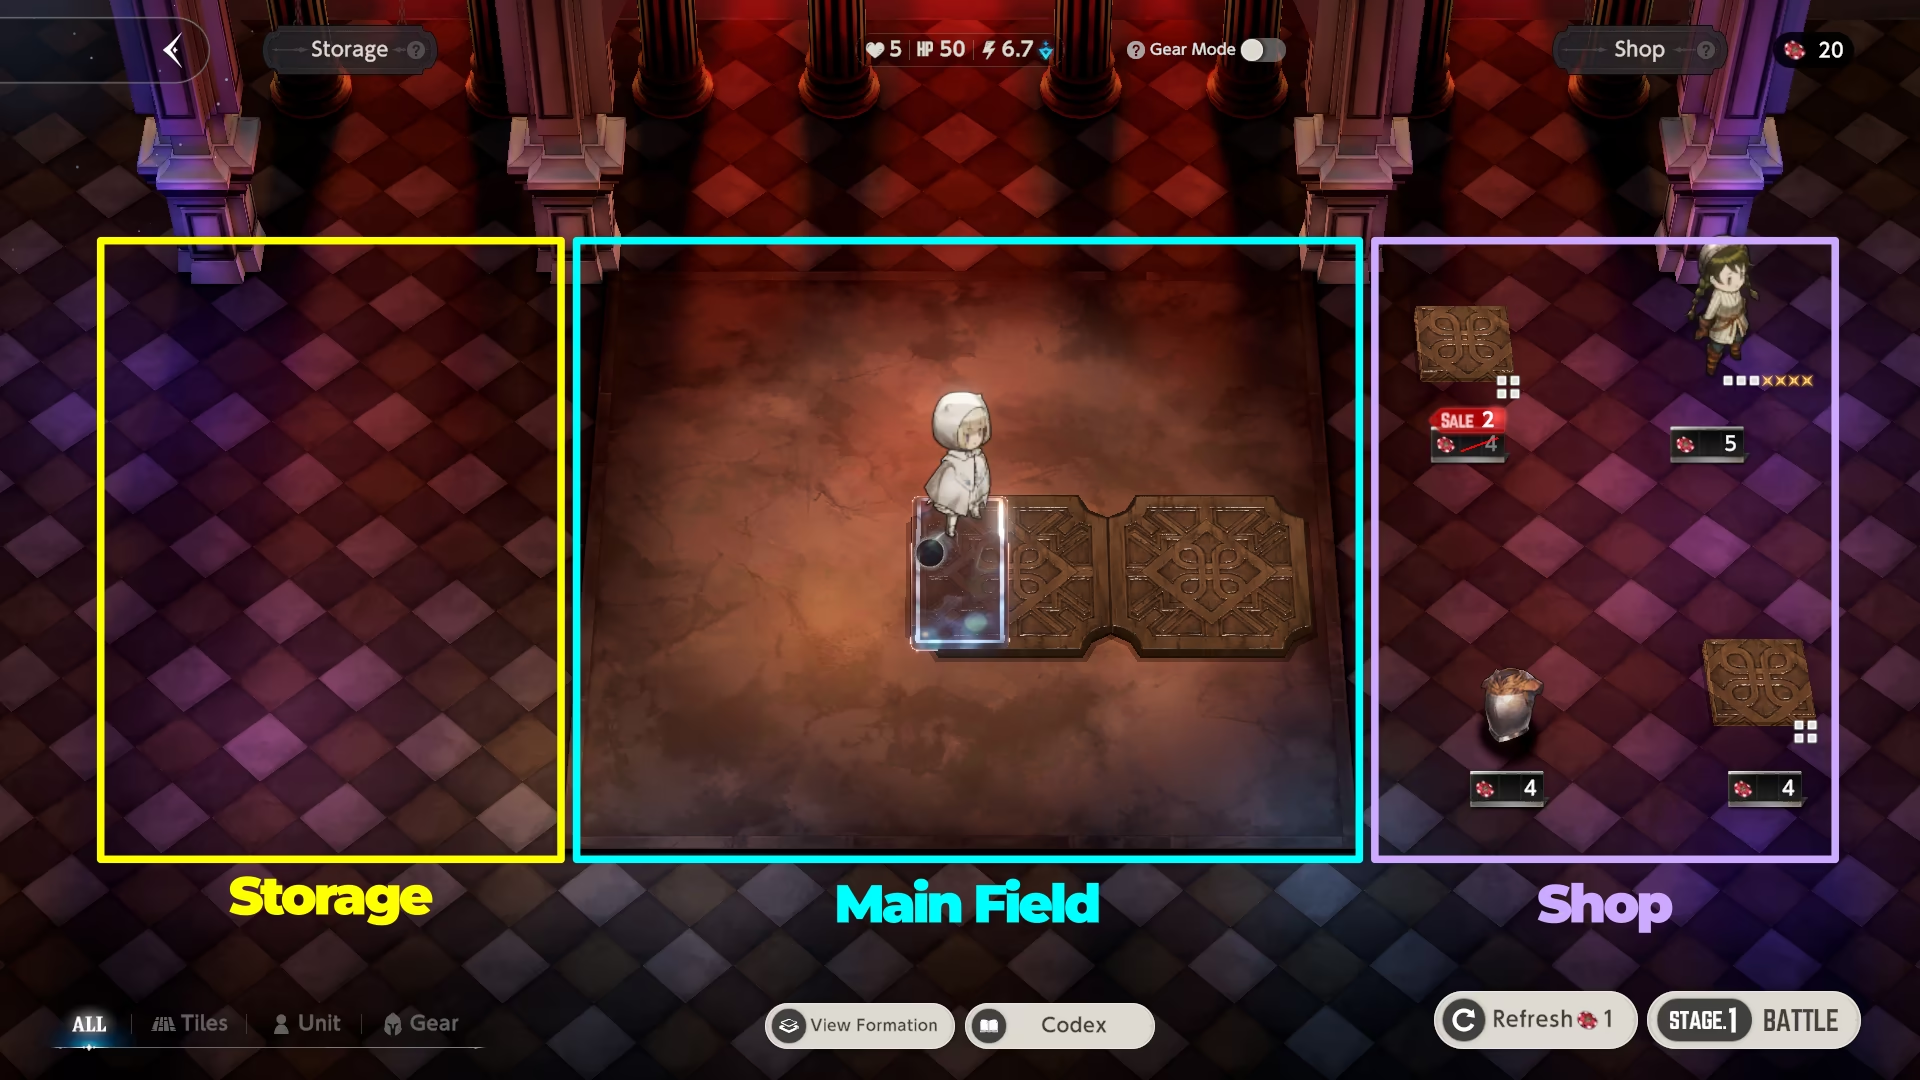
The Phase Formation screen consists of three sections: Storage, Main Field, and Shop.
Formation Screen layout
Main Field
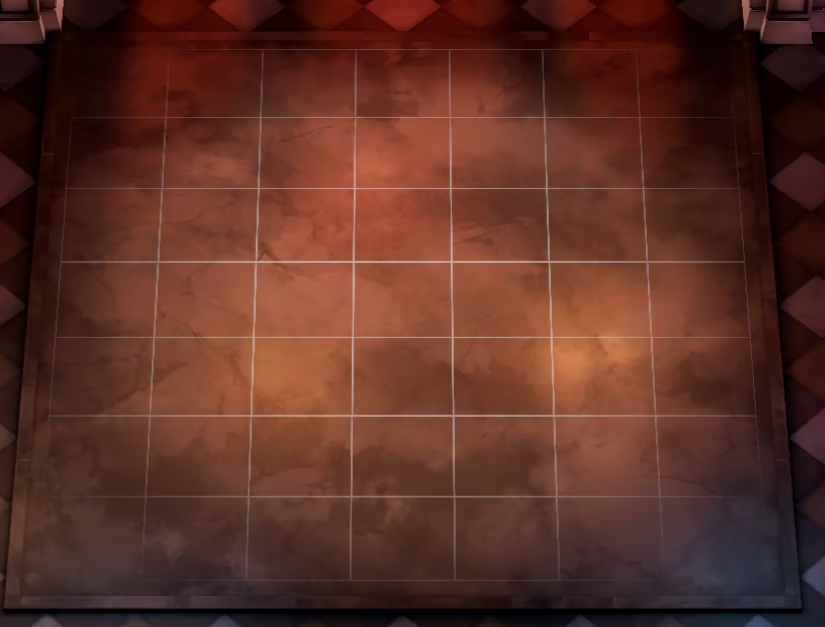
The Main Field is a 7 x 7 field where you place your Tiles, Units, and Gear.
Each tile varies in size, ranging from 1 x 1 (1 square) to 2 x 2 or 1 x 4 (4 squares).
Units are placed on top of these tiles. Each unit has a unique footprint, varying in size from 1 x 1 (1 square) to 3 x 4 with missing corners (8 tiles).
Rotation
You can rotate your Tiles and Units.
- PC: Hold LMB and click RMB to rotate clockwise by 90°.
- Phone / Tablet: Tap and hold with one finger, then tap with another to rotate clockwise by 90°.
Main Field Grid
Enemy Formation (View Formation)
Before or during a run, you can press the View Formation button to inspect the enemy's active grid layout and Unit Actions, allowing you to develop strategies to counter them.
View Formation Screen
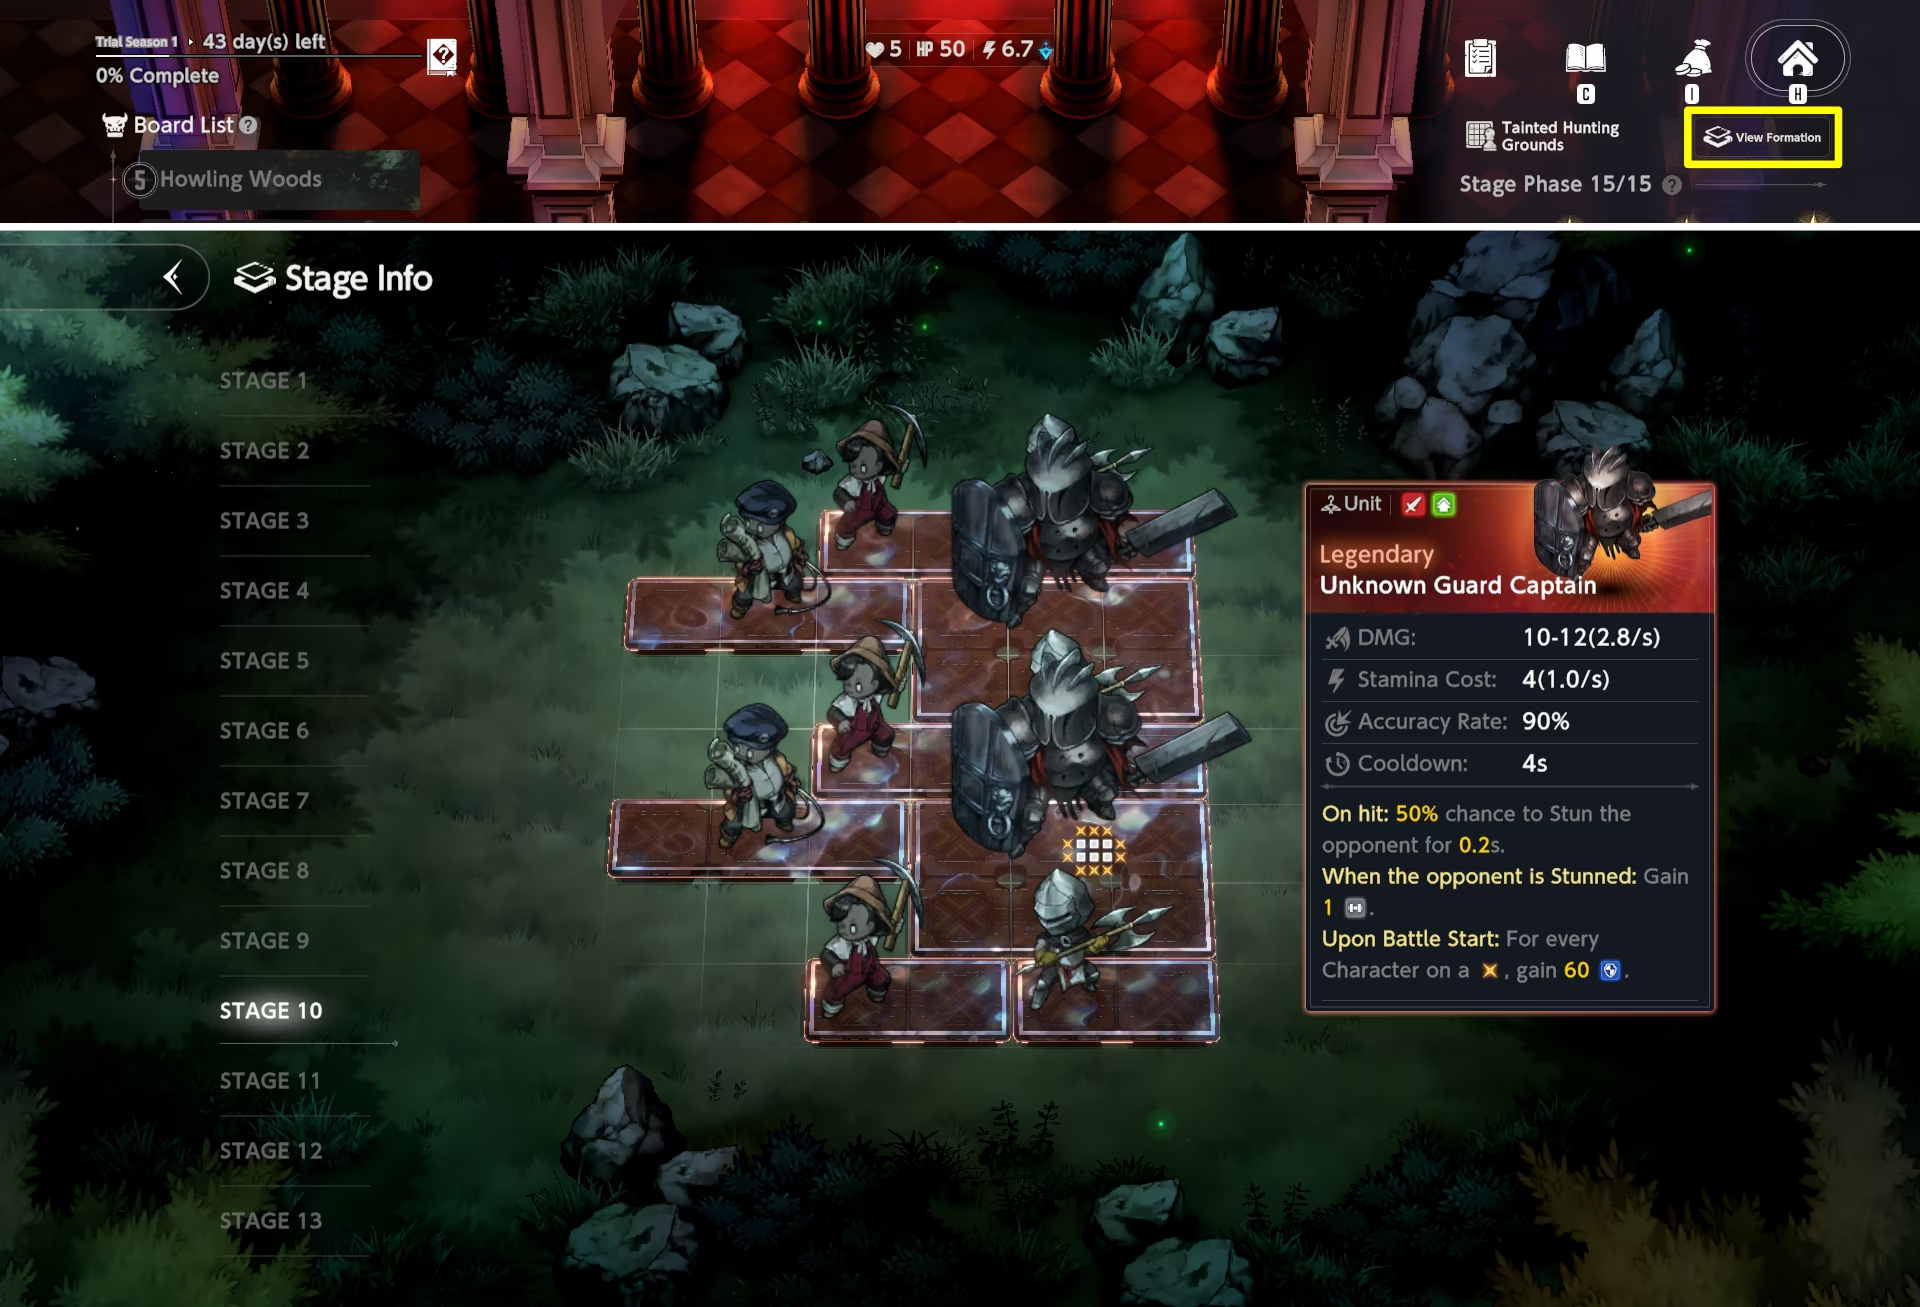
Using this tool is important for high-level play, as it allows you to build a strategy around the enemy's weaknesses.
The Battle Shop
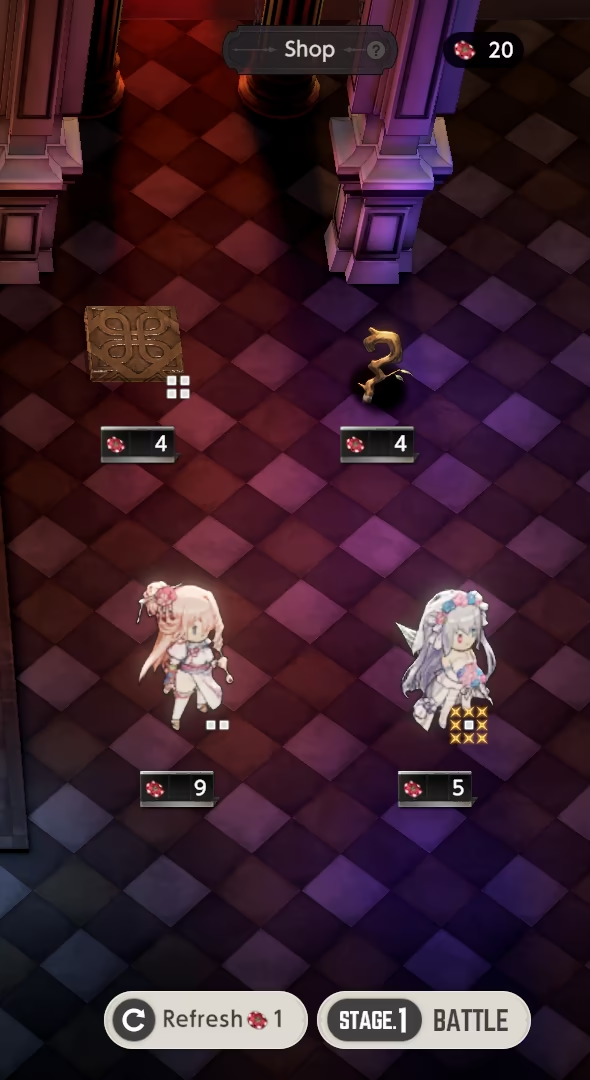
The Battle Shop offers you 4 slots, where Tiles, Units and Gear can appear.
After each battle, the Battle Shop is refreshed, regardless of the outcome of the battle.
Each board piece has an equal chance to appear within the same Grade; however, the chances of drawing a specific Grade heavily depend on the Stage Phase and the Board.
- For example, Tainted Hunting Grounds (Board 5) Stage Phase 1 can only have Normal and Rare Grades (with 83.33% and 16.66% respectively), while Stage Phase 15 offers all 6 Grades with an equal chance of 16.66%.
The Battle Shop Image
Shop Prices
| Tile | Price |
|---|---|
| Acceleration Tile | 3 |
| Basic Tile | 4 |
| Protection Tile | 2 |
| Support Tile | 5 |
| Vitality Tile | 4 |
| Unit | Price |
|---|---|
| Alec - The Destruction | 12 |
| Anastasia - Fire Graffiti | 9 |
| Angelica - Neon Savior | 10 |
| Angelica - The Fallen | 12 |
| Arines - Priest of Vitality | 3 |
| Beatrice - The Mighty Warrior of the Tribe | 5 |
| Bernie - Righteous Raider Girl | 4 |
| Blade - Apostle | 12 |
| Blade - Onsen Swordfighter | 10 |
| Carlson - The Mercenary Knight | 4 |
| Celia - Masquerade Bunny | 7 |
| Celia - The Curse | 4 |
| Cynthia - Warmth within the Severe Cold | 4 |
| Dalvi - Bright Moon | 6 |
| Dalvi - Tricky Lover | 10 |
| Dalvi - Summer Vacation | 7 |
| Darian - Bittersweet Bunny | 9 |
| Diana - Adventurer of the Unknown | 7 |
| Diana - Anti-Dystopia | 12 |
| Eclipse - Dimension Witch | 5 |
| Eclipse - Dream Bride | 8 |
| Eclipse - Nightmare Bunny | 12 |
| Eleaneer - B-Rank Idol | 9 |
| Elise - Code Name O | 4 |
| Elise - Lovely Lady | 8 |
| Elpis - Hand of Salvation | 8 |
| Emma - School Queen | 3 |
| Fred - Lugo Defense Force | 3 |
| Glacia - Alice | 7 |
| Granadair - Shrine Maiden of Purification | 9 |
| Granhildr - Comeback Idol | 13 |
| Granhildr - The Void | 8 |
| Gray - Mist Man | 7 |
| Gray - Vanguard | 5 |
| Gynt - Lugo Hunter | 3 |
| Helena - Top Idol | 5 |
| Ingrid - Kardis' Bullet | 5 |
| Jayden - Beautiful Girl Devotee | 7 |
| Julie - Healer | 4 |
| Justia - Blood Glutton | 8 |
| Justia - Knight of Blood | 9 |
| Justia - Pool Party | 7 |
| Justia - White Reaper | 3 |
| Lathel - Dark Knight | 11 |
| Lathel - Homunculus | 4 |
| Layla - Anvil of Creation | 7 |
| Lecliss - Android Queen | 7 |
| Levia - Overheat | 6 |
| Liatris - Neon Stalker | 8 |
| Liatris - Rodev's Star | 6 |
| Liberta - Onsen Manager | 6 |
| Lisianne - Wandering Priest | 5 |
| Loen - Last Hope | 8 |
| Loen - Track and Field Team | 8 |
| Lucrezia - Seductive Wings | 5 |
| Luvencia - Wild Dog | 11 |
| Lydia - Apprentice Spearman | 5 |
| Mamonir - Miracle Marine | 11 |
| Maria - Archmage | 6 |
| Michaela - Beachside Justice | 9 |
| Michaela - Queen of Signatures | 7 |
| Morpeah - Beach Vacation | 10 |
| Morpeah - Daydream Bunny | 3 |
| Nebris - Labyrinth Gatekeeper | 8 |
| Nebris - Laid-back Lifeguard | 9 |
| Olivier - Apostle | 10 |
| Olivier - Faithful Wings | 12 |
| Olstein - Fiend Scholar | 4 |
| Palette - Shattered Dream | 7 |
| Rafina - Code Name A | 8 |
| Rafina - Steel Engine | 5 |
| Refithea - Poolside Fairy | 4 |
| Refithea - Pure White Blessing | 4 |
| Rigenette - Little Hunter | 3 |
| Rou - Red Riding Hood | 9 |
| Rou - Stray Cat | 8 |
| Rou - White Cat | 7 |
| Rubia - Maid Name C | 6 |
| Rubia - The Empress of the Ocean | 9 |
| Rubia - Thorn of the Desert | 6 |
| Sacred Justia - Reclaimed Destiny | 14 |
| Samay - Kind Liberator | 8 |
| Samay - Kind Student | 6 |
| Scheherazade - Lapis Witch | 6 |
| Scheherazade - Magic School Professor | 9 |
| Scheherazade - Pool Party | 6 |
| Seir - B-Rank Idol | 5 |
| Seir - Demon's Daughter | 7 |
| Sonya - Little Pumpkin Girl | 11 |
| Sylvia - Admiral | 12 |
| Sylvia - Desert Flower | 6 |
| Sylvia - Sword Queen | 7 |
| Teresse - Angel of Destruction | 10 |
| Teresse - Beachside Angel | 8 |
| Teresse - Medical Club | 7 |
| Tyr - Starlight Guardian | 7 |
| Venaka - DJ | 7 |
| Ventana - Snow White | 10 |
| Wiggle - Bomb in the Hoodie | 4 |
| Wilhelmina - Frozen Queen | 7 |
| Wilhelmina - Iron Monarch | 6 |
| Yuri - Comeback Idol | 5 |
| Yuri - Whitebolt | 9 |
| Zenith - Robin Hood | 5 |
| Gear | Price |
|---|---|
| Demon's Forbidden Book | 15 |
| Evil Dragon's Blade | 15 |
| God-King's Silver Arm | 12 |
| Hero's Staff | 9 |
| Hero's Sword | 9 |
| Invulnerable Armor | 15 |
| Knight's Necklace | 5 |
| Knight's Staff | 6 |
| Knight's Sword | 6 |
| Mercenary Armor | 4 |
| Mercenary Staff | 4 |
| Mercenary Sword | 4 |
| Peerless Javelin | 15 |
Reserving
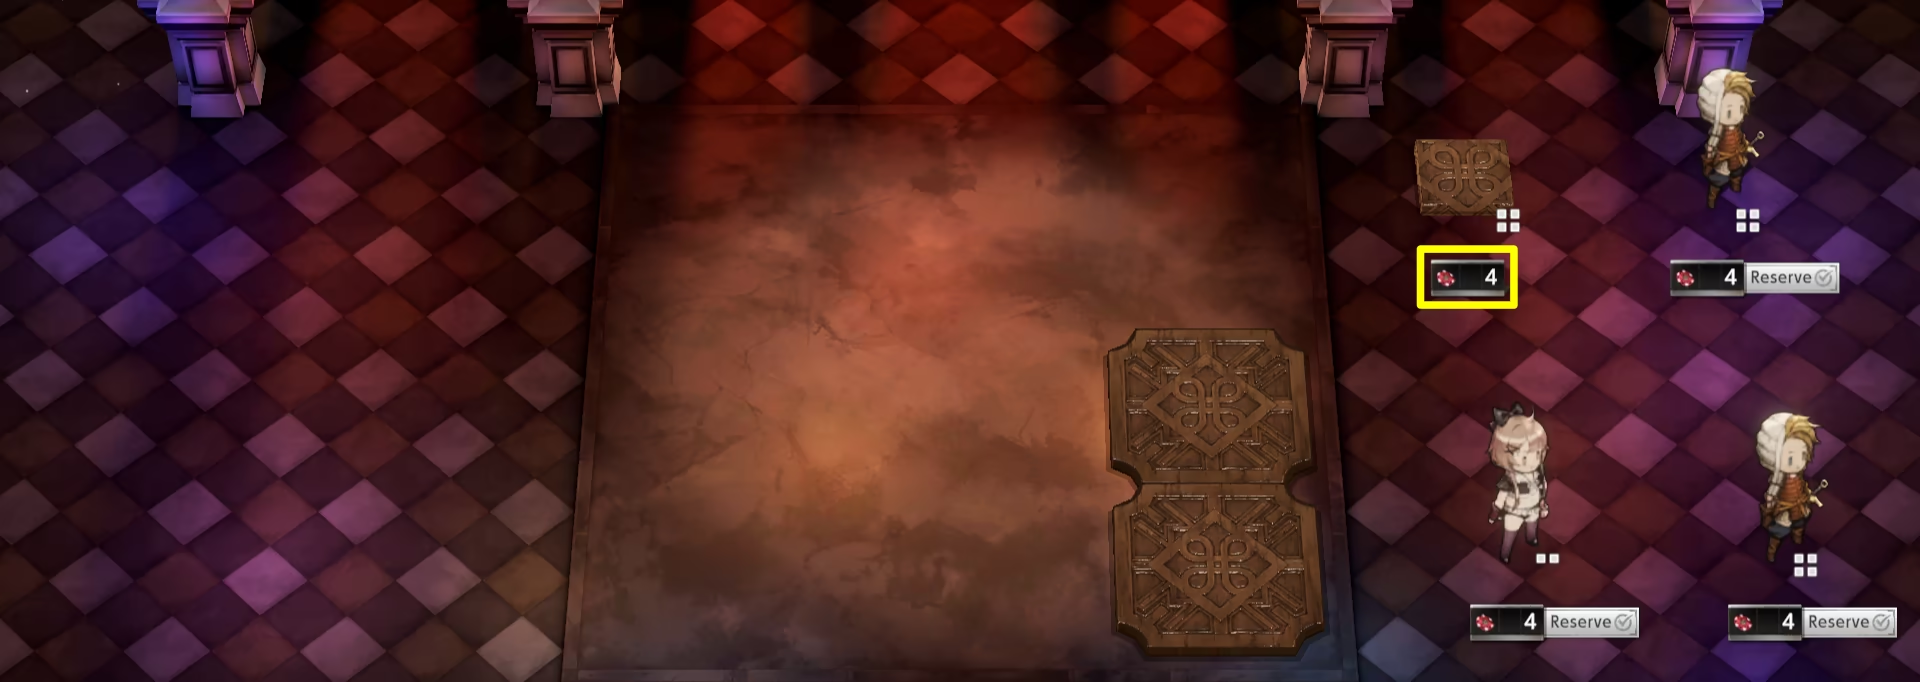
If you want a board piece to stay in the shop until the next Formation Stage, you can click on the price tag to reserve it. This way, it will not be refreshed after the next battle.
To undo the reservation, simply repeat the given action.
Reserving Board Pieces
Discounts
Some deals may feature a reduced price.
- The chance of a discount is 10%.
- The discount is calculated as \(\text{round}(0.5 \times \text{Price})\), providing roughly a 50% discount.
- Calculated prices are always rounded up.
- For example, Lathel - Homunculus with the discount (0.5 × 5 = 2.5) will cost 3 instead.
Reroll
If you don't like the shop deals, you can Reroll the shop using Soul Tokens.
The Reroll button is located at the bottom right part of the screen.
Reroll Button

Rerolling costs 1 Soul Token and increases by 1 after every 4 rolls within the same Formation Phase. Therefore, it is not recommended to reroll more than 4-5 times per Phase.
Selling
You can sell existing Board Pieces to obtain some Soul Tokens back. To do that, either select a board piece and click Sell, or directly drag the piece to the Sell button.
Different Selling Options
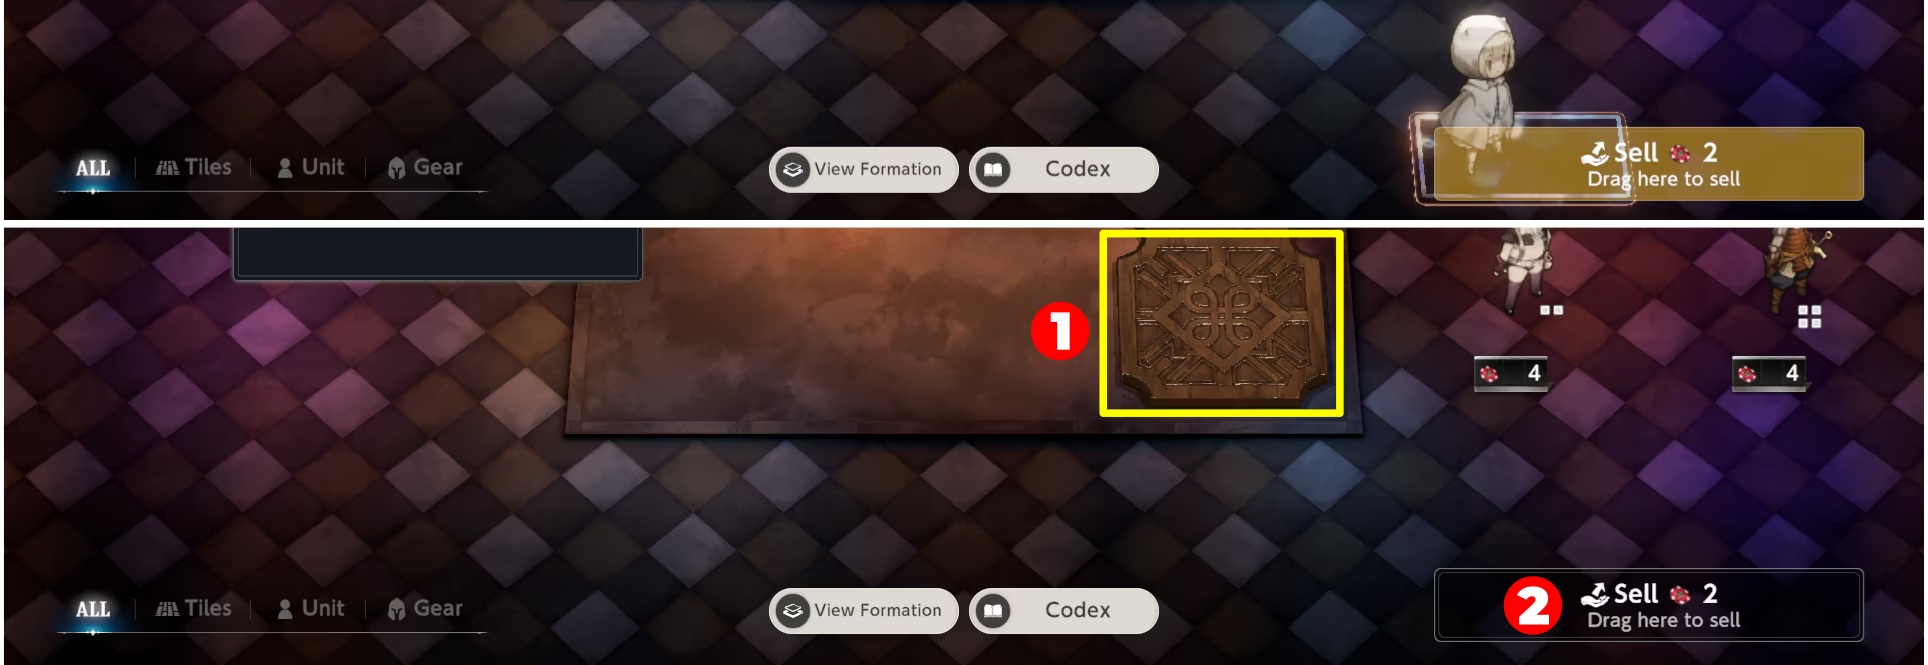
- Selling price is calculated as \(\text{round}(0.5 \times \text{Purchase Price})\), which means Unit upgrades do not increase the Price.
- Rounding is always down, but the price cannot be less than 2, with the Protection Tile being the only exception, which has a selling price of 1.
- For example, Lathel - Homunculus (0.5 × 5 = 2.5) will give 2 instead, but Arines - Priest of Vitality (0.5 × 3 = 1.5) will give 2, compared to the 1 she was supposed to give.
Storage
The Storage section is a space where you can leave your purchased Board Pieces. They will not be used in battle, and there is no penalty for storing them.
Storage Image
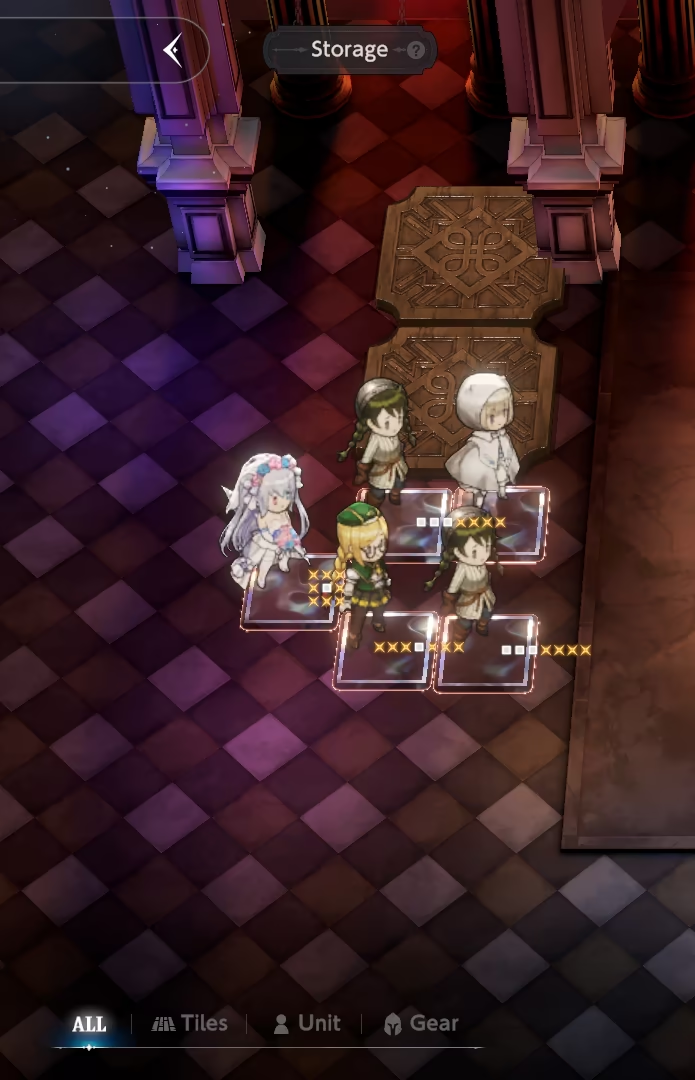
You can filter your Storage by Tiles, Units, Gear or All at the same time.
Additionally, the Storage zone features a "gravity" system. Placing any stored piece on the left side of the storage panel automatically slides it flush against the right boundary, behaving like a sideways Tetris stack.
Codex
The Codex is a place to learn more about Tiles, Units and Gear. To access it, press the corresponding icon on top of the screen before a run, or at the bottom of the screen during a run.
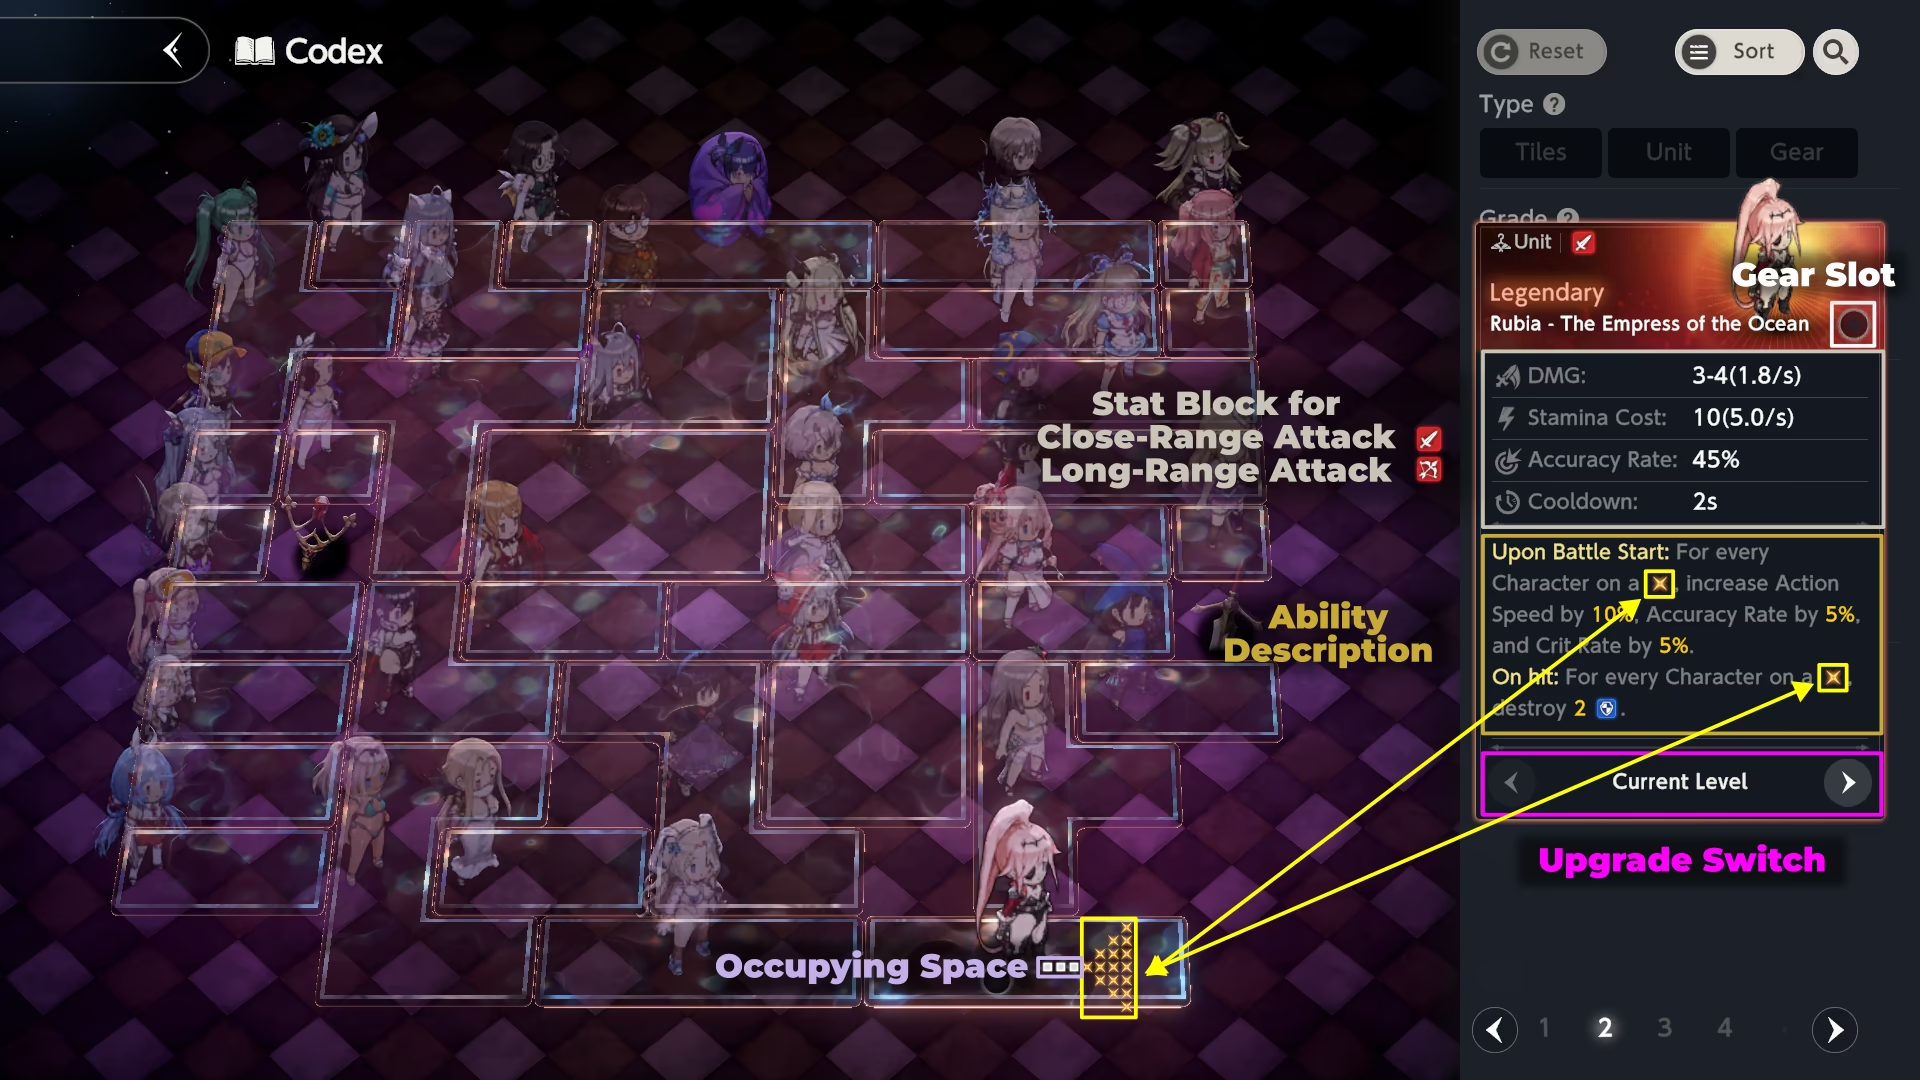
Image Guide

Codex View
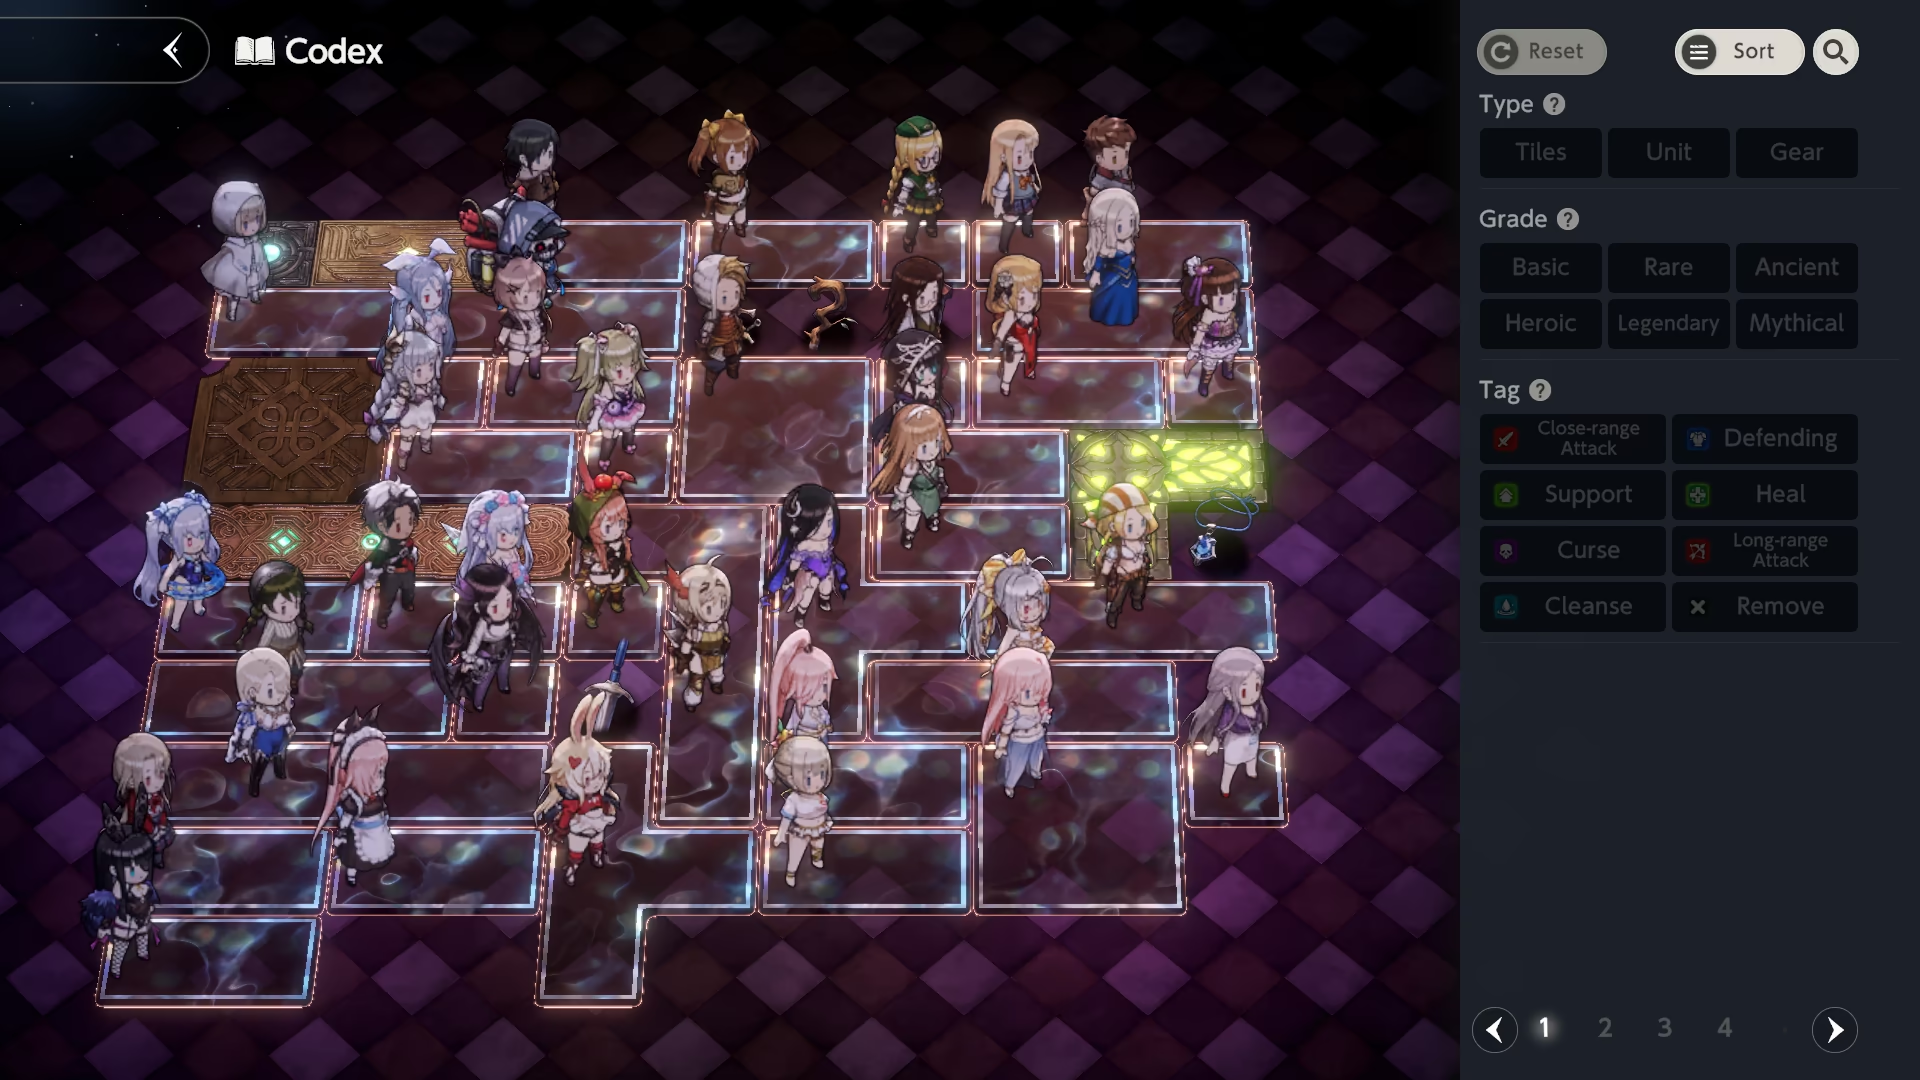
Tiles
There are a total of 5 different Tiles, each varying in shape, cost, and abilities. They are required to place Units on.
Tile Codex
Units
Units can only be placed on top of the Tiles. To deploy and use a unit, you must have unoccupied tile space available.
Each Unit has a distinct Grade and set of Tags. While a Unit's Grade determines its shop appearance rarity, its Tags briefly outline its gameplay role.
Tags List
There are a total of 8 Tags:
 Close-Range Attack: This Character performs a close-range attack upon every cooldown reset.
 Defending: Defending Characters have abilities that are triggered when the opponent attacks.
 Support (Utility): Utility Characters grant Buffs to their allies.
 Heal: Heal Characters have the ability to restore HP.
 Curse: Curse Characters apply Debuffs to the opponent.
 Long-Range Attack: This Character performs a long-range attack upon every cooldown reset.
 Cleanse: Cleanse Characters remove Debuffs on yourself.
 Remove: Remove Characters remove Buffs on the opponent.
Every attacking unit has a few key stats:
- DMG — Damage per hit. It features its own value range, with a random value selected for each Action.
- Stamina Cost — Stamina used per Action.
- Accuracy Rate — The chance that an Action successfully deals damage to the enemy.
- Cooldown — The interval between a Unit's Actions.
Unit Description Explanation
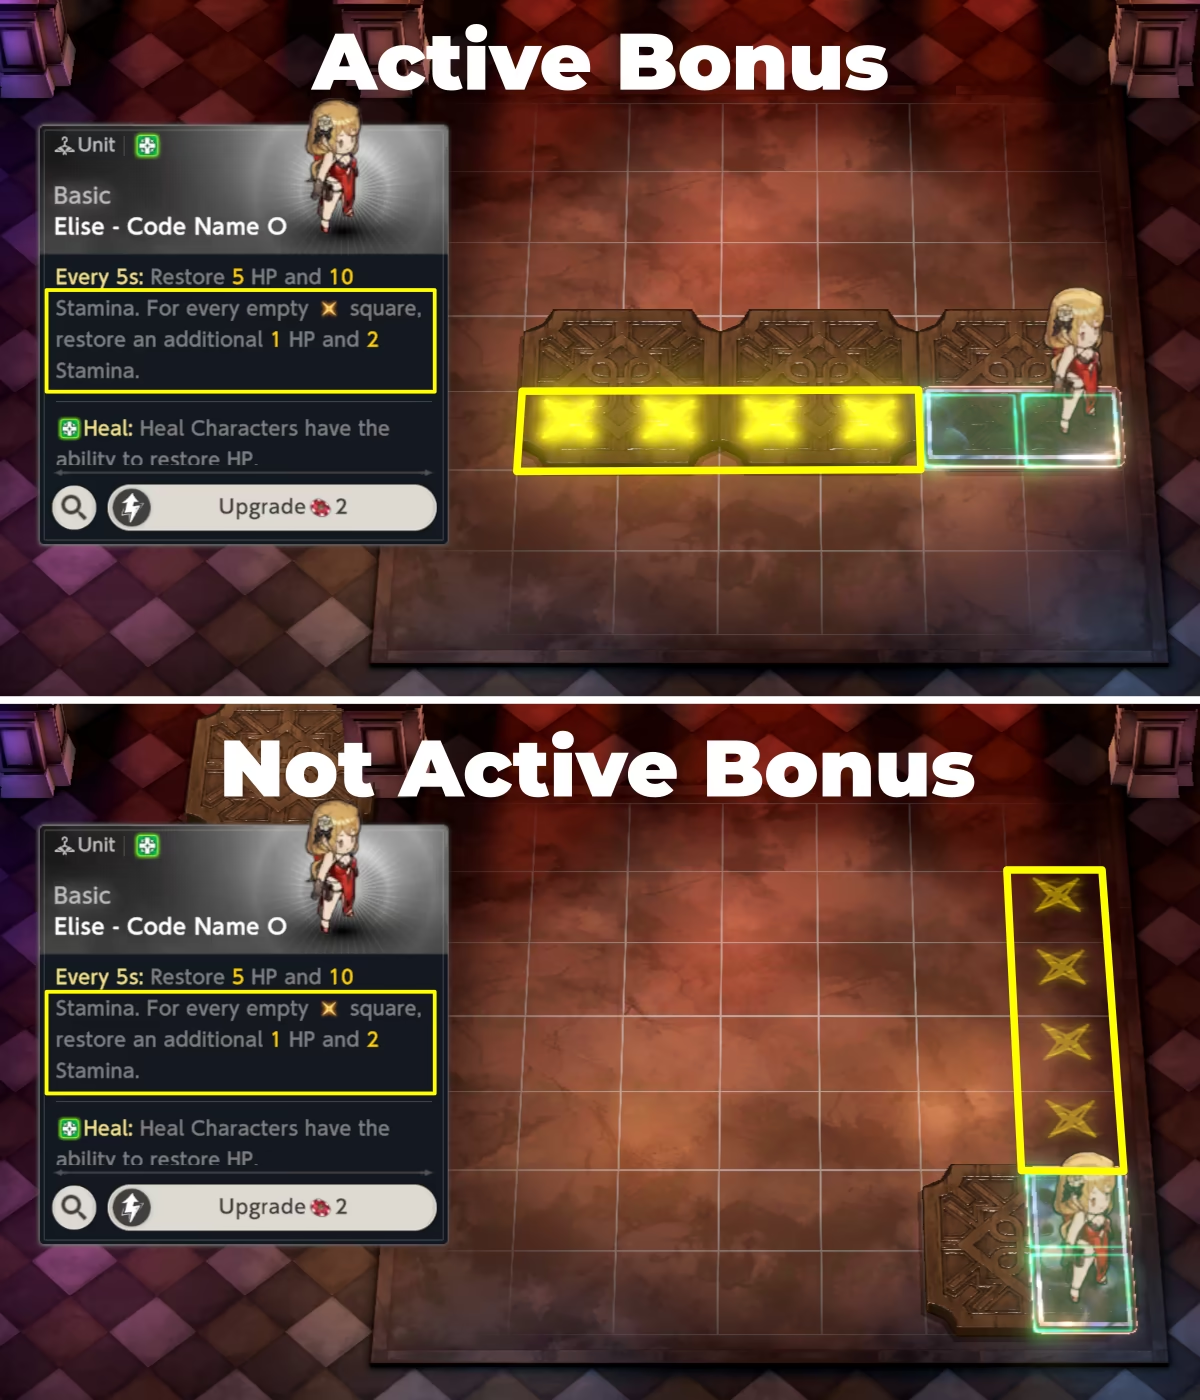
Certain units benefit from specific conditions tied to how you place their tiles on the grid. These requirements are indicated on their skill cards by the  icon. These bonuses only trigger if the required tiles are actually placed on the battlefield grid.
For example, you cannot trigger Elise - Code Name O's enhanced restoration if her target tiles are rotated off the active board layout.
Image Explanation
Additionally, certain Units generate Buffs for the team or Debuffs for the enemy. You can learn more about them from Units' cards or check below.
Soul Wager Buffs
 |
|  Regeneration: For every stack, restores 1 HP every 2s.
 |
|  Overheat: For every stack, increases Action Speed by 2%.
 |
|  Lifesteal: For every stack, restores HP equal to close-range DMG dealt. Healing is capped at max stacks.
 |
|  Focus: For every stack, increases Accuracy Rate of all Characters by 5%.
 |
|  SP: Used to trigger certain effects. SP in and of itself does not have effects.
 |
|  Strength: For every stack, increases the DMG dealt by Attacking Characters by 1.
 |
|  Counter: For every stack, deals Counter DMG equal to DMG taken from close-range attacks. If DMG is higher than stack count, deals Counter DMG equal to stack count.
Soul Wager Debuffs
 |
|  Poison: For every stack, takes 1 DMG every 2s.
 |
|  Frost: For every stack, reduces Action Speed of all Characters by 2%
 |
|  Darkness: For every stack, reduces the Accuracy Rate of all Characters by 5%.
 |
|  Laceration: For every stack, increases the Stamina Cost of Attacking Characters by 2%.
Units Upgrading
You can upgrade Units, which will improve their Actions. Units can be upgraded to +5, similarly to the main game, with the exception that you cannot upgrade a Unit higher than their current rank in your main roster.
Each Upgrade level costs differently for each Unit.
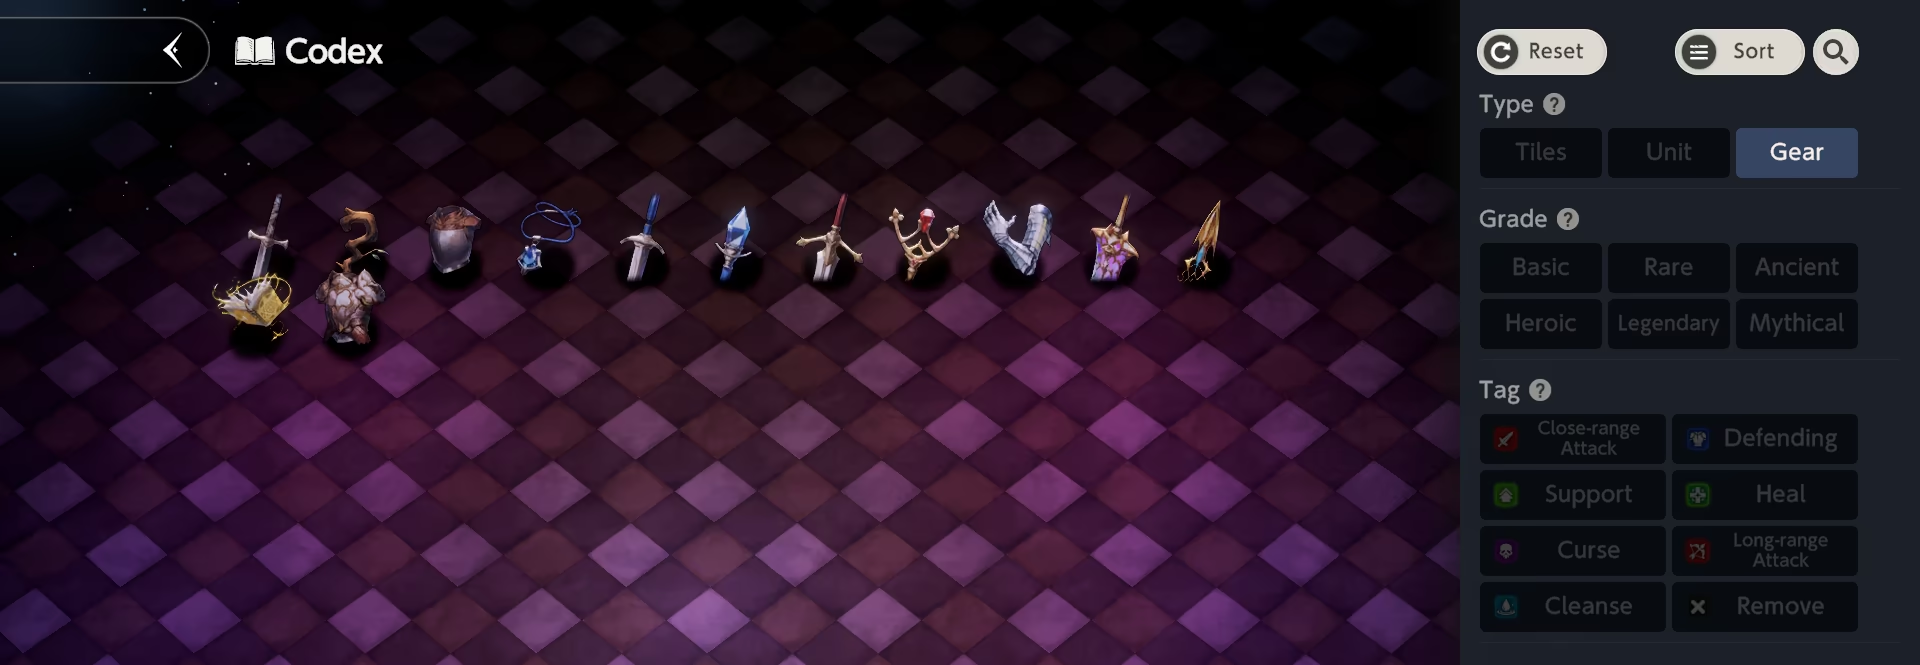
Gear
Gear can be equipped on Units that have Gear Slots. There are a total of 13 Gear Pieces, each providing different bonuses depending on the type of Unit you equip the gear on.
Gear Codex
Battle
Pressing the "Battle" button in the bottom right corner begins the match.
Battle Screen
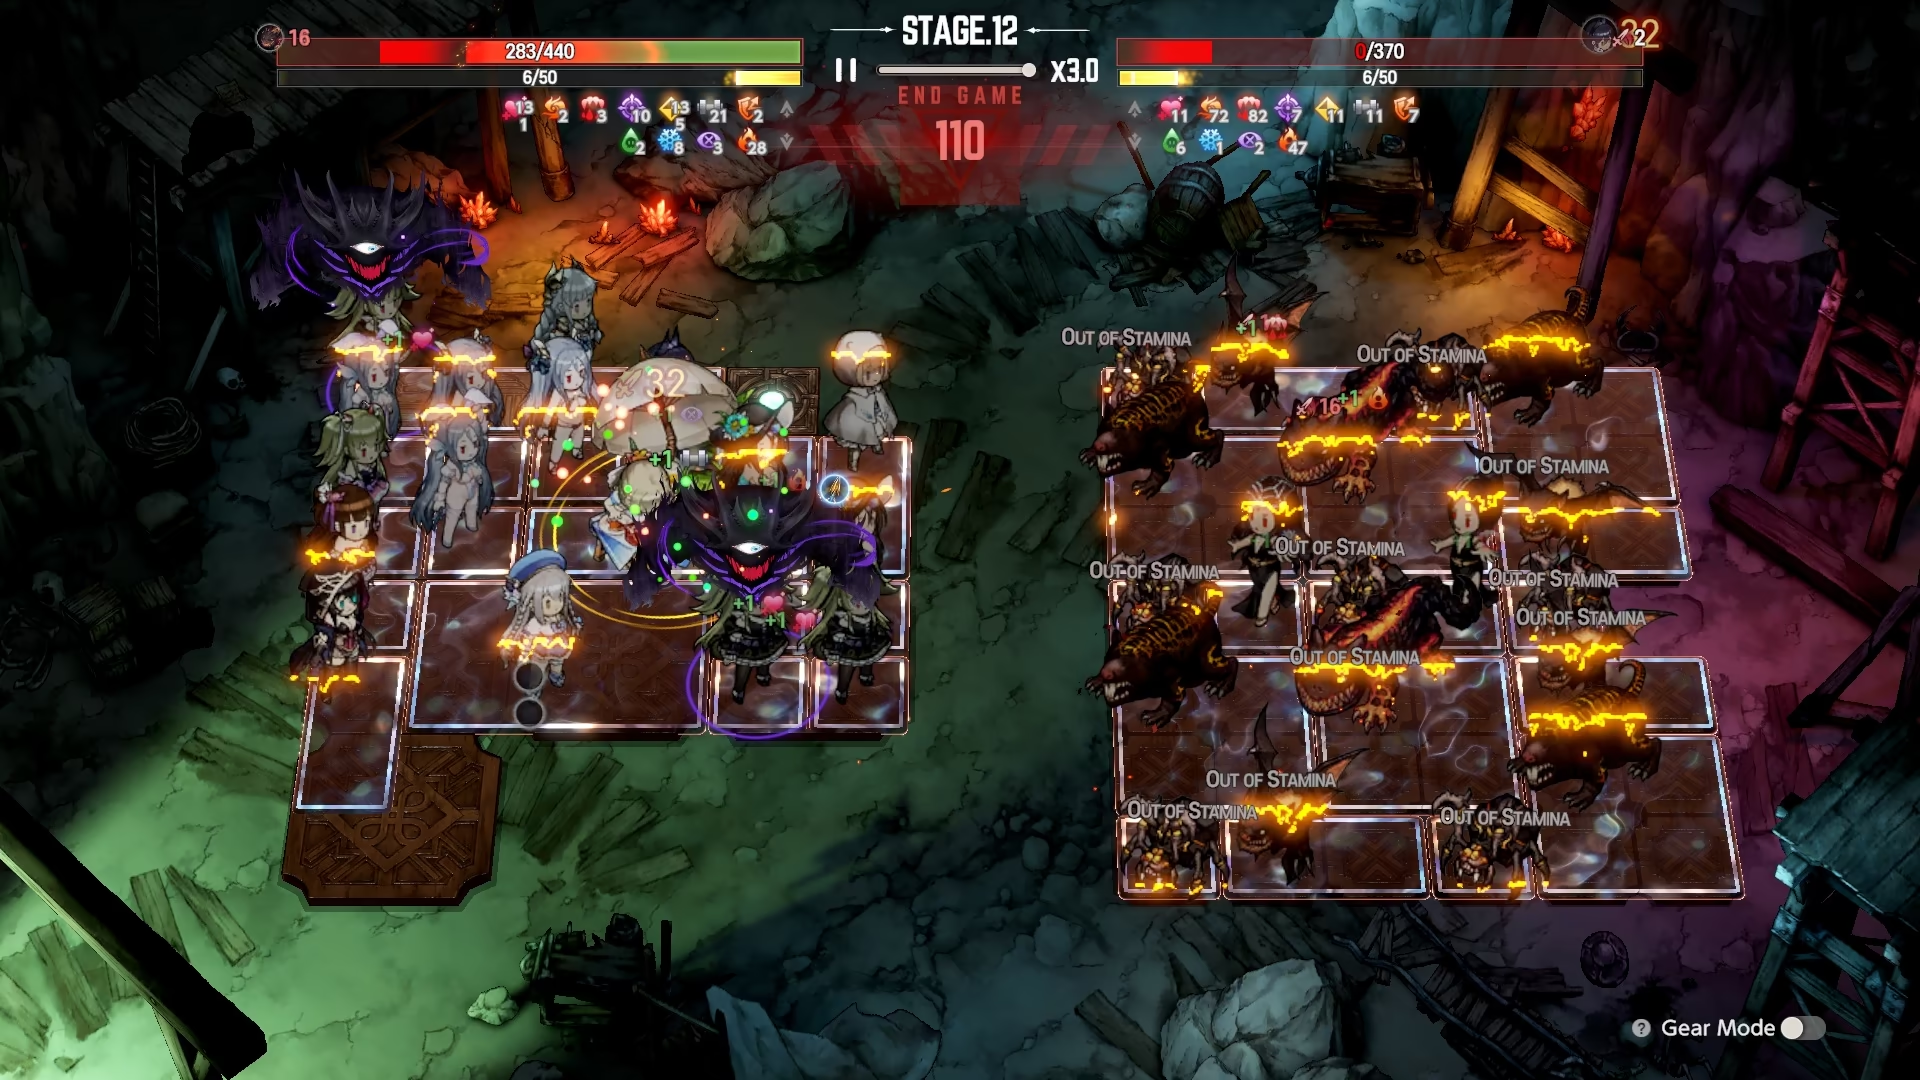
Combat is fully automated and continues until one side's total HP is reduced to 0. If both sides reach 0 HP simultaneously, the player is declared the winner.
During the battle, all Units on the field perform their actions based on their respective cooldowns. The only exceptions are Units that lack individual cooldowns, instead triggering off incoming enemy attacks, allied actions, specific conditional actions, or "Upon Battle Start" triggers (such as Seir - Demon's Daughter, Eclipse - Dream Bride, Refithea - Poolside Fairy, and Jayden - Beautiful Girl Devotee, respectively).
While grid placement matters for triggering team synergy bonuses, spatial positioning does not affect combat targeting. All deployed units strike the entire enemy field simultaneously, meaning you can place your DPS units on any tile or rotate the board layout without changing your team's total damage output.
When a unit performs an Action that requires Stamina, the cost specified on its Unit card is deducted from the team's shared Stamina pool. If the shared pool lacks enough Stamina to fund the action, the Unit cannot perform the move (displaying "Out of Stamina") and will enter its cooldown cycle once again.
More about Stamina
During the Preparation Phase, you can see the Stamina Cost on top. It is calculated as the sum of average Stamina usage across all Units and does not account for Stamina restoring Actions.
 Very Low: 0.0 — 4.9 Stamina.
 Low: 5.0 — 9.9 Stamina.
 Medium: 10.0 — 14.9 Stamina.
 High: 15.0 — 19.9 Stamina.
 Very High: >20.0 Stamina.
End Game
If a match takes longer than 20 seconds to conclude, the End Game mechanic activates. This mechanic inflicts damage over time (DoT) every second to both sides, based on the value displayed under the END GAME label.
The damage scales every 3 seconds upward according to the following logic:
- Below 10 Damage: The value increases by a flat +1.
- 10 Damage and Above: The value begins scaling by 11% every 3 seconds.
Exact Scaling Formula
In reality, the system runs an exponential 11% scaling curve in the background starting from second 1. To smooth the damage curve from the beginning, the system uses +1 increments instead.
Once the background exponential curve naturally surpasses 10, the game switches from the flat +1 floor to the true calculated curve. Because the background curve does not land exactly on 10 before its next iteration, subsequent values are derived from the underlying unrounded formula rather than exactly 10 x 1.11. All final ticking damage values are rounded up to the nearest integer.
Strategy
Current Season offer decent variety of builds you can run to clear the mode.
DPS that show themselves the best are Liatris — Rodev's Star, Rubia — Thorn of the Desert and Blade — Apostle.
When in comes to Supports / Curse units, there are a lot of options, such as Refithea — Pure While Blessing, Celia — The Curse, Levia — Overheat, Liberta — Onsen Manager, Palette — Shattered Dream and more.
The goal is to stack huge amount of Debuffs, in particular Poison, while having moderate sustain to nullify enemy's incoming damage.
Shop
The Shop provides resources such as  Refining Powder,
  Tear of Goddess,
  Gold,
Gold,  Scrolls and
  Magic Crystals.
To access the shop, either visit the Shop tab or use the shortcut inside the Soul Wager mode.
Access Guide
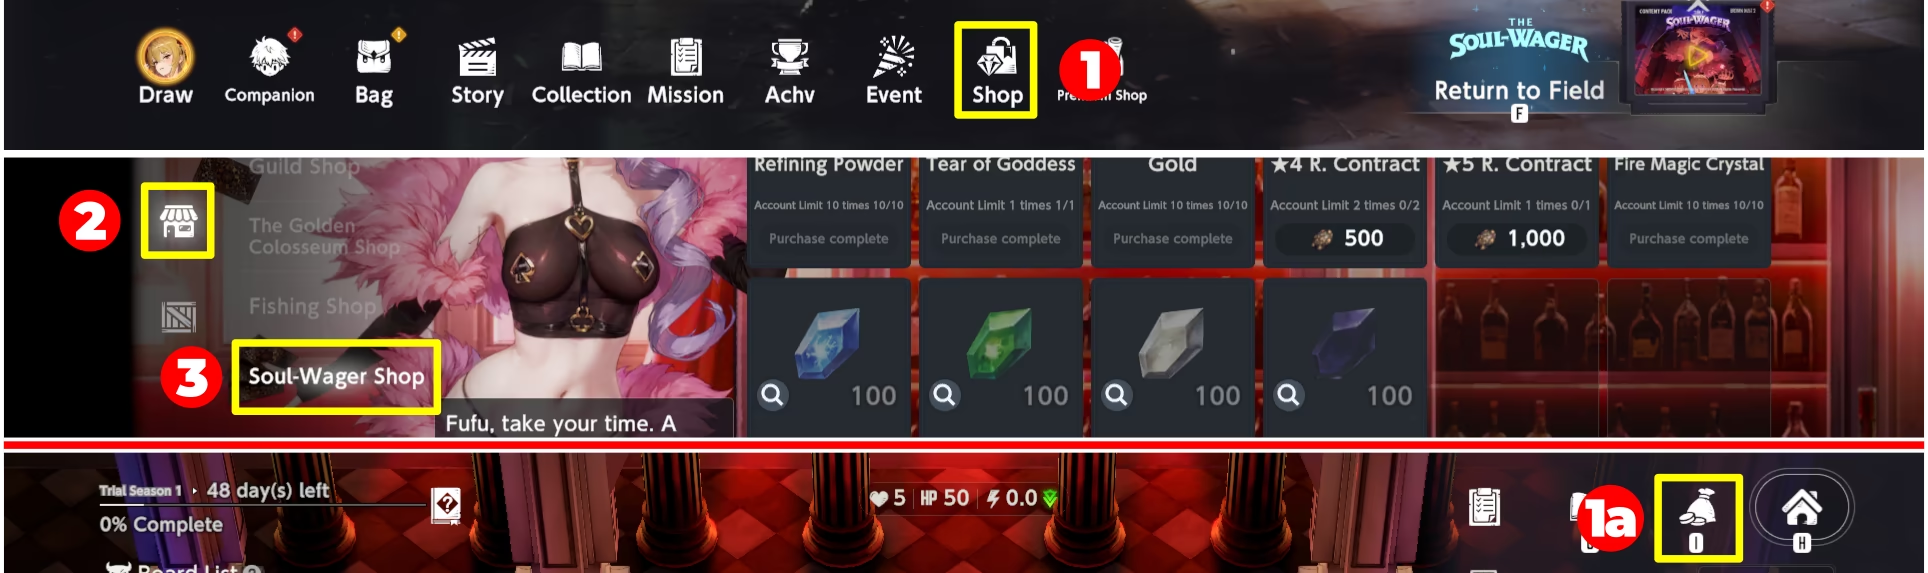
The Soul Wager Shop
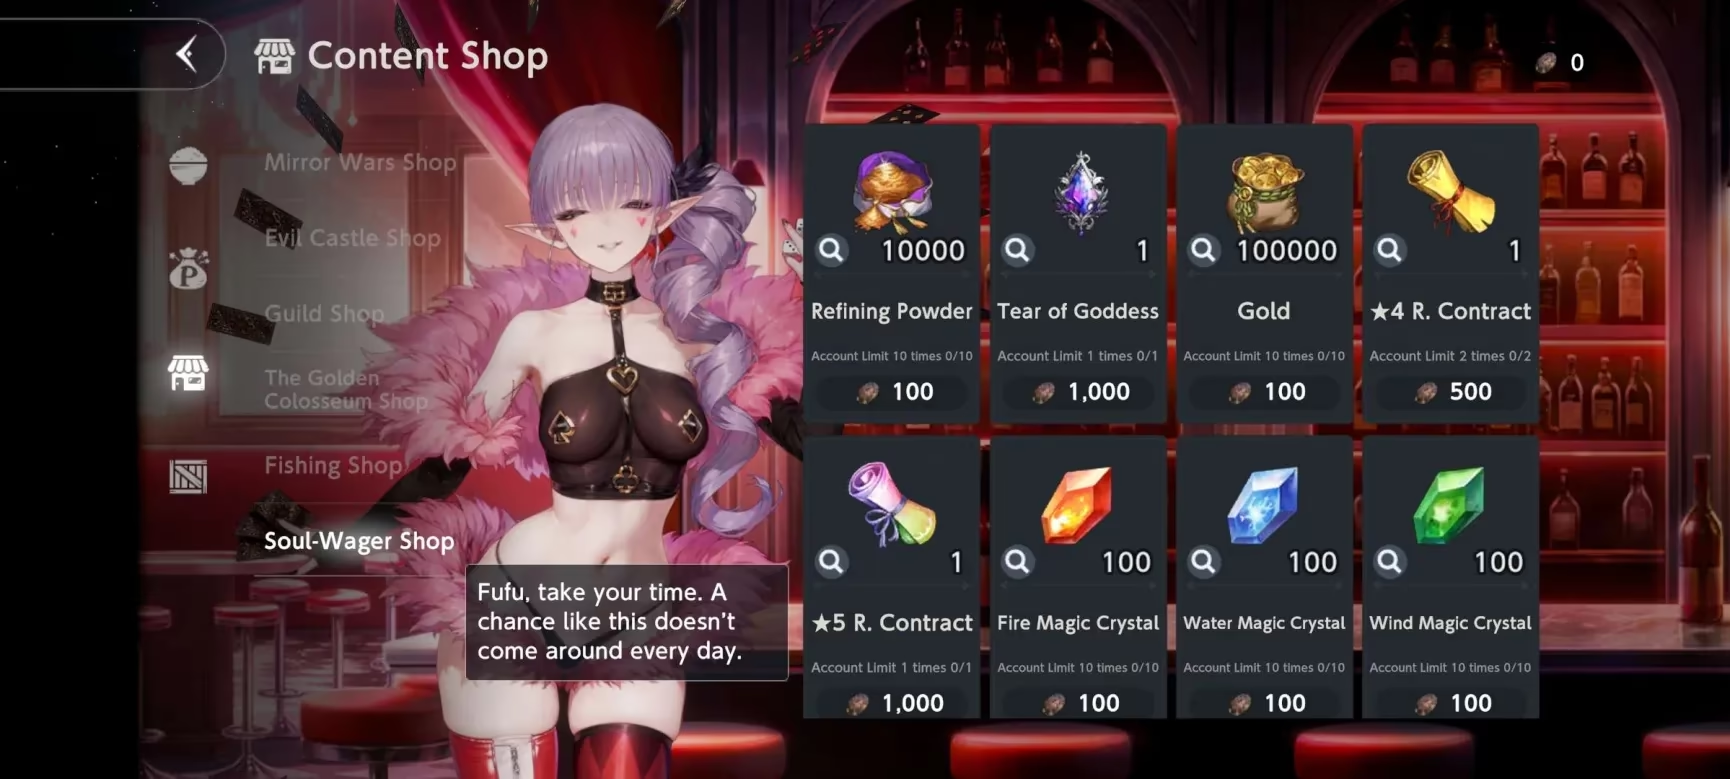
As mentioned earlier, this Shop uses Alea Chips as currency.
You get enough Alea Chips to buy everything from the shop if you clear all the Boards.
Since excessive Alea Chips are removed at the end of the season, you should purchase everything from the shop, including Scrolls, even if you are a veteran player.