
New Player Page
Welcome to Brown Dust 2! Whether you are starting fresh or returning after a break, navigating the game's cartridge system, gacha mechanics, and tactical grid battles can feel overwhelming at first.
This guide provides a structured roadmap to help you build an efficient account from Day 1 without wasting scarce resources. Below you will find breakdowns of the interface, early battle solutions, gacha and ticket priorities, core team templates, and essential daily farming routines.
If you are looking for quick navigation:
- Clear Master Pack 1 (Edge of Dimensions) to unlock the gacha and core event hubs.
- Target The Curse Celia in the Infinite Draw and save your Selective Tickets for meta supports (mostly Adventurer of the Unknown Diana, B-Rank Idol Helena, Homunculus Lathel).
- Never mix Physical and Magic buffers and DPS in the same team composition.
Field Menu Layout
Field Menu Layout
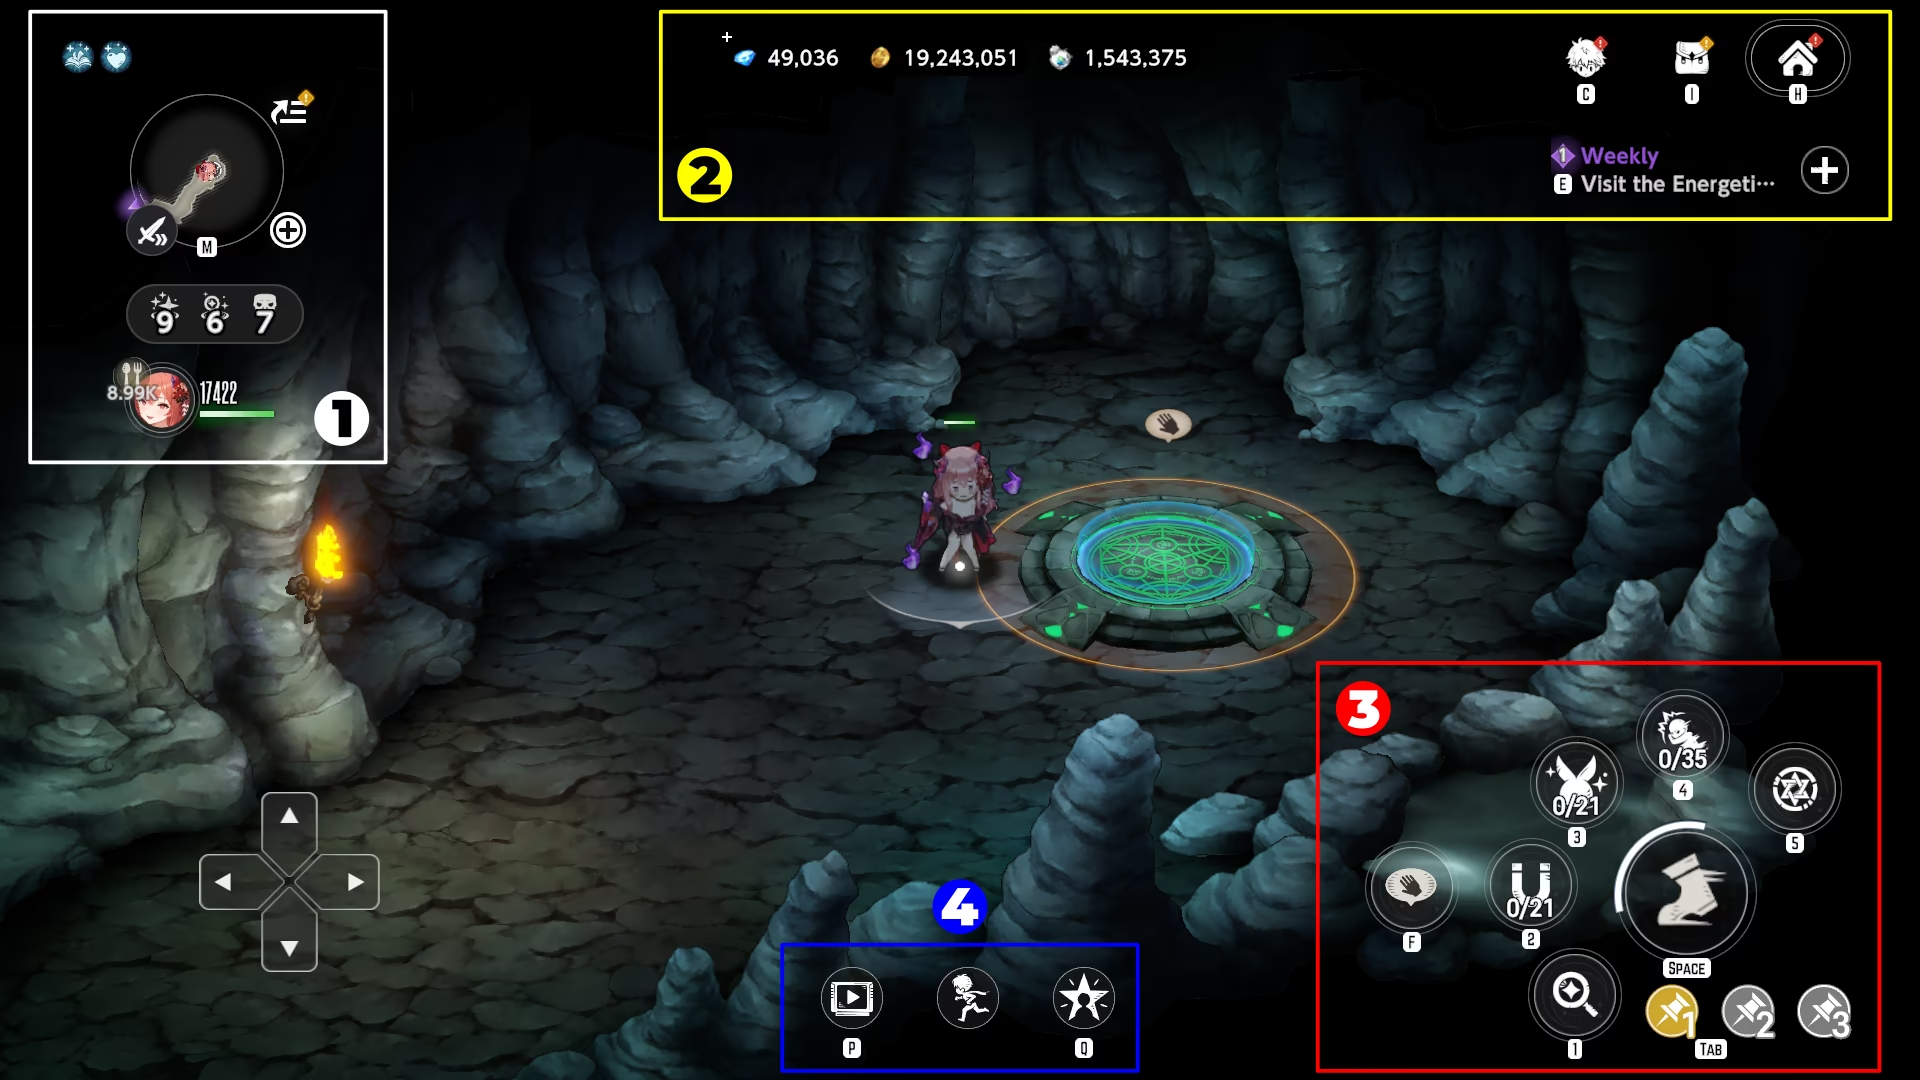
1 — Minimap & Map Info (Top-Left)
- Collection & Rapport & Other Bonuses — View active global stat bonuses applied to the current Pack.
- Minimap & Enlarging Button ([+] Icon) — Shows immediate surroundings; tap the [+] icon to expand into the bigger version of itself, tap the minimap directly to expand into the full area map.
- Shortcut Menu — Fast-travel to key landmarks, such as the Inn or Hunting Grounds.
- Rewards & Exploration Info — Tracks remaining collectibles (glimmers), search objects, and field monsters left in the area.
- Health Bar & Food Option — Track HP of the first Character and enable restoring HP with Food.
2 — Resources, Shortcuts & Quests (Top-Right)
- Current Currencies — Displays current totals for
 Dia,
Dia,  Gold, and
  Ability Pills.
 - Companion — Manage your character roster: level up, equip costumes, upgrade gear, allocate Potential Liberation nodes, Awakening and Burst upgrades.
- Bag — View your inventory of consumables, gear and collection.
- Home — Return directly to the Home Screen.
- Quest Tracker — Displays active quest goals. Tap the tracker to activate Auto-Move pathfinding, or tap the [+] icon to view full quest details.
3 — Interaction, Field Abilities & Movement (Bottom-Right)
- Interaction Button — Interact with objects on the map.
- Field Abilities Shortcut — Quick-cast equipped Field Abilities (Search, Absorption, Assemble, Overpower, Danger Detection etc.) using Ability Pills.
- Dash — Sprint to move faster in fast motion.
- Field Abilities Presets — Cycle between 3 customizable sets of assigned Field Abilities.
4 — Miscellaneous (Bottom)
- Pack Selection (Cartridges) — Switch between Main Story Packs, Character Packs, and Special Content Packs (e.g., Evil Castle, Mirror Wars).
- Field Character — Toggle field sprite appearance between the Story Team, Custom Character, or active Battle Team.
- Field Ability Menu — Use Field Abilities of Characters or create a Shortcut / Presets.
Battle System
Battle System is made in a form of Turn-based strategy.
Battle Screen
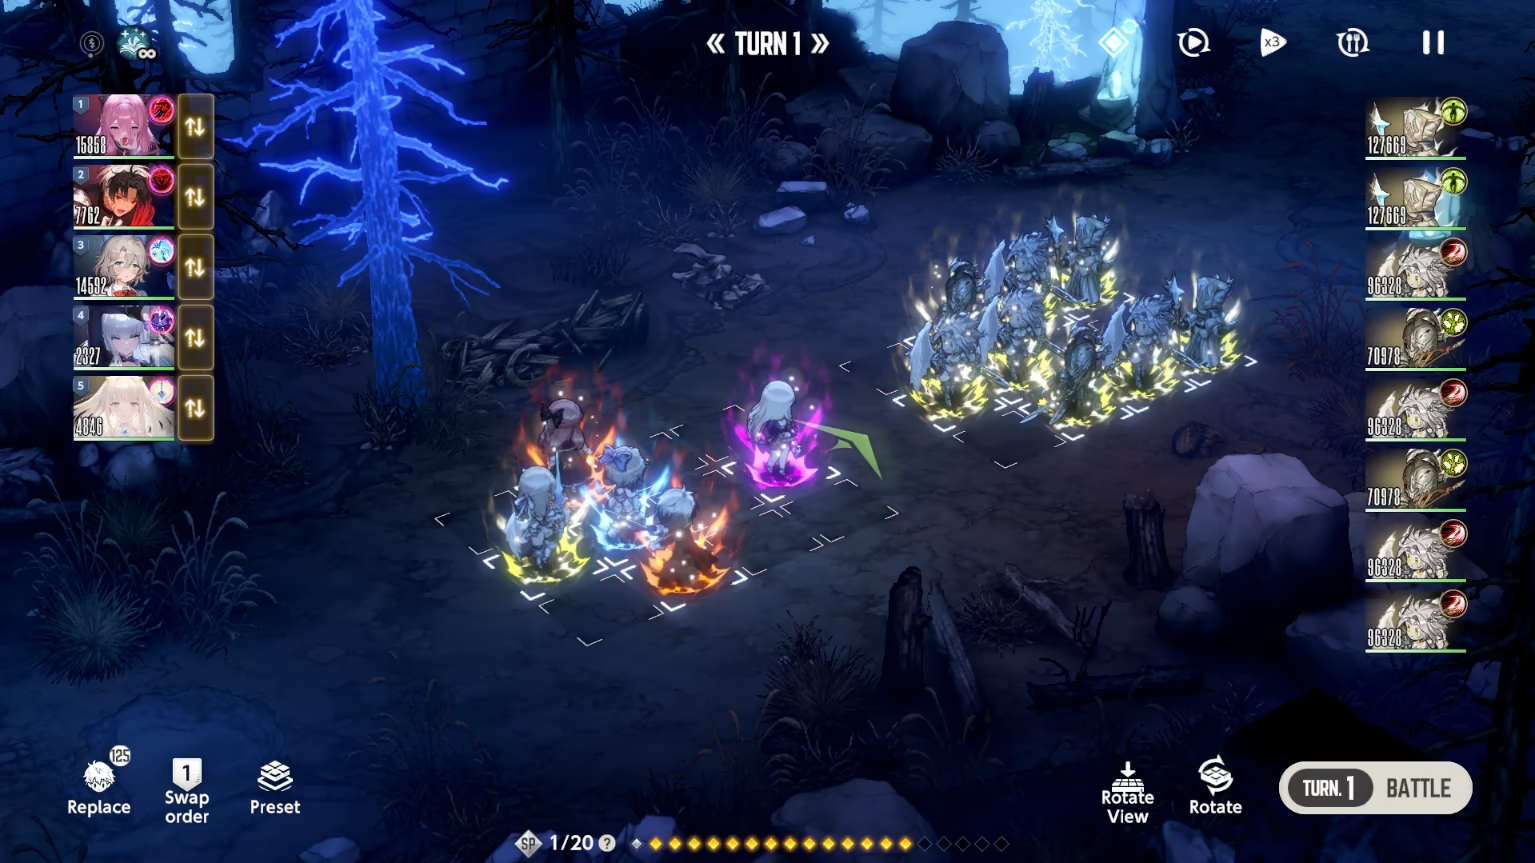
You attack on odd turns, while the enemy attacks on even turns. Before any of your turns, you are allowed to freely position your Characters on a grid and pick used Costumes (Skills).
Each Character can use only 1 Costume (Skill) per turn.
Master Pack 1 Battle Solution
Since Master Pack 1, Edge of Dimensions, mostly relies on using Temporary Units for clears, it can be tricky for a new player to find out good strategies immediately. Therefore, below, solutions to 4 battles are listed if you have troubles clearing the pack and unlocking most of the content in the game.
Episode 27: Defeat the Fallen Angels
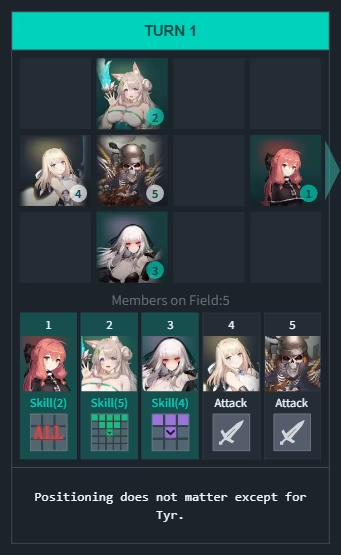
Episode 28: Defeat the Fallen Angels
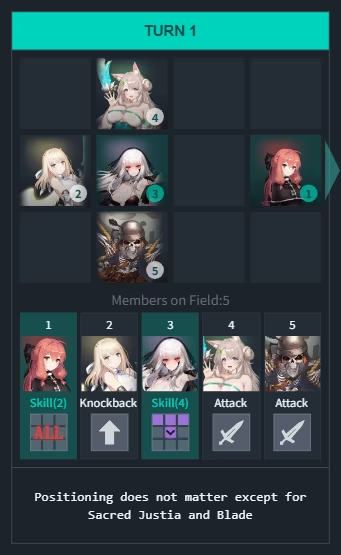
Episode 30: Defeat Ran
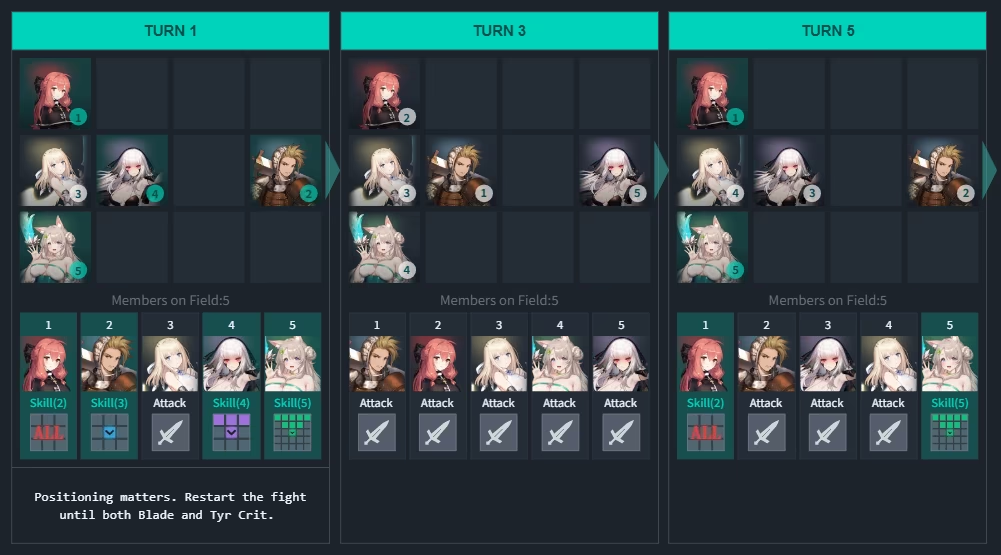
Episode 32: Defeat Ran
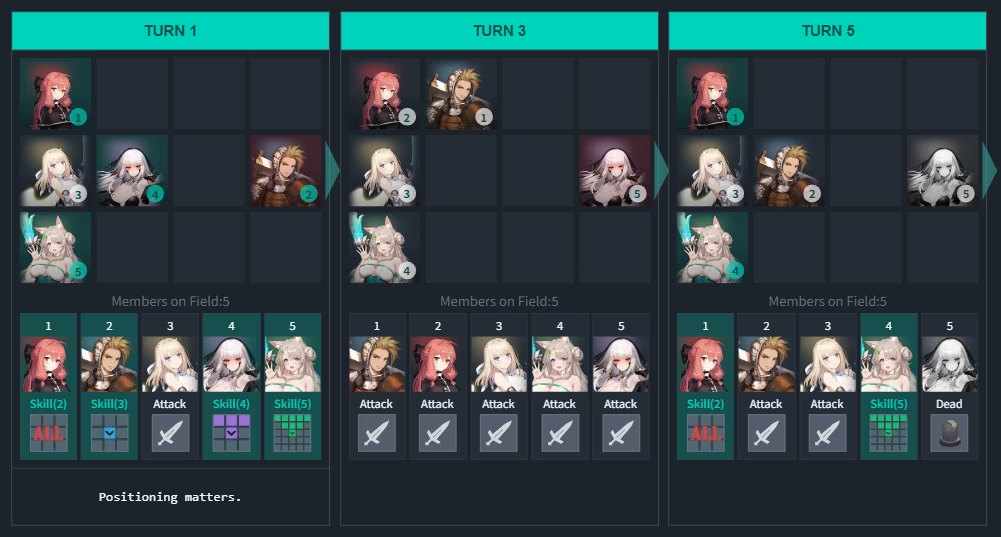
Home Screen Layout
Home Screen Layout
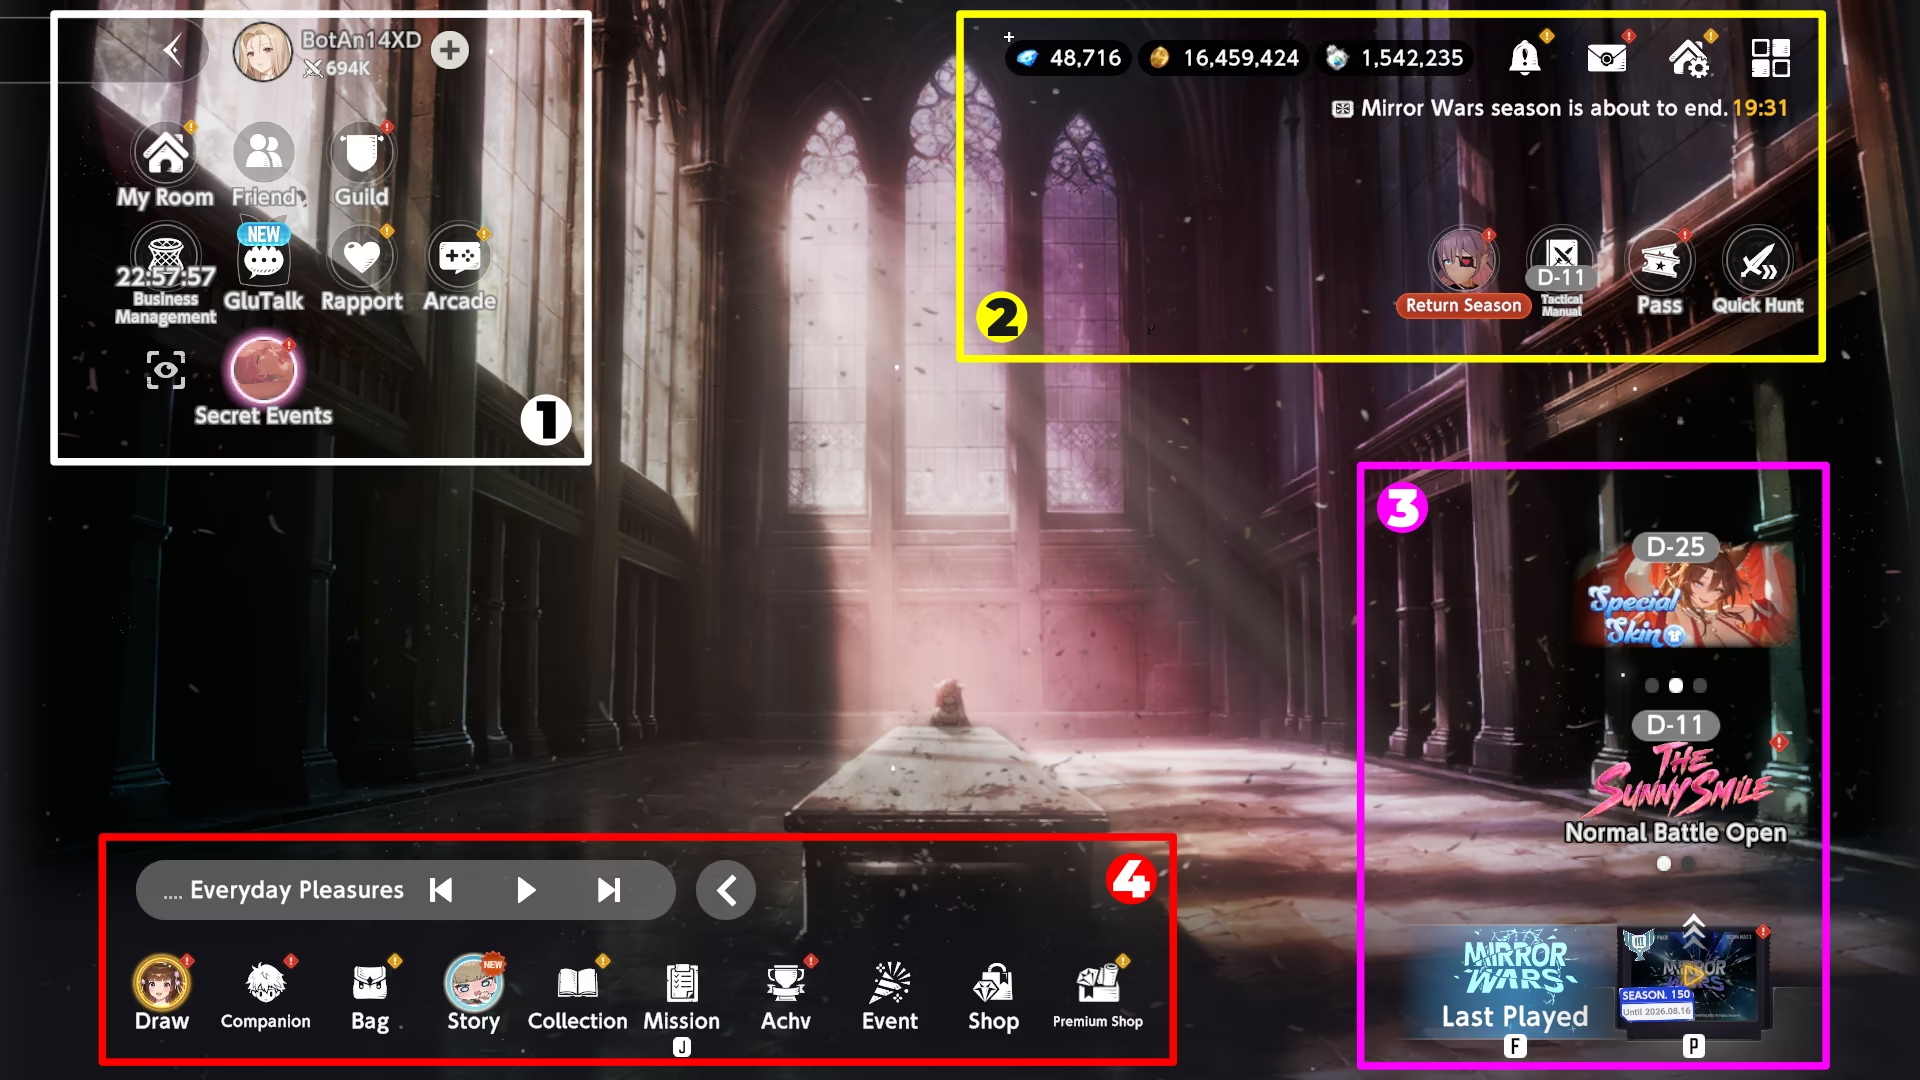
1 — Social & Daily Management (Top-Left)
- Profile / Account — View player Profile & Combat Power. Tapping the plus icon displays your Player ID and detailed account statistics.
- My Room — Customize and decorate a personal dormitory that can be visited by other players.
- Friends — Manage your friend list and set your shared Support Character.
- Guild — Access daily Guild check-ins and participate in seasonal Guild Raids.
- Business Management — Quick-claim shortcuts for passive resource generation from Glupy Diner, Fishing Voyage, and Territory Helpers.
- GluTalk — Text message conversations with specific Costumes to obtain special wallpapers and interactions (Secret Events).
- Rapport — Deepen affinity with specific Costumes / Characters via gifts / dialogue to earn permanent global stat buffs and Dia.
- Arcade — Access standalone mini-games.
- Secret Events / View Mode — Trigger special interactive cutscenes with specific Costumes, or hide the UI for a clean background view.
2 — Currencies, System & Shortcuts (Top-Right)
- Current Currencies — Displays current totals for Dia, Gold, and Ability Pills.
- Notices — Official patch notes, maintenance alerts, update announcements, and player feedback surveys.
- Mailbox — Collect login bonuses, maintenance compensation, package purchases, pass and coupon codes rewards.
- Wallpaper Editor — Customize lobby artwork.
- Settings & ETC (Grid Icon) — Account linking/switching, settings, customer support, and the official in-game Guidebook.
- News Ticker — Scrolling banner alerting you of banners or events ending soon.
- Return Season — Special event button that appears during Fiend Hunter rerun seasons.
- Tactical Manual — Shortcut to Taros Tactical Manual, a monthly tactical puzzle mode with clearance rewards.
- Pass — Central hub for the Guide Pass, Season Pass, Character Pass and other seasonal passes.
- Quick Hunt — Instantly sweep unlocked Hunting Grounds and Path of Adventure stages without having to load into the map.
3 — Cartridges & Event Shortcuts (Bottom-Right)
- Prestige & Special Skins — View active cosmetic skins offers (purely visual overhauls with no gameplay stat bonuses).
- Season Event — Shortcut to the current limited-time event hub (Event Story, Mini-game, Fiend Hunter, and Event Shop).
- Pack Selection (Cartridges) — Switch between Main Story Packs, Character Packs, and Special Content Packs (e.g., Evil Castle, Mirror Wars).
You Need to Know This
Season Event button is scrollable. Doing so will give you the access to the previous Seasonal Event Shop, allowing you to spend the currency.
4 — Navigation Dock (Bottom)
- Jukebox — Select background music from the unlocked soundtrack collection.
- Draw (Gacha) — Summon on rate-up banners, standard banners, and claim daily free pulls.
- Companion — Manage your character roster: level up, equip costumes, upgrade gear, allocate Potential Liberation nodes, Awakening and Burst upgrades.
- Bag — View your inventory of consumables, gear and collection.
- Story (Archive) — Story replay archive for main story chapters, seasonal events, and cutscenes. (Note: Reading stories here does not progress the actual game).
- Collection — Track collected costumes, weapons and items to get permanent account-wide Collection stat bonuses.
- Missions — Track Daily and Weekly tasks for regular Dia and other resources income.
- Achv (Achievements) — Long-term account milestones, trophy achievements, and title rewards.
- Event — Special check-ins, Pickup Missions and ongoing reward campaigns.
- Shop — In-game exchange shops using earned gameplay currencies (Golden Thread, Mirror Wars medals, Powder of Hope).
- Premium Shop — Cash shop for Dia bundles, subscription packs, and special paid packages.
Pack System
Almost all content is divided into Packs. To switch the Packs, press the Cartridge in Home Screen.
Image Guide
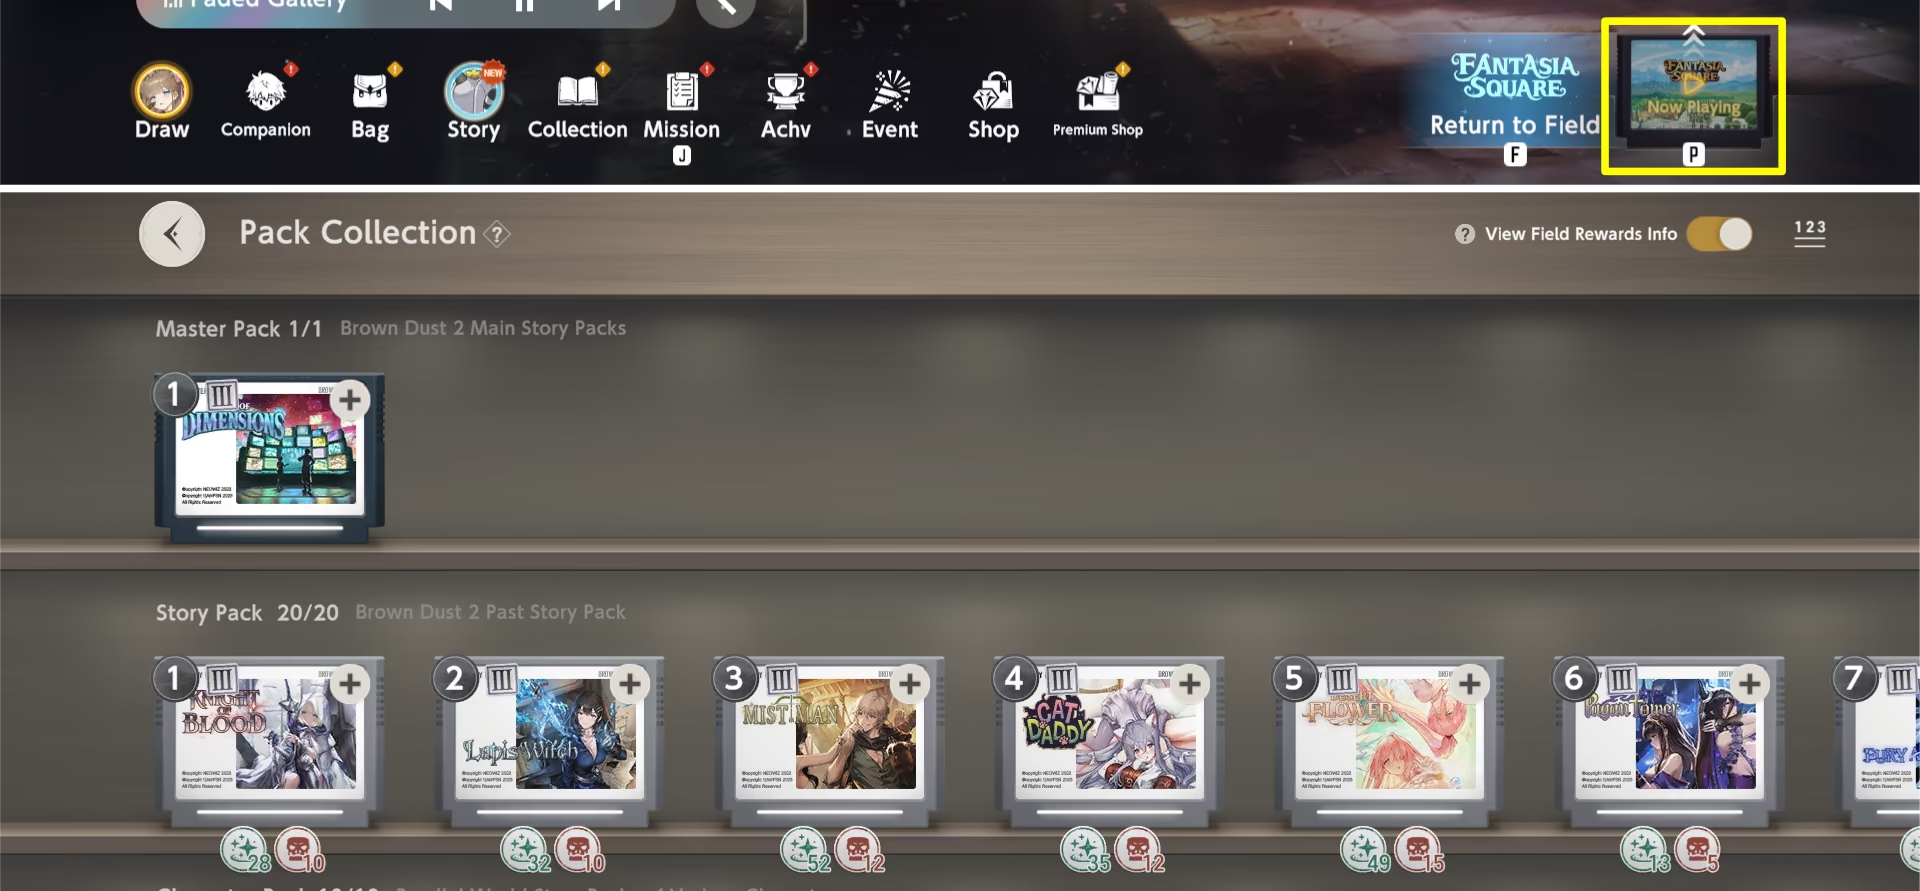
A Common Mistake
Story tab serves for an Archive, not progressing down the Story. You can read stuff from there, but it will not grant any progress.

Guide Pass
The Guide Pass is a beginner event designed to help new players learn game mechanics while earning essential progression resources.
It is located in the top right corner of the Home Screen in the Pass tab. Additionally, while it's active, it will be displayed above the Pass button.
Image Guide

Guide Pass Image
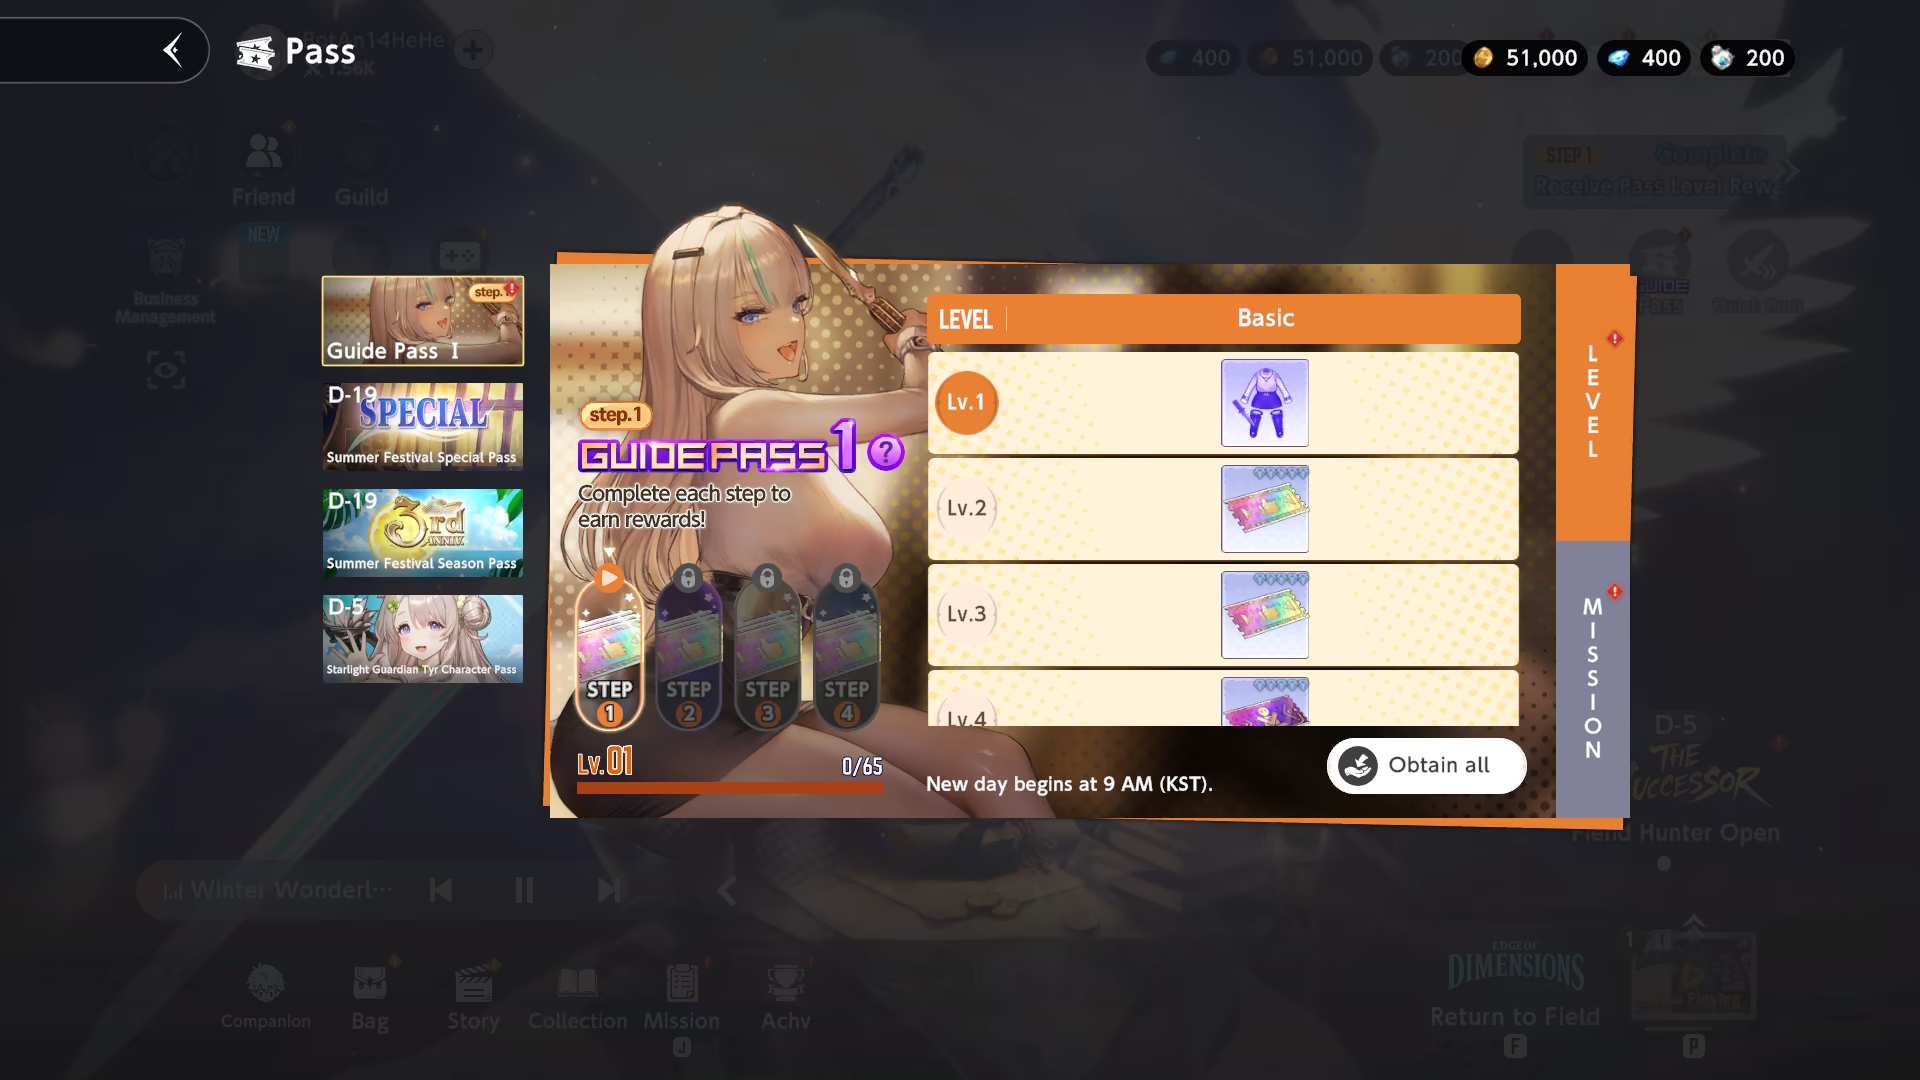
There are a total of 2 Guide Passes, with 4 Steps for each.
It is incredible powerful tool to learn the game. Follow tasks and try to remember things.
Common Pass Problems
- Proceed with Hunting Grounds Battle... — use a shortcut for Hunting Grounds, located near a minimap.
Image Guide
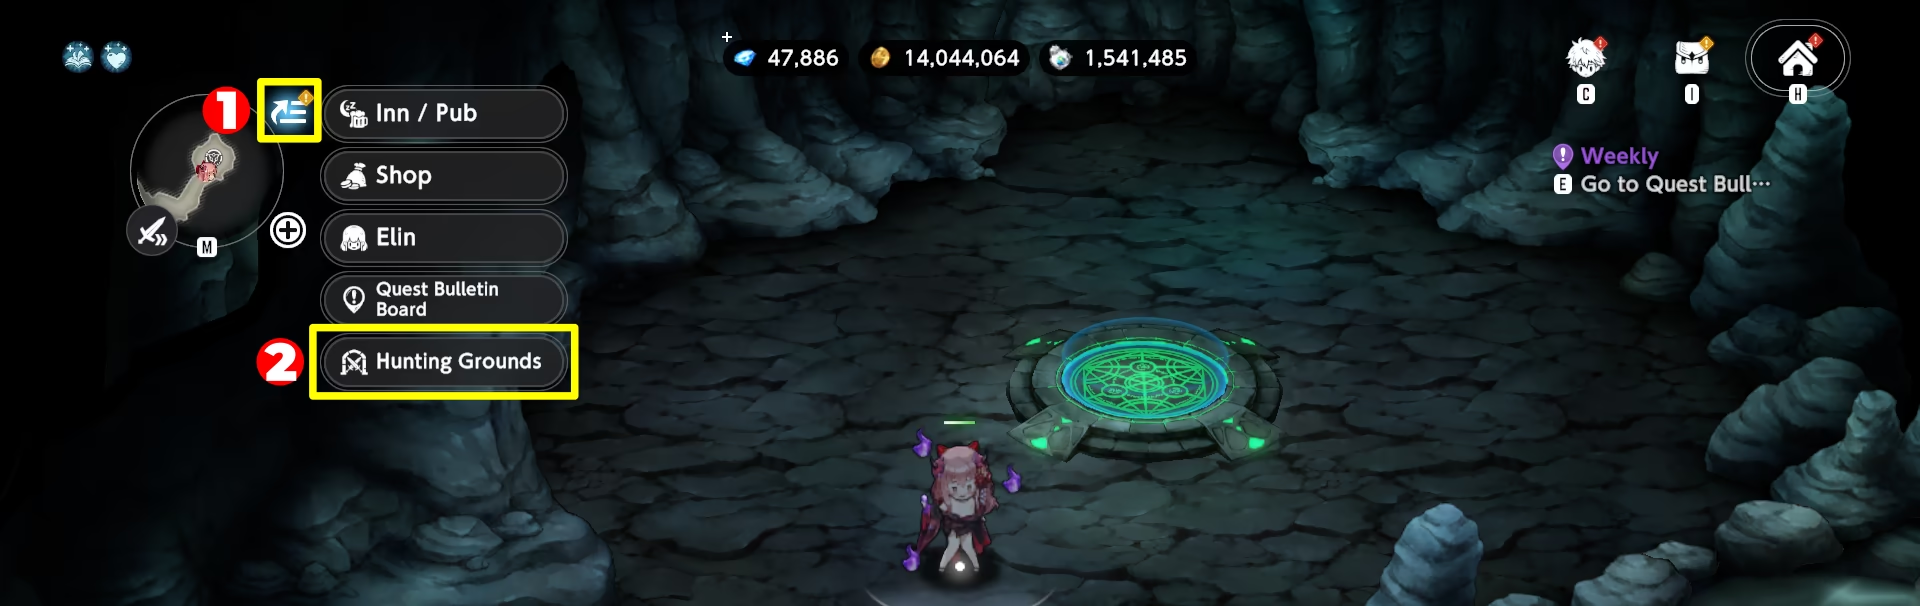
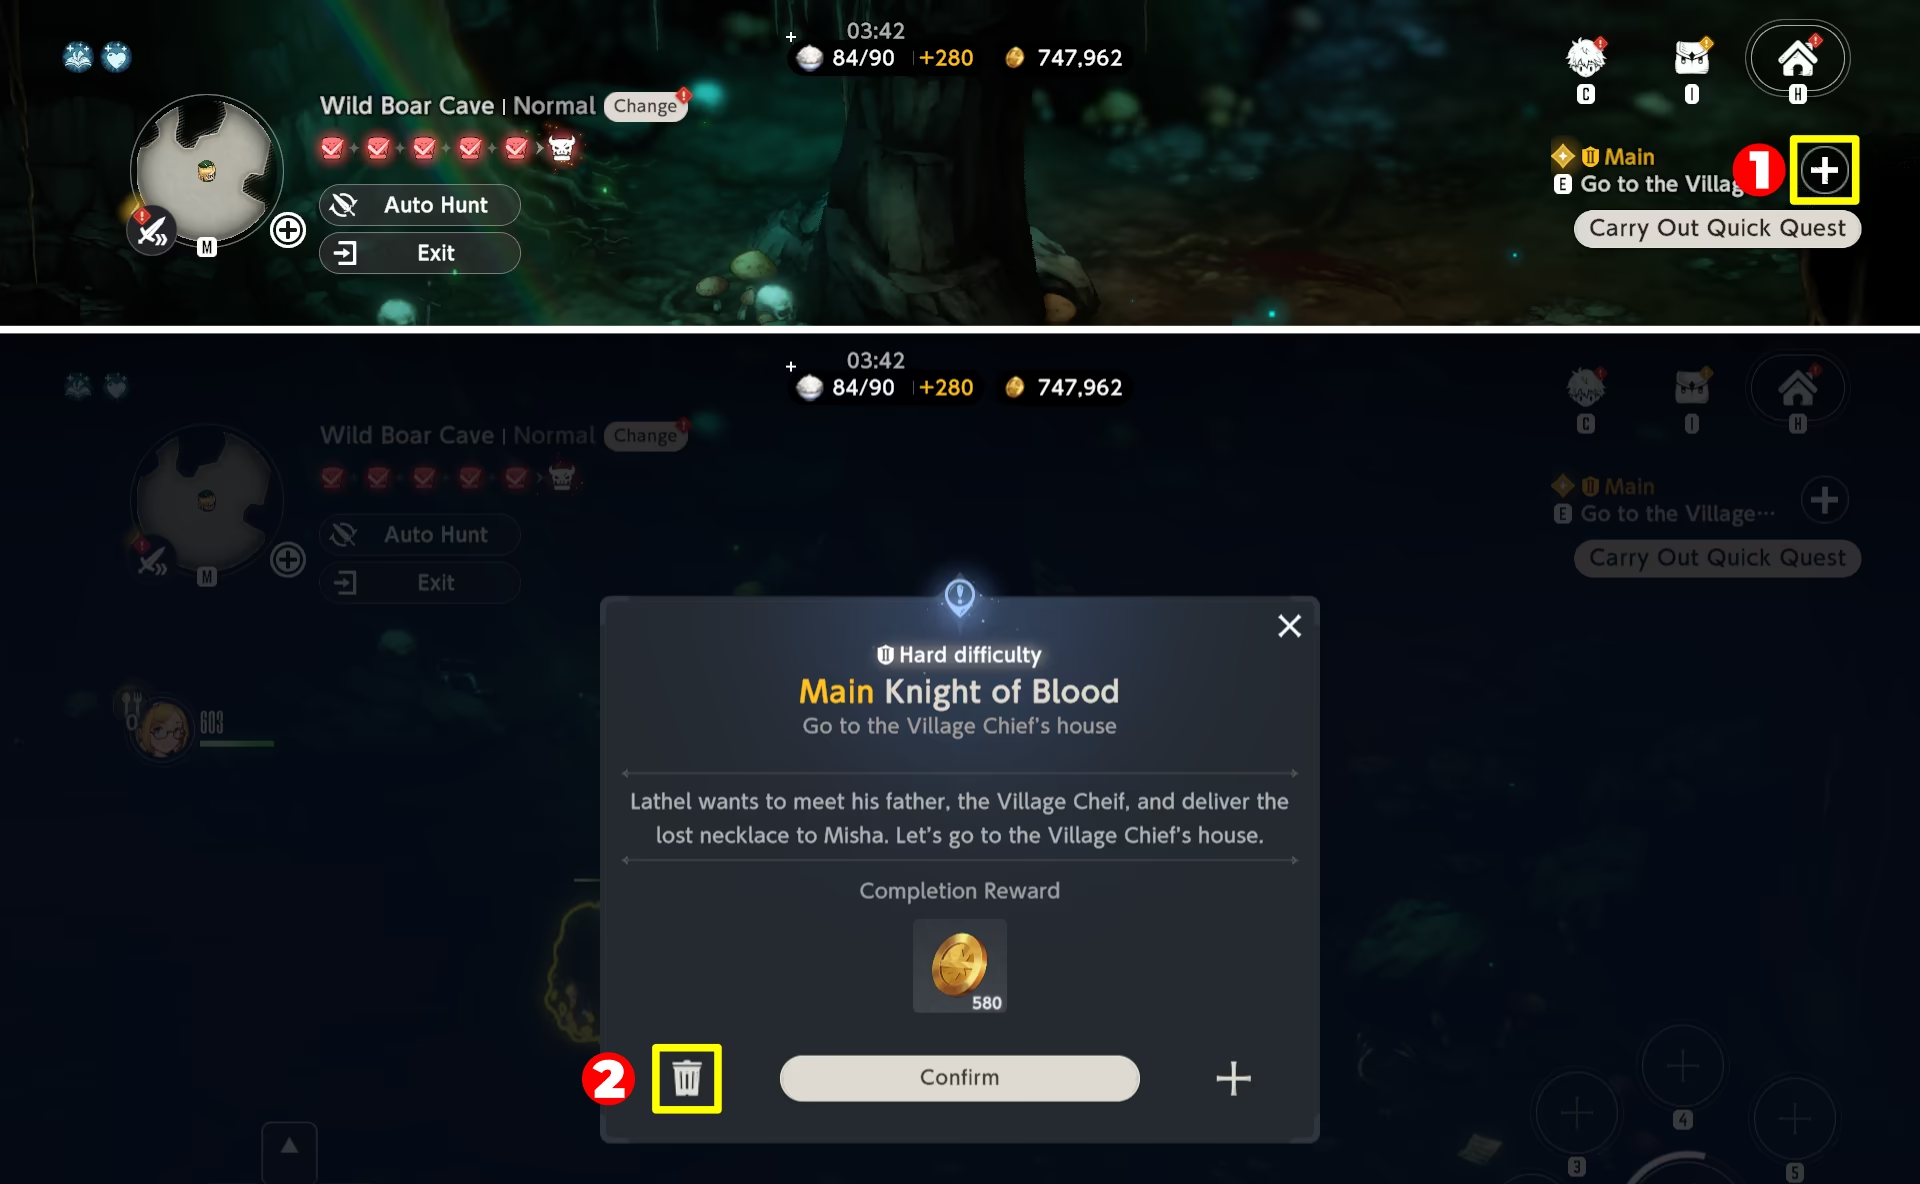
If there are no enemies in Hunting Grounds, cancel the active quest.
Image Guide
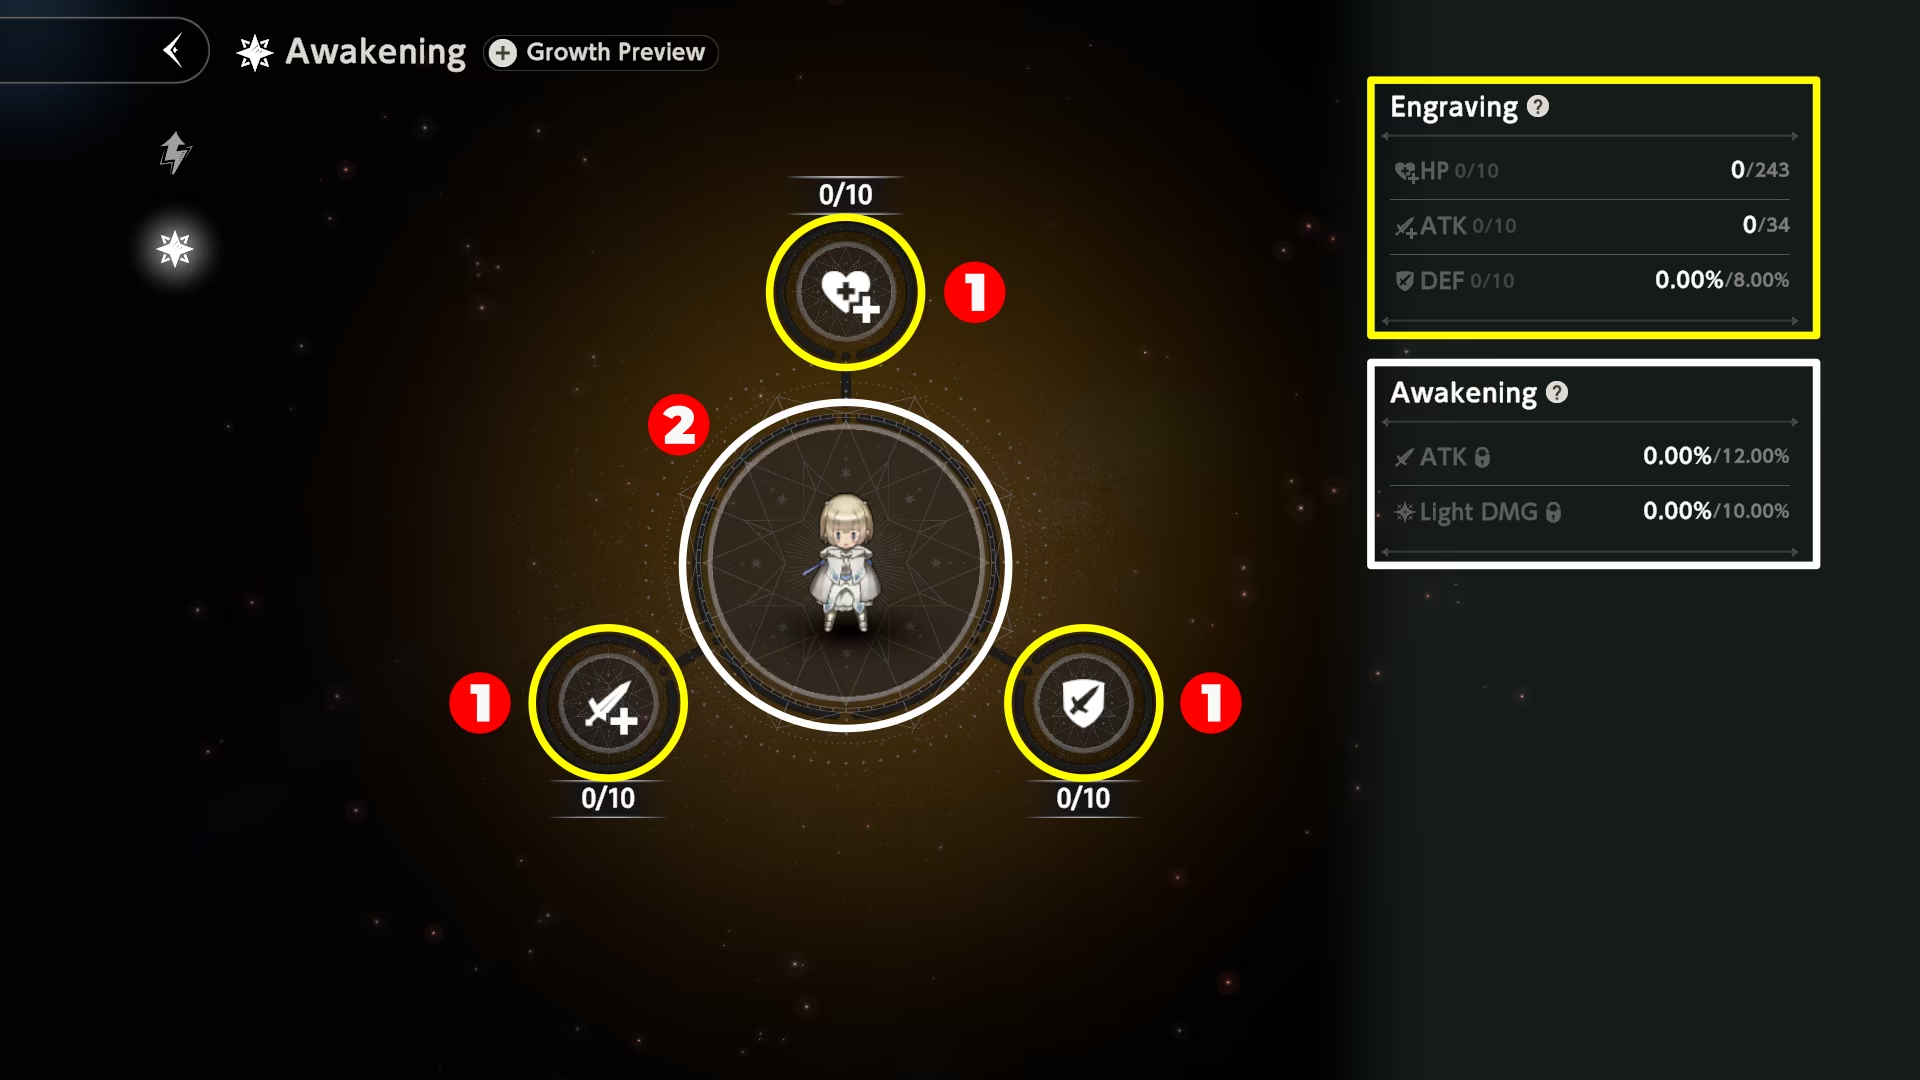
- Proceed with Companion awakening Growth — Task wants you to do full engraving (3 nodes) and Awakening upgrade itself (in the middle).
Image Guide
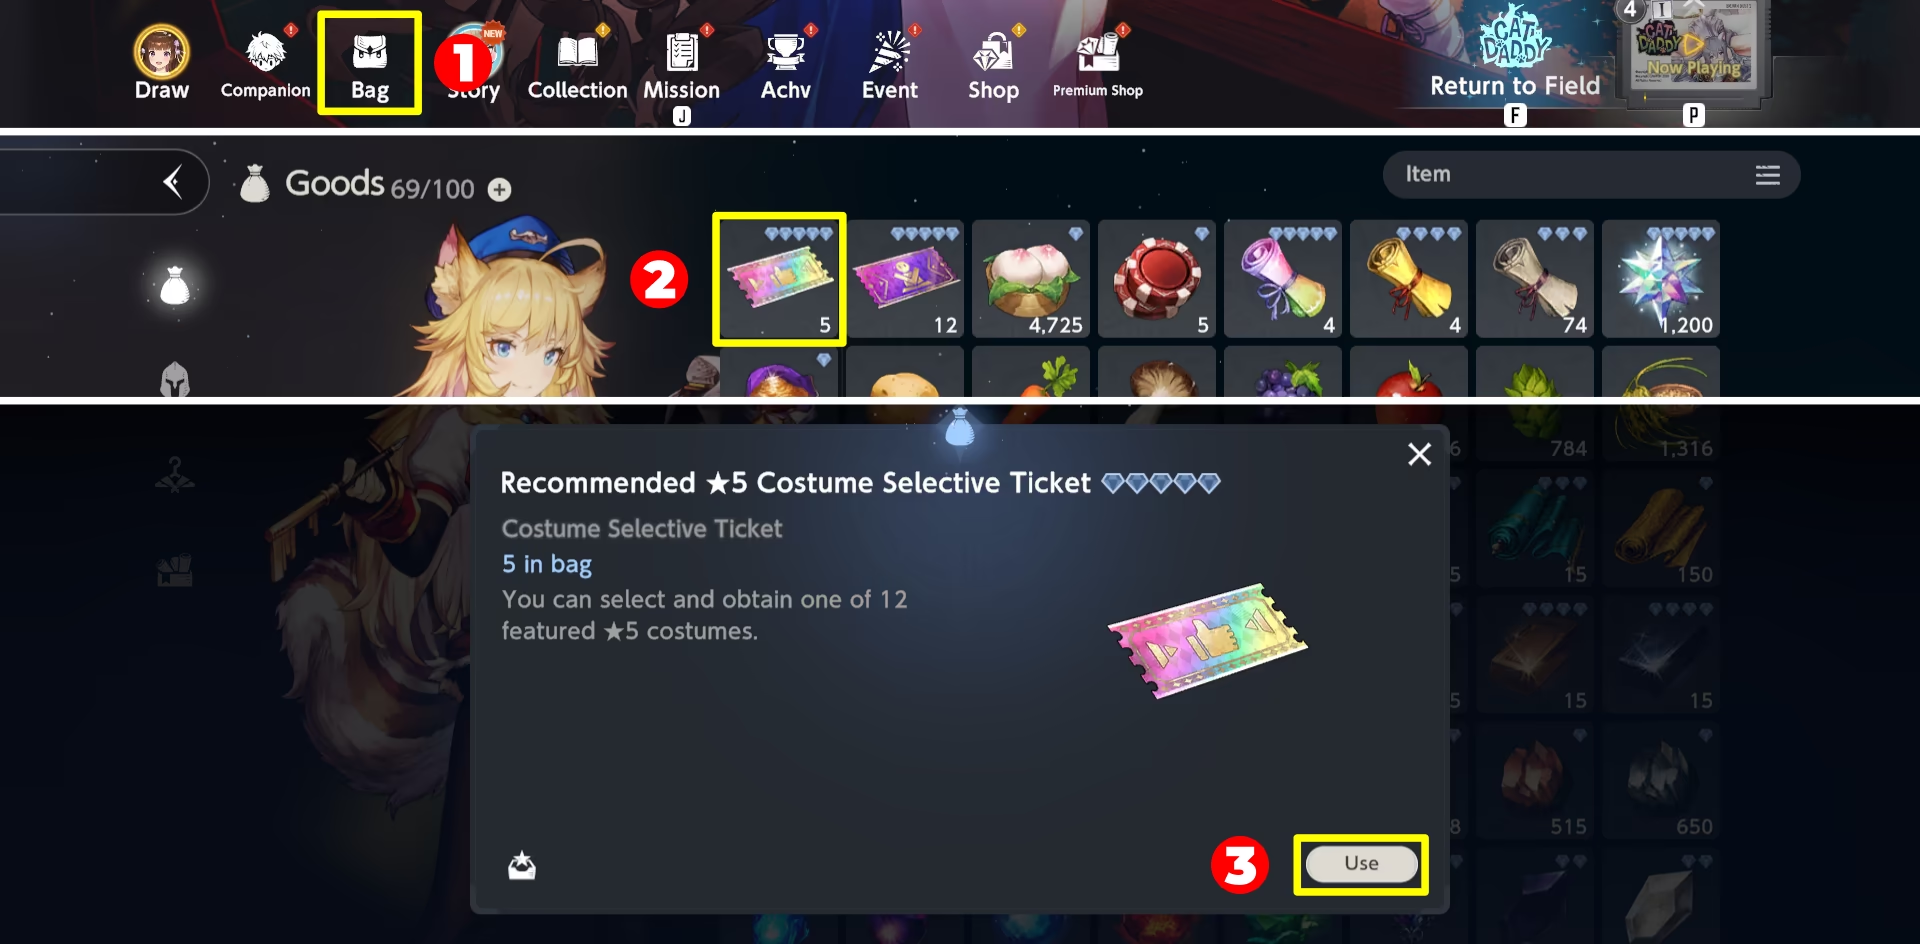
Recommended ★5 Costume Selective Tickets
Recommended ★5 Costume Selective Tickets are the ones that are given as a reward in a Guide Pass, as well as some Paid Packages.
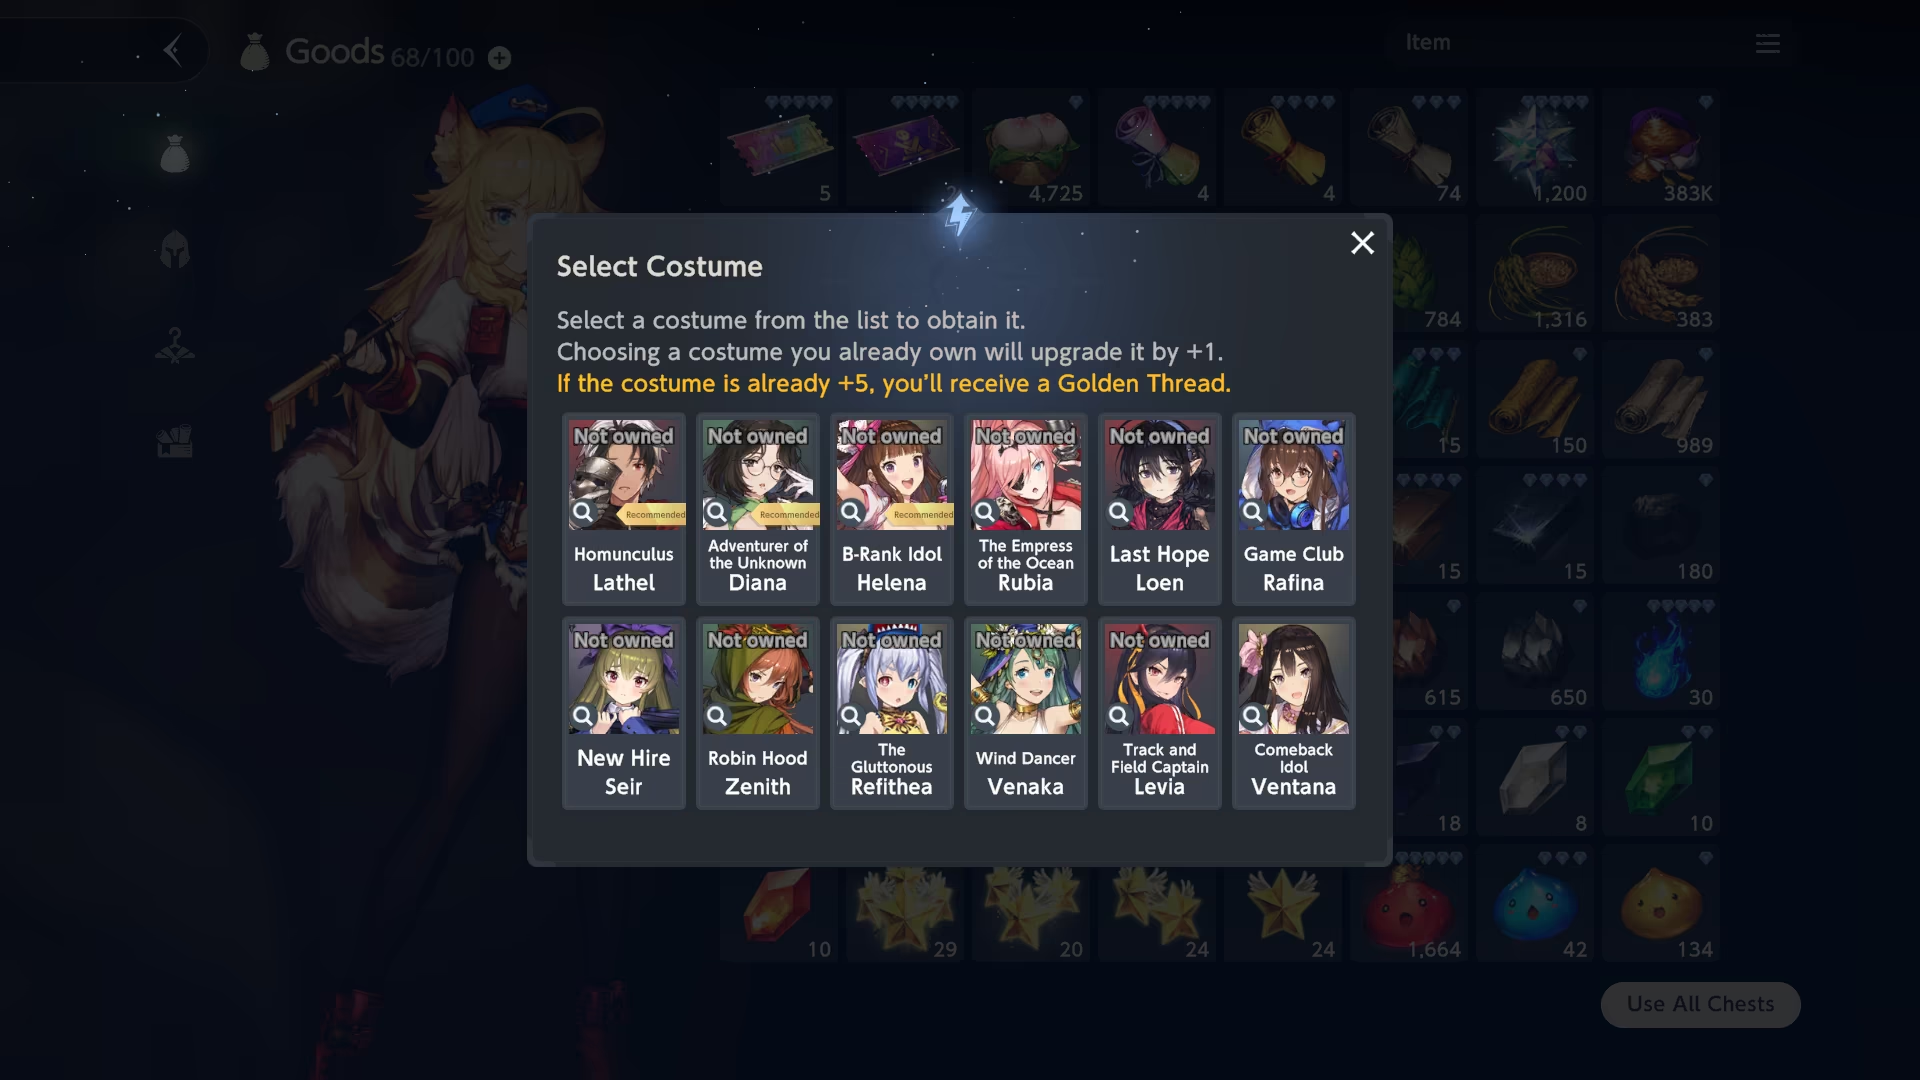
Each Ticket allows you to pick 1 Costume amongst 12 suggested.
To use tickets, head to the bag and press corresponding button.
Image Guide
Selection Menu
Guide Pass gives you 12 tickets. Mega SALE!!! First Time Countdown Package! (Paid Package) gives another 5. Occasional other Paid Packages can give you 3 tickets as well.
Assuming you have no one, you should pick
- Adventurer of the Unknown Diana +2 (3 tickets)
- B-Rank Idol Helena +1 (2 tickets)
- Homunculus Lathel +2 (3 tickets)
- New Hire Seir +0 (1 ticket)
- Track and Field Captain Levia +0 (1 ticket)
- Robin Hood Zenith +0 (1 ticket)
- Game Club Rafina +0 (1 ticket)
Assuming you also bought Mega SALE!!! First Time Countdown Package!, your choice changes to:
- Adventurer of the Unknown Diana +4 (5 tickets)
- B-Rank Idol Helena +3 (4 tickets)
- Homunculus Lathel +3 (4 tickets)
- ...
Order, generally speaking, does not matter since at the end you will have the same costume set either way. Nonetheless, you can start by picking B-Rank Idol Helena +1 first to comfortably run your starting team.
Gacha
For quick reference, check the sections below. If you, however, want to check other banners' suggestions or more in-depth explanation, refer to the Gacha page.
Infinite Draw
Infinite Draw is a banner that allows you to obtain free ★5 Costume within some pool. You can roll the banner infinitely, but keep in mind that only 1 ★5 Costume is possible from it.
Infinite Draw Image
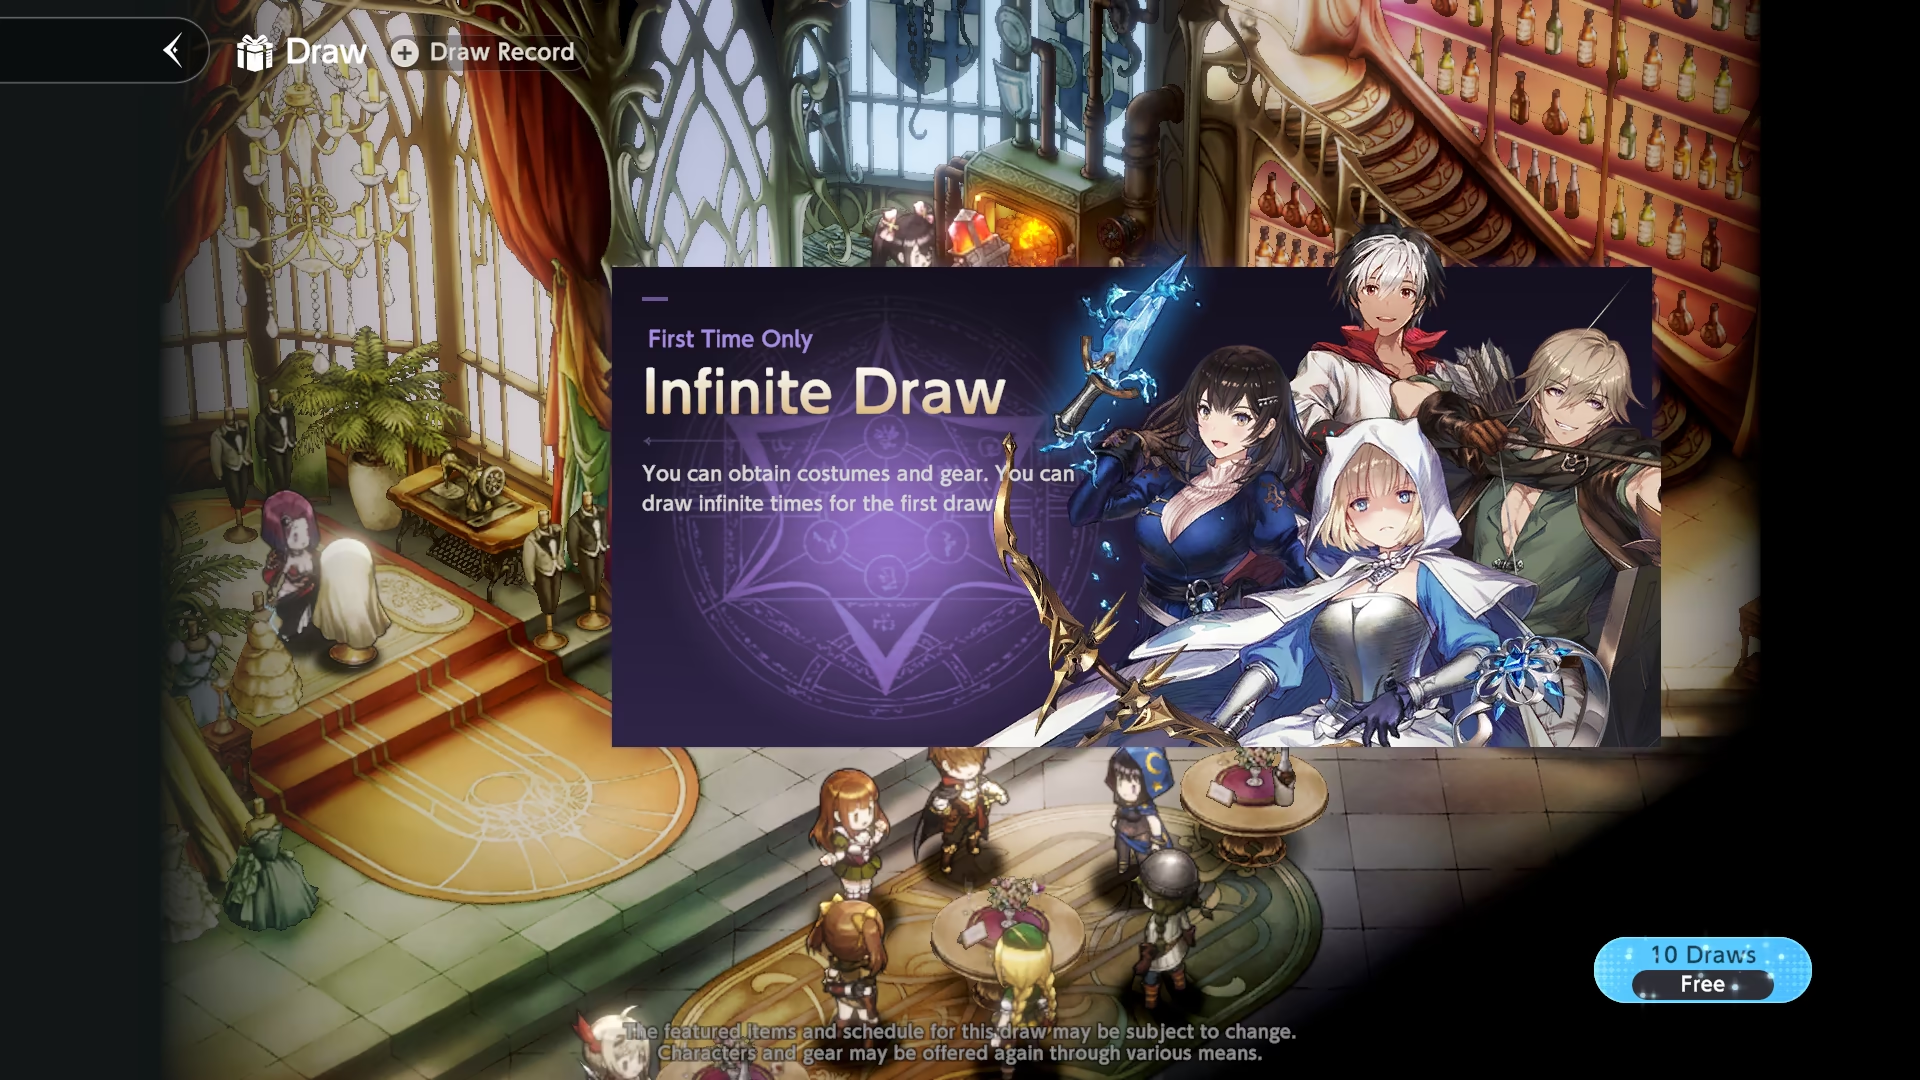
As soon as you claim your draw, you will have the access to the rest active banners.
For the Infinite Draw, go for The Curse Celia Costume. Rest, such as Gear or ★4 Costumes, does not matter.
Nowadays, there are some other viable choices like Gentle Maid Anastasia and Top Idol Helena, but since game is support-heavy, Celia is still recommended over DPS or defensive Supports.
Good Infinite Draw
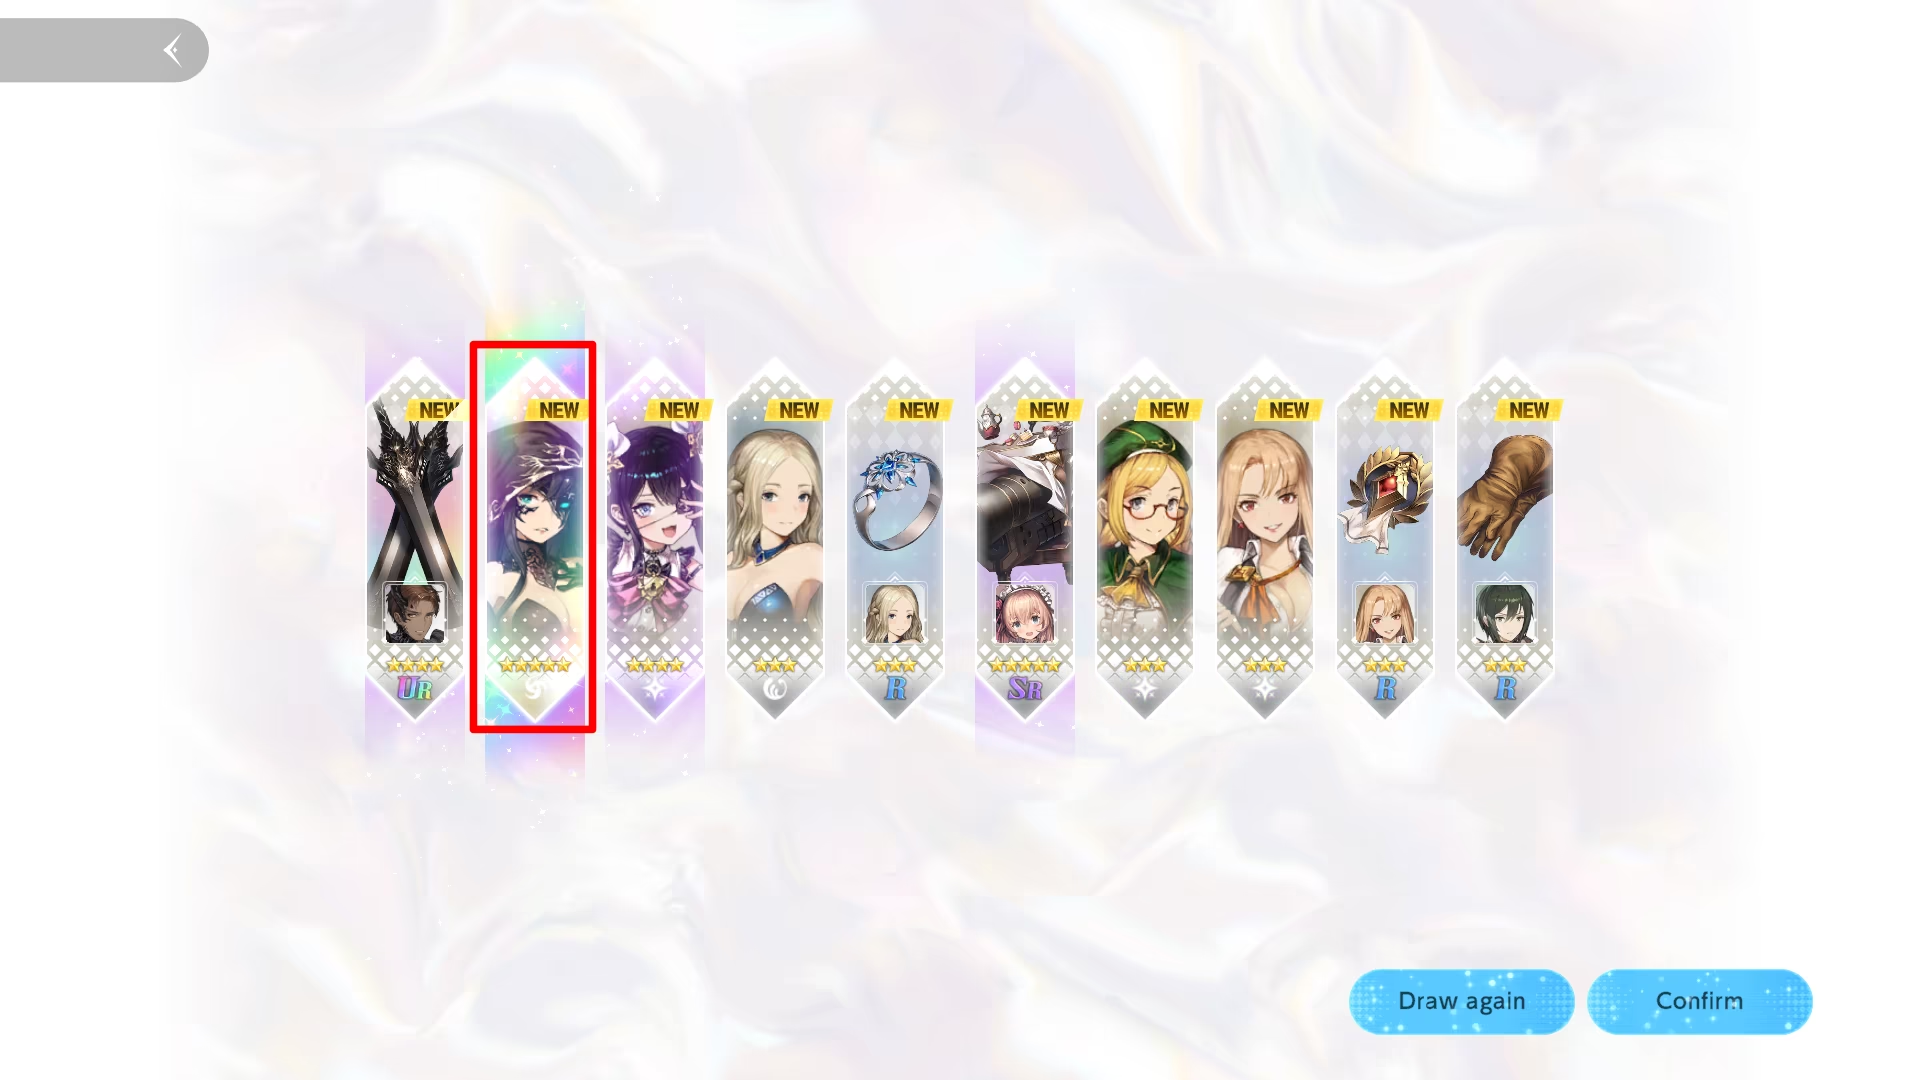
Active Banners
For current Active Banners, refer to Banner Recommendations.
Tickets & Dia Usage
As a general rule,
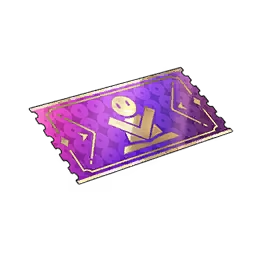 Selective Exclusive Draw Tickets (Purple tickets) — for 12-Pick Banner.
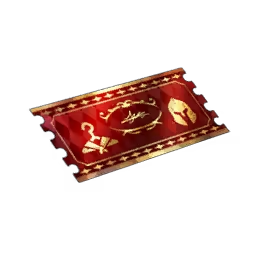 Draw Tickets (Red Tickets) — for regular banners. Sometimes using in 12-Pick banner is fine, but keep it balanced.
- Dia — treat them as Red Tickets, but always have 1k for purchasing a Seasonal Pass.
1 Draw Ticket is equal to 200 Dia, with 10x Draw costing 2000 Dia, respectively.
Teams
Generally speaking, there is no universal team for every content. Broadly, it depends on enemies.
However, for simplification, in a story you tend to run the same core stuff with some modifications.
The general idea is 1-3 DPS, with rest being Supports. 3 Supports and 2 DPS is author's preferred team composition for simple fights, although it can vary.
Avoid Mixing Physical & Magic Damage Types!
Keep your buffers and DPS within same damage type, unless you know what you are doing.
 ATK Buffers (Arines, Homunculus Lathel) only buff
  Physical damage.
 MATK Buffers (B-Rank Idol Helena, Elpis) only buff
  Magical damage.
- Universal Buffers (Kind Student Samay, Adventurer of the Unknown Diana) buff both damage types.
General Content AoE Team
This team is designed to clear battle with a lot of enemies.
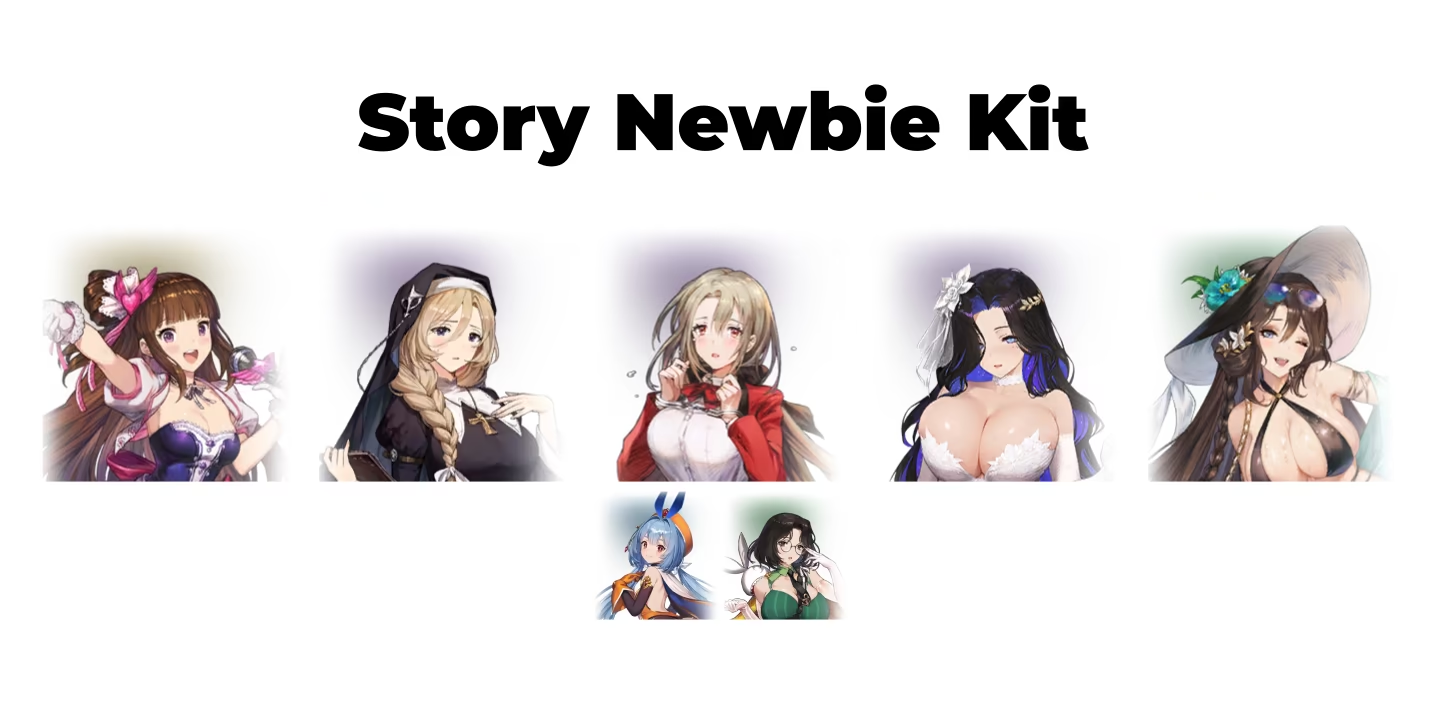
Newbie AoE Team
Text Version
- Slot 1 — B-Rank Idol Helena — 5★ Support — from Recommended ★5 Costume Selective Ticket.
- Slot 2 — Hand of Salvation Elpis — 4★ Support — from any Gacha banner.
- Slot 3 — Kind Student Samay — 4★ Support — from any Gacha banner.
- Substitute — Queen of Gluttis Granadair — 5★ Support — from random Pub Recruit.
- Substitute — Adventurer of the Unknown Diana — 5★ Support — from Story Pack 10 Pub Recruit — if enemy is
 Light or
  Water.
- Slot 4 — Dream Bride Eclipse — 5★ DPS — from Events Tab.
- Slot 5 — Summer Vacation Dalvi — 5★ DPS — from Events Tab.
Costumes vs Characters
To clarify things, in a battle you use Characters.
On the image and in the list, Costumes are provided as a Turn 1 option. If you use these Costumes (Skills) on Turn 1, you have more chances to finish the battle in a single turn.
Do I really have to use ★3/4 Characters?
There is absolutely nothing wrong with using ★3/4 Supports. To be even more precise, ★5 equivalents are often worse at low upgrade dupes than +5 ★3/4 Costumes.
Of course, you can replace them once you are established in the game, but it should not be your main objective early on.
What positioning should I use?
There is no solid concrete positioning, because it varies based on the enemies.
If your current positioning clears, there is no reason to change it. If you fail, check positioning first.
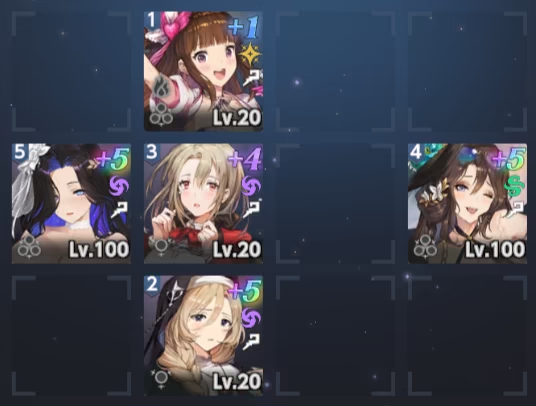
Nonetheless, most of layouts vulnerable to damage from middle row/column, therefore, put DPS in the middle, while supports positioning does not matter much.
One of possible positioning layouts
Additional Note
Dalvi's and Eclipse's order can be altered based on enemies. Supports order in this team does not matter.
General Content Single Target Team
This team is suitable for fights against a single targets, like Apostle Partan.
Newbie Single Target Team
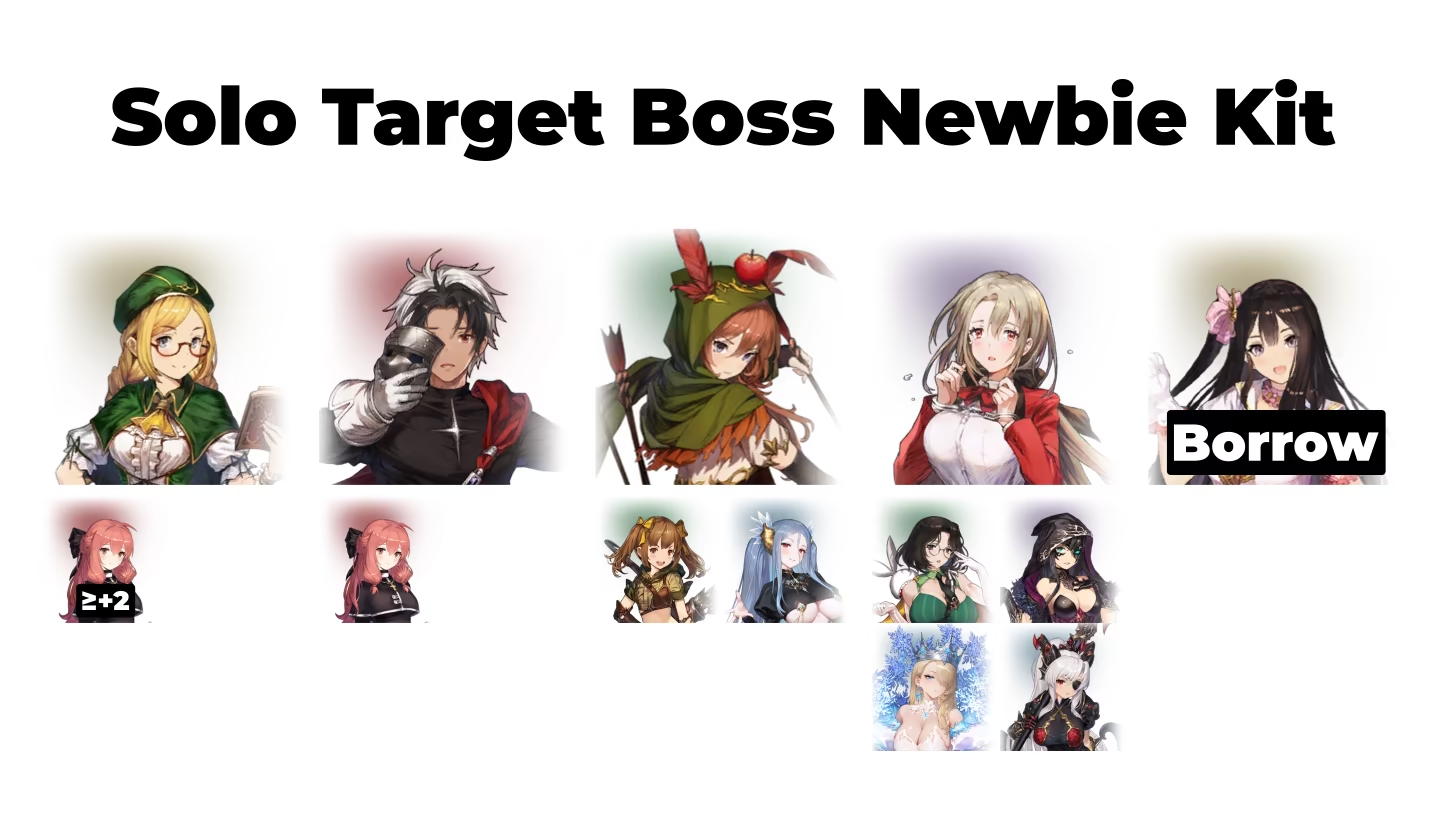
Text Version
- Slot 1 — Priest of Vitality Arines — 3★ Support — from any Gacha banner.
- Substitute — Dark Saintess Liberta — 5★ Support — from Story Pack 15 Pub Recruit — if she is +2 or higher.
- Slot 2 — Homunculus Lathel — 5★ Support — Recommended ★5 Costume Selective Ticket.
- Substitute — Dark Saintess Liberta — 5★ Support — from Story Pack 15 Pub Recruit.
- Slot 3 — Robin Hood Zenith — 5★ Support — from Recommended ★5 Costume Selective Ticket.
- Substitute — Little Hunter Rigenette — 3★ Support — from any Gacha banner.
- Substitute — Apostle Morpeah — 5★ Support — from Story Pack 17 Pub Recruit.
- Slot 4 — Kind Student Samay — 4★ Support — from any Gacha banner.
- Substitute — Adventurer of the Unknown Diana — 5★ Support — from Story Pack 10 Pub Recruit — if enemy is
 Darkness.
 - Substitute — The Curse Celia — 5★ Support — from Infinite Draw Gacha Banner.
- Substitute — Frozen Queen Wilhelmina — 5★ Support/DPS — from Events Tab.
- Substitute — Night of Death Mamonir — 5★ Support/DPS — from random Pub Recruit.
- Substitute — Adventurer of the Unknown Diana — 5★ Support — from Story Pack 10 Pub Recruit — if enemy is
- Slot 5 — Comeback Idol Ventana — 5★ DPS — borrow from Friends.
How to Borrow?
- Find a person with the unit you need, either via social media, in-game or via other means.
- Send request and get accepted.
- Head into the battle, then press Replace → Hand symbol in the top right corner → Pick the desired unit.
Hunting Grounds, Path of Adventure & Quick Hunt
Quick Hunt you can see on the Home Screen and Field Screen is combined menu for Hunting Grounds and Path of Adventure.
Quick Hunt Menu
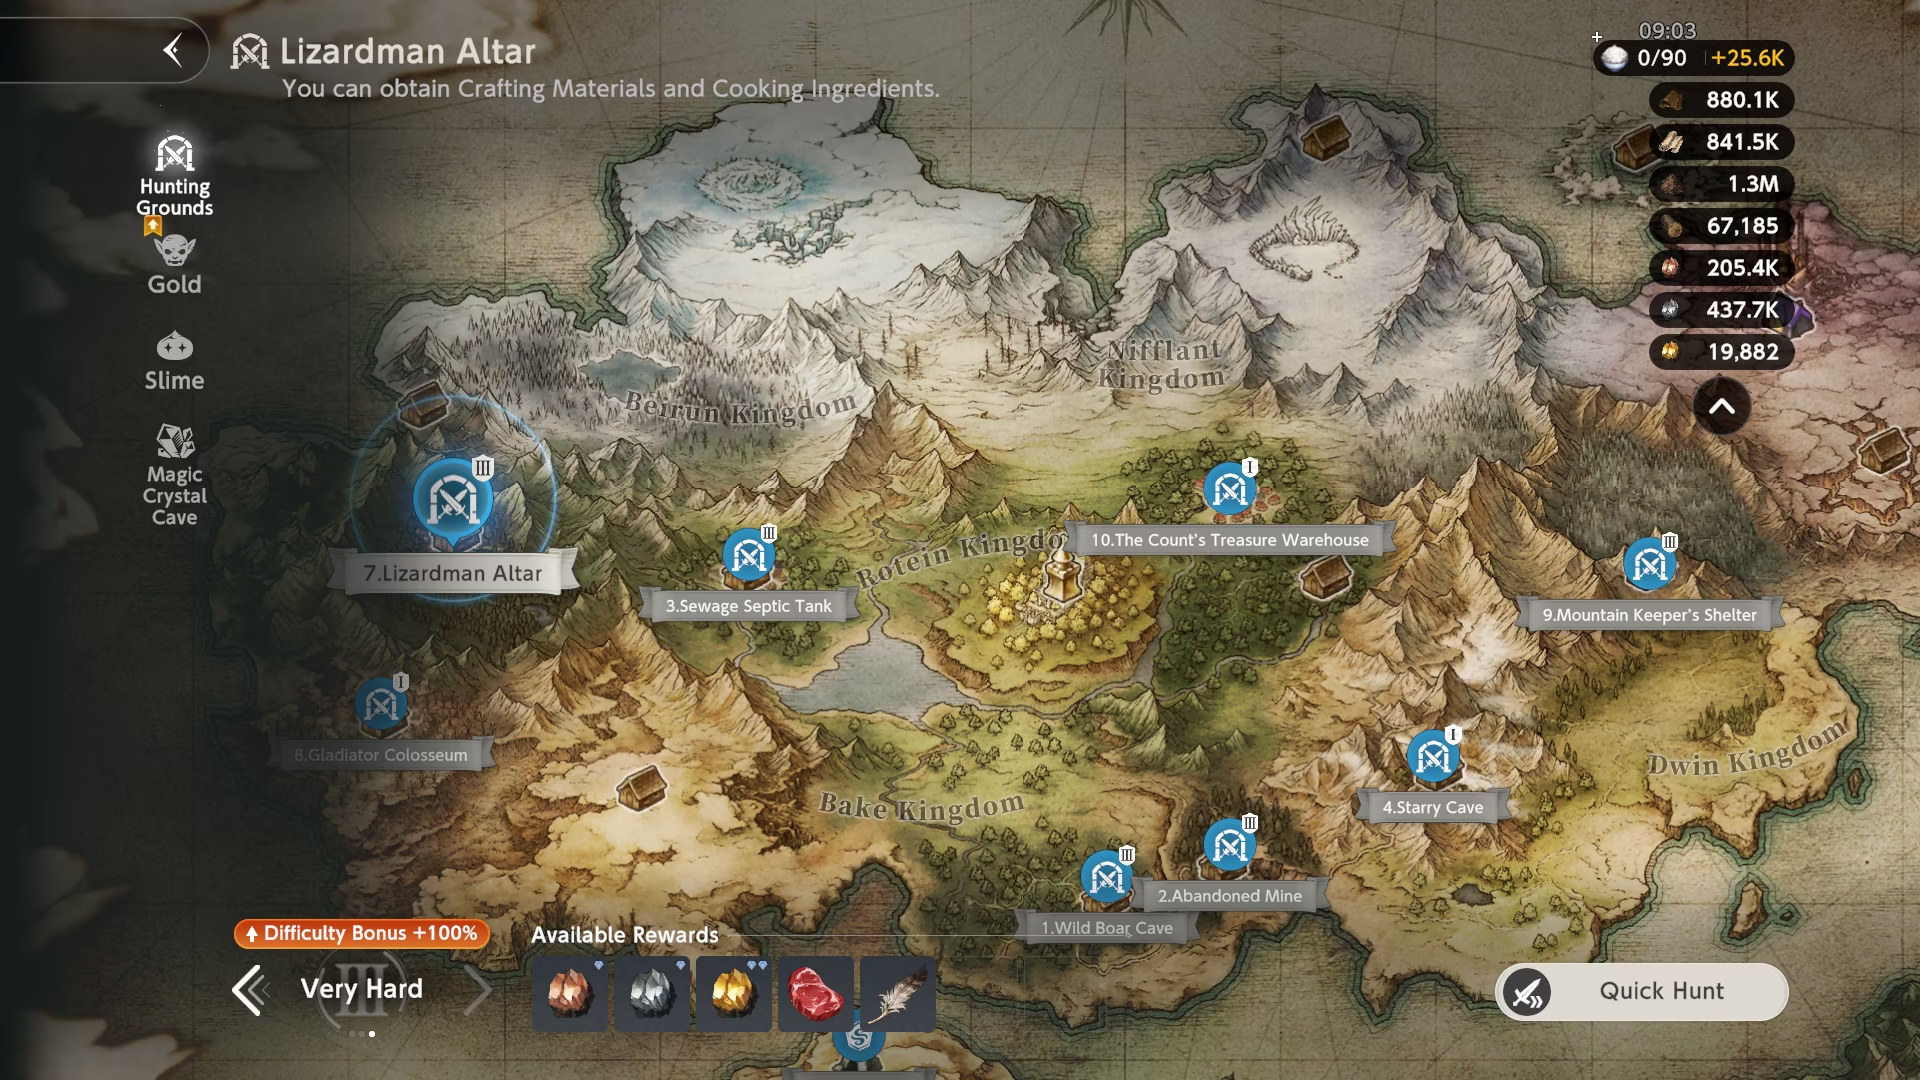
It serves as a shortcut, in which you do not have to manually do 6 fights in order to clear a dungeon. Yet, all unlock requirements remain the same:
- Story Pack 3 Cleared for Goblin Cave,
 Slime Empire and
  Magic Crystal Caves
 - Story Pack 1 — 10 Normal Difficulty Cleared for Hunting Grounds 1 — 10 correspondingly.
How should I use  Rice and
  Torches?
- For Rice, use 6 rice (equivalent to 1 Quick Hunt) on Hunting Grounds for the pass task, rest 84 — on Gold (Goblin Cave) or Slimes (Slime Empire) depending on the bonus day.
- For Torches, do whatever Property you need crystals for.
Gear System
Gear is important to increase damage output and sustain of the Characters. Proper gear can increase your damage roughly up to tenfold, if not more.
There are two main types of the Gear — Offensive and Defensive. For most of the Characters that rely on ATK / MATK,  Weapon,
  Accessory and
  Glove are considered to be offensive ones.
  Armor and
  Helmet for these Characters are considered to be a defensive ones.
Gear have different Rarity ( —
—  ), Tier (I — IV), Upgrade Level (+1 — +9), and Refinement Score (6 — 24). The higher the number everywhere, the better.
To craft Gear, you need to upgrade the Crafting Ability first (Fred / Layla). To do that, you need to earn EXP and then update it. The EXP required is equivalent to at most 20-40 crafts of gear for each level.
Focus on your Offensive Gear first, running glass cannon setup.
Progression To-Do List
Given list can help you to not miss anything for a game progression.
Do keep in mind that you do not have to strictly follow the order, but the list is ordered in a way that makes sense during a playthrough.
If you are searching for a daily, weekly or seasonal routine, follow the link below instead.
Shops Recommendations
Points Shops
 Golden Thread Shop
- Costume Selective Enhancement (1600 )
 Spark of Rampage x55 (275 )
- Featured Costume (1600 ) — Situational
 Powder of Hope Shop
- Featured Costume(s) (200 per copy) — Situational
- Spark of Rampage x55 (55 ) — only if big excess
 Refinement Remnants Shop
- Spark of Rampage x200 (600 )
- 24-Point Gear Score Change Ticket (10000 )
- 23-Point Gear Score Change Ticket (6000 )
Content Shops
 Mirror Wars Shop
- Featured Costume (18000 ) — Unless the Costume is already at +5
 Refining Crystal x150 (10500 )
 Evil Castle Shop
 Engraving Scroll x2000 (10000 )
 Essence of Strength x200 (4000 )
 Essence of Perseverance x200 (4000 )
 Essence of Life x200 (4000 )
- Gold Pocket x100 (10000 ) — Optional
 Refining Powder x2000 (20000 ) — Optional
 ★4 Ability S. Book x5 (2560 ) — Optional
 Guild Shop
 Tear of Goddess (2000 )
- Spark of Rampage (750 )
- Draw Ticket x10 (3000 )
 Awakening Elixir x100 (3000 )
- Essence of Strength x100 (1000 )
- Essence of Perseverance x100 (1000 )
- Essence of Life x100 (1000 )
Do note that it is possible to buy everything from the shop if you are active enough in Guild Raid.
 The Golden Colosseum Shop
Depends on the account Progress, although Sparks and Draw Tickets take high priority nonetheless.
Check more details in Golden Colosseum Page.
 Fishing Shop
- Gold Pocket x10 (18750 )
- Refining Powder x30 (18750 )
 Deco Coin x450 (33750 )
Do note that it is easy to purchase everything on monthly basis if you progressed in fishing enough.
 Soul-Wager Shop
- Tear of Goddess (1000 )
- Refining Powder x10 (1000 )
- Gold x10 (1000 )



 Magic Crystals x10 each (1000 each)
 ★5 R. Contract (1000 )
 ★4 R. Contract x2 (1000 )
Do note that you can purchase everything if you full clear Soul Wager.
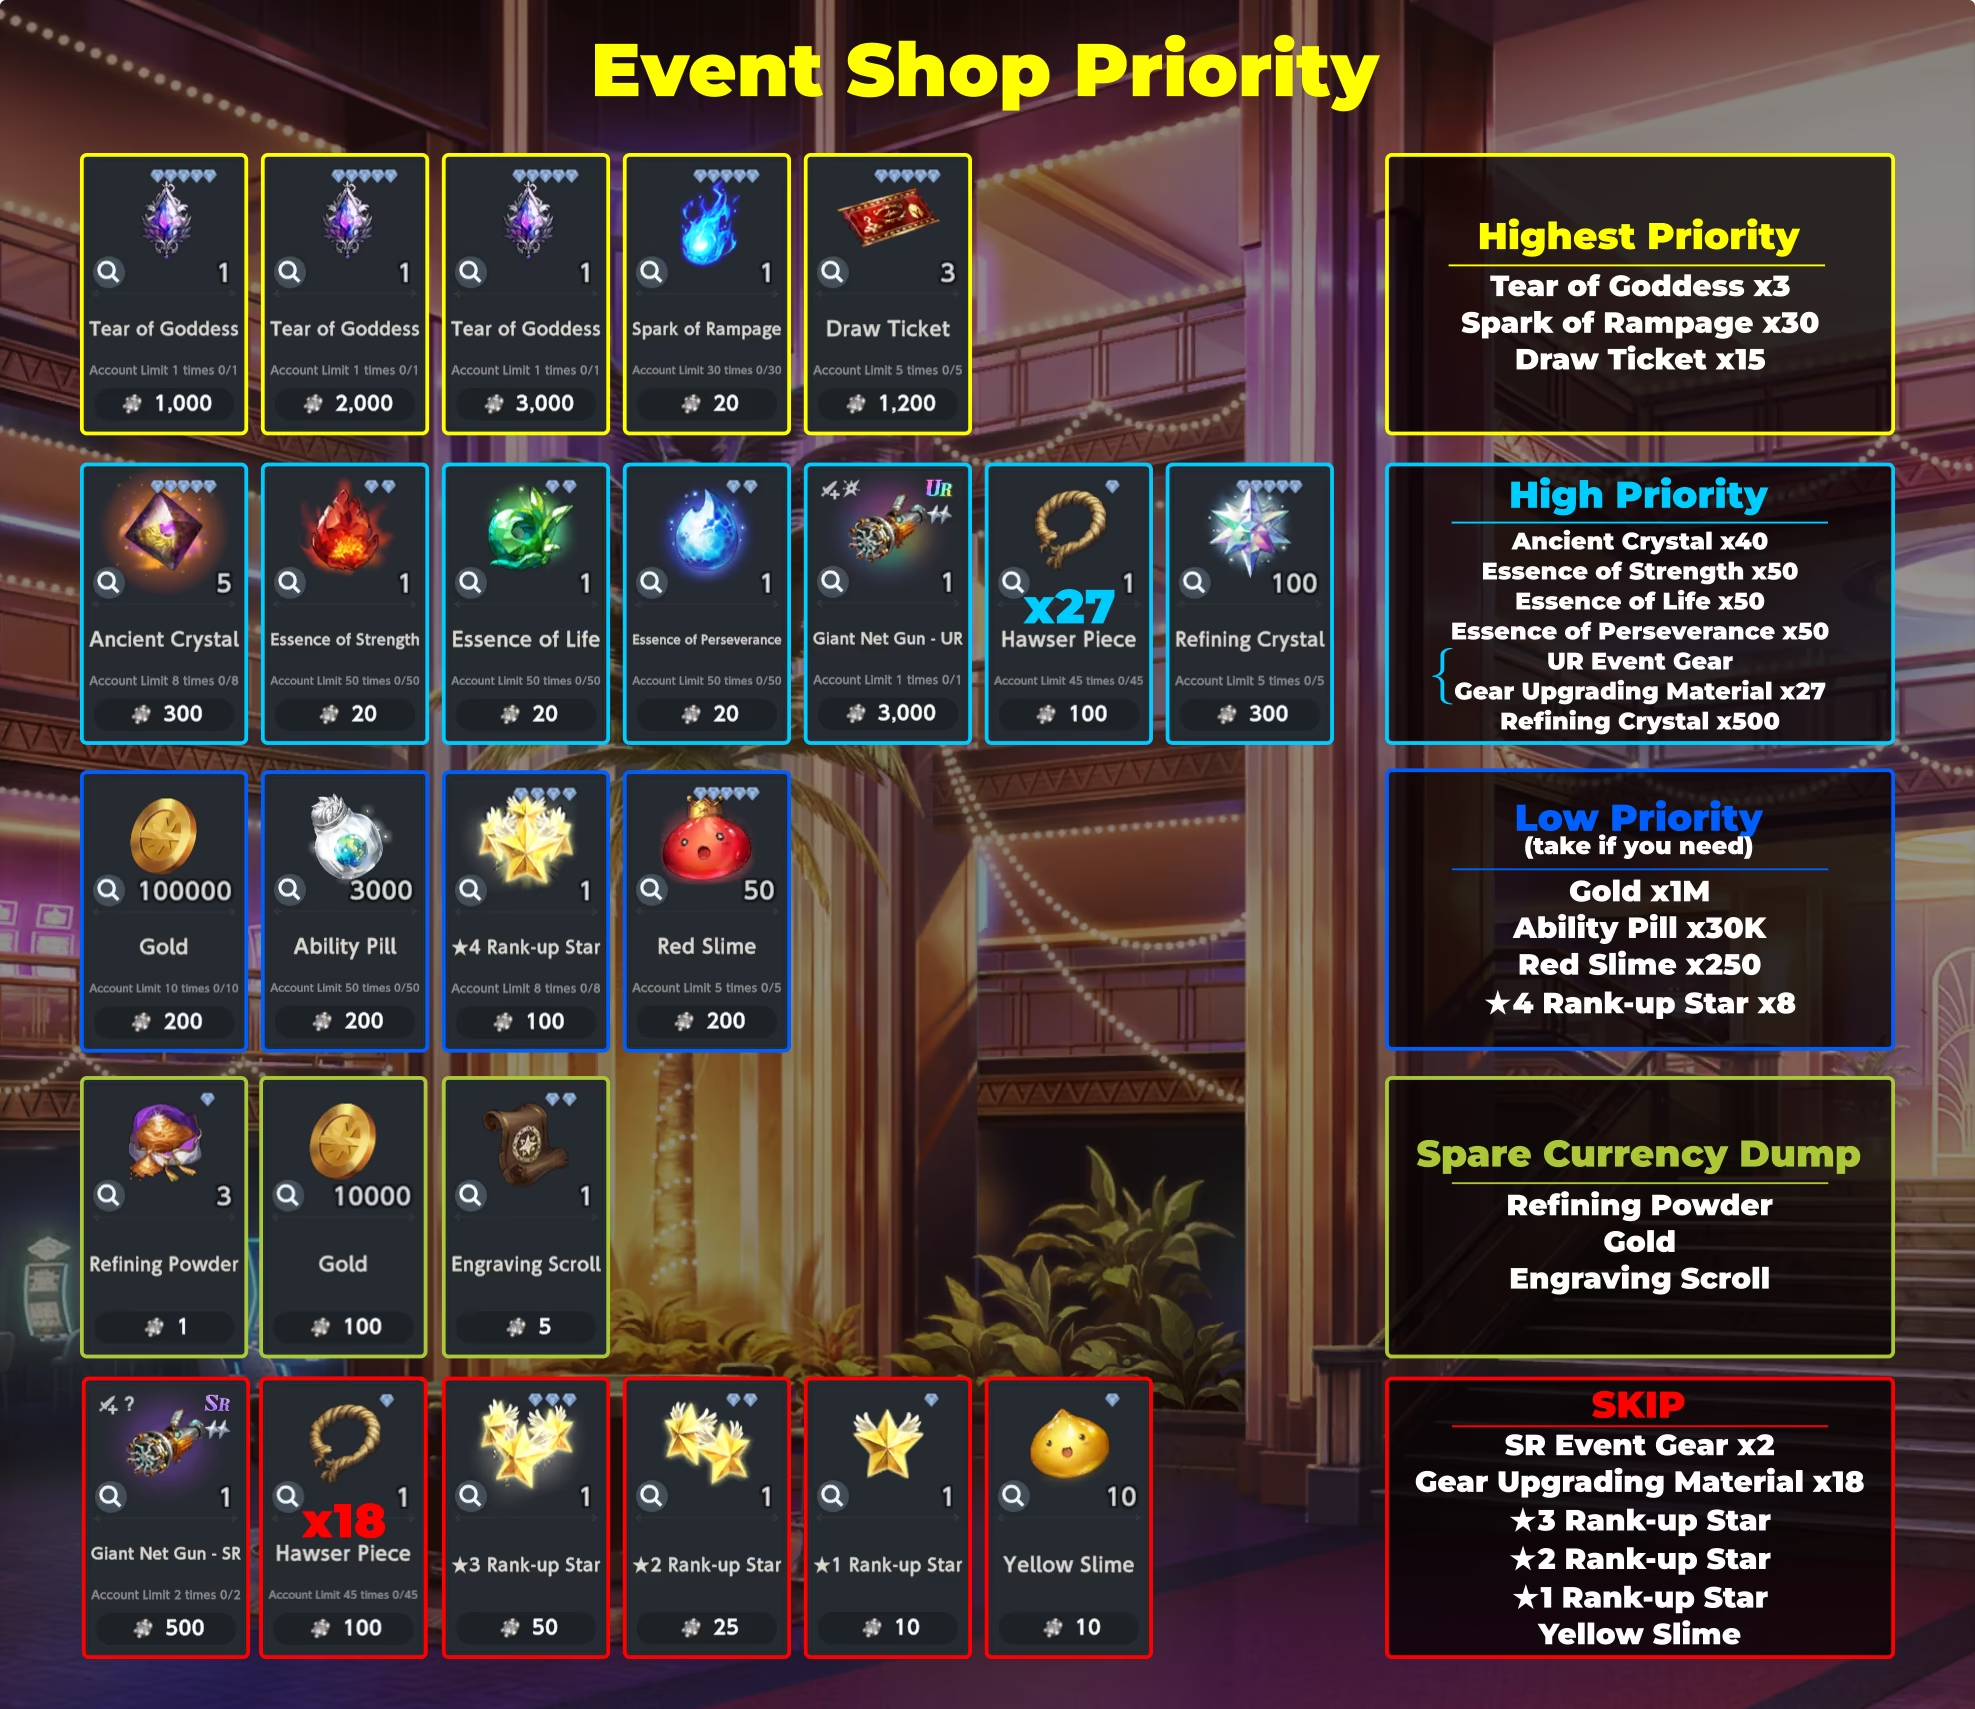
Event Shop
Event Shop
Still Have a Question?
Have a specific question not covered here? Check out the FAQ or use the search bar above to look up specific mechanics, character builds, and modes.
Either way, feel free to experiment with your progress and do not hesitate to search for any info you seem necessary.